Building a Hydroponic Top Feeding Bucket System
Materials
1. One 3 to 5-gallon bucket per plant.
2. One 5-gallon bucket per plant.
3. Two 3/4-inch hull-thru fittings per plant.
4. One 3/4-inch T per plant.
5. 3/4-inch yellow flex hose.
6. One reservoir with 3/4-inch hull-thru fitting in the bottom.
7. One 3/4-inch T.
8. One roll of 1/2-inch black poly tubing.
9. One roll of 1/8 or 3/16-inch black poly tubing.
10. One fitting per plant to connect 1/2-inch tubing to 1/8 or 3/16-inch tubing.
11. One alligator stake per plant.
12. One 1/2-inch T fitting.
13. One 1/2-inch end cap.
14. One to two 1/2-inch elbows.
15. One 1/2-inch female threaded fitting for pump.
16. One pump.
Tools
1. Drill.
2. 1-inch holesaw.
3. Knife.
4. Wrench.
Introduction:
The main use of a bucket system is to grow big plants very quickly. This system can be used for vegetative growth and flowering, but flowering is the more popular choice.
The system is used for flowering if a grower uses one room for vegetative growth and the other for flowering. Clones or 4 to 5-week-old seedlings need about 3 weeks of vegetative growth in this system or a flood and drain system before they are induced to flower. Plants in a flood and drain system are easy to transplant into the 3-gallon pots.
Any medium can be used with this system. Using clay pellets (Hydroton) is the popular choice. Plants started in any other medium can be transplanted into this system prior to flowering.
Building the System
A bucket system can be used in a closet or a larger space. One or two plants should be plenty for a closet since plants have the potential to reach the ceiling and cover the width, as long as the space for them to grow is adequate.
Plants grown in a bucket system will need about 2 to 3 weeks for vegetative growth using an 18-hour on / 6-hour off light cycle. Then they can be induced to flower with a continuous 12-hour on / 12-hour off light cycle.
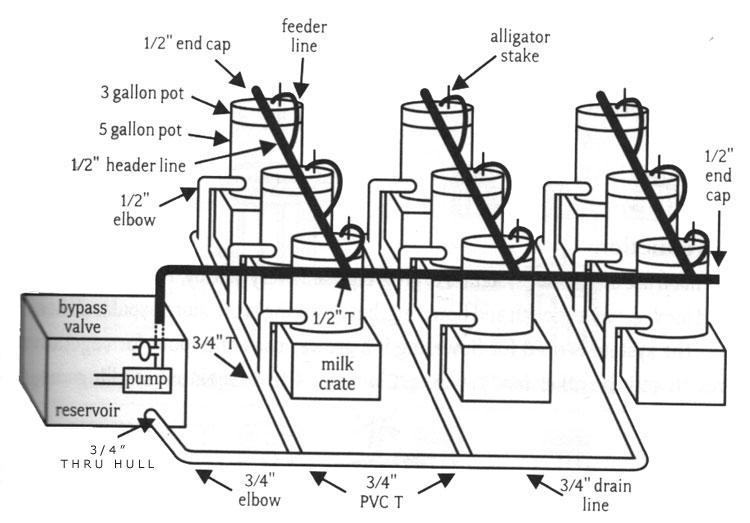
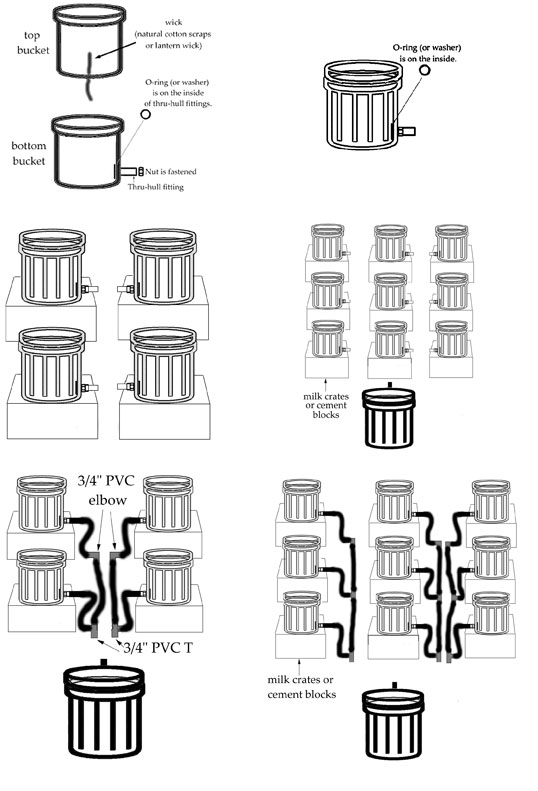
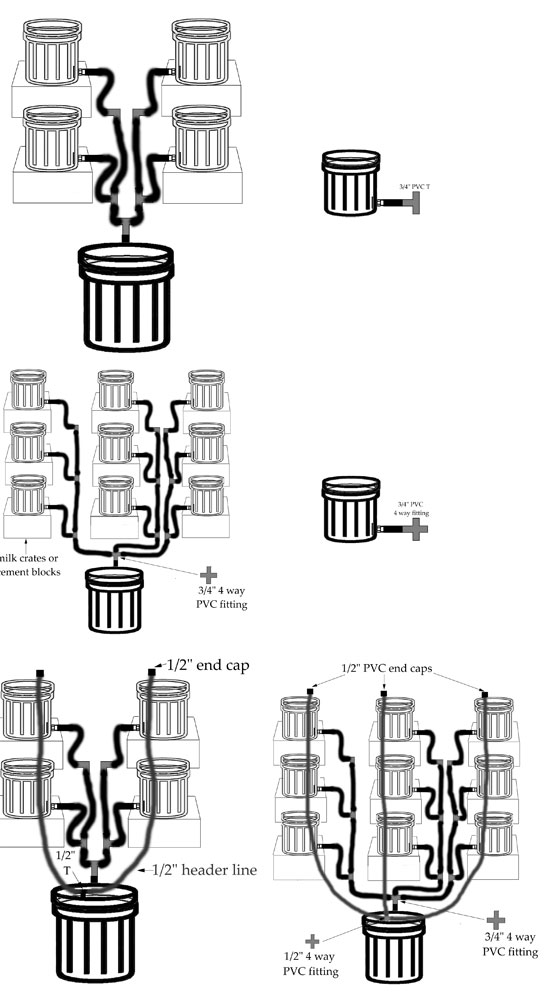
With a bucket system, a 3 to 5-gallon bucket is stacked into a 5 to 7-gallon pail.
A. If a bucket is used, a 3/4-inch thru-hull fitting should be inserted into the bottom so that solution can drain into the bottom pail.
B. The bottom pail should have a 3/4-inch thru-hull fitting inserted in the side near the bottom. If this hole is too low, the thru-hull fitting won’t fit.
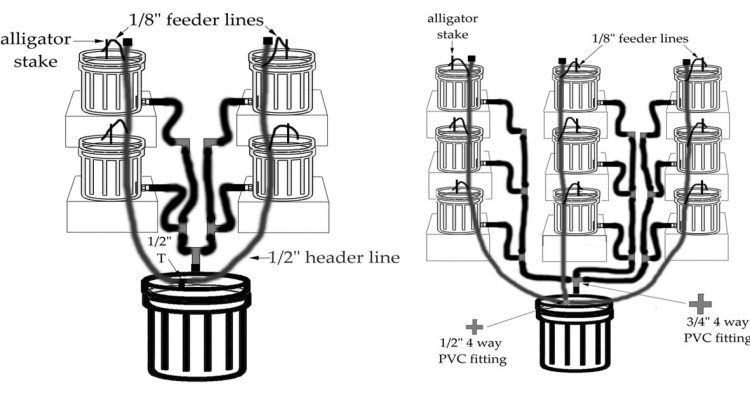
C. Buckets should be placed in position. Each plant in this system can cover up to 10 square feet. Common uses for this system are 4 plants or 9 plants. 4 plants will use one 400 to 1,000-watt light, 9 plants can use four 400 to 1,000-watt lights. Therefore, they can be lined up in 2 rows of 2, or 3 rows of 3. Buckets are placed on top of milk crates or cement blocks. (Figures 4.57 and 4.58)
D. A 3/4-inch elbow should be inserted into the 6-inch piece of hose of each bucket that is at the back of each row.
3/4-inch PVC Ts are inserted into the other ends of the 6-inch piece of hose.
The open ends of the PVC Ts and elbows should be connected to other buckets with 3/4-inch flex hose. (Figures 4.59 and 4.60)
E. After all buckets are connected, there will be open ends from the 3/4-inch T-fittings attached to two of the buckets. The next step is to attach these fittings to hose, then to attach them to a 1/2-inch PVC T or 1/4 four-way PVC fitting. (Figures 4.61 and 4.62)
F. The hose is connected to the 3/4-inch hull-thru fitting on the bottom of the reservoir. (Figures 4.61 and 4.62). The reservoir is located lower than the pails so the pails drain well.
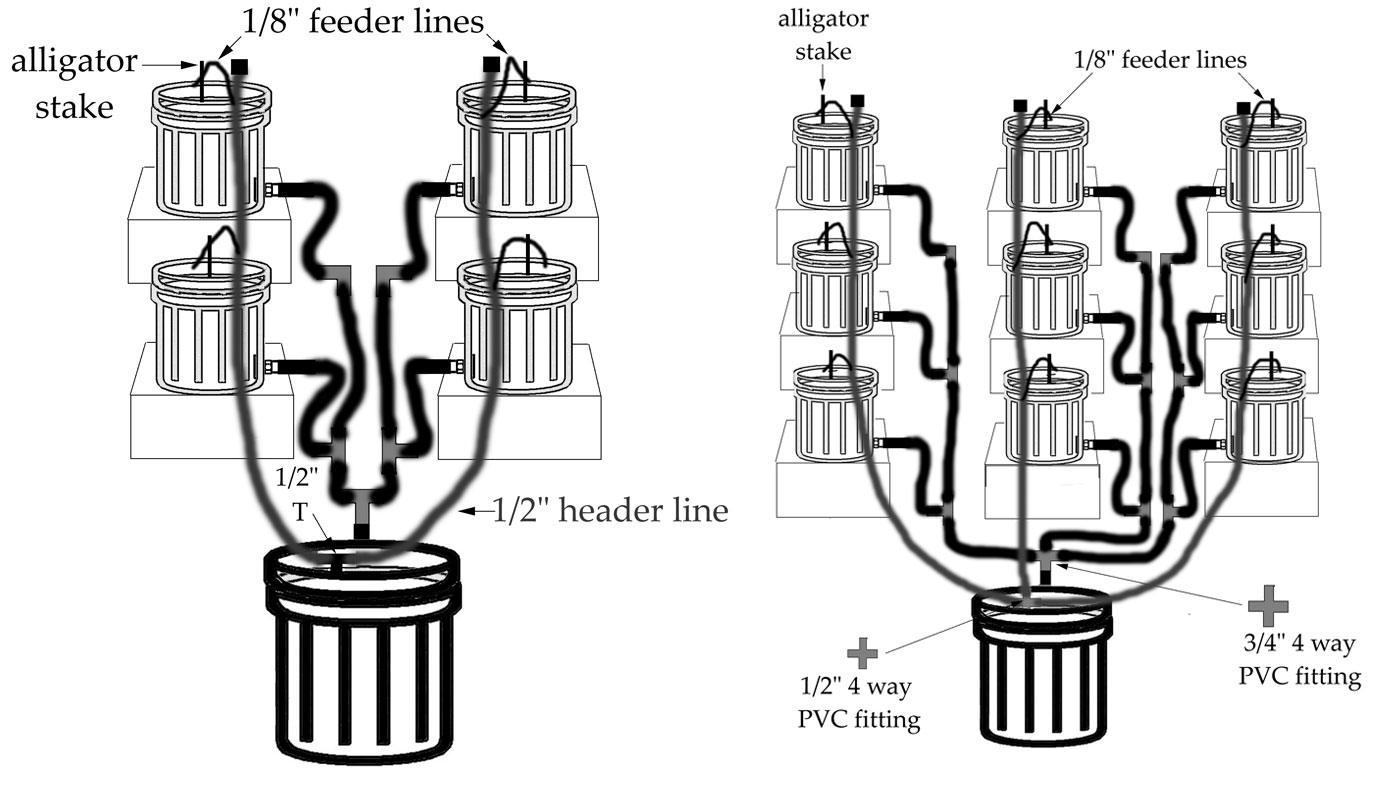
G. Pieces of 1/2-inch poly tubing (header line) are cut and laid near the plants. (Figure 4.63 and 4.64)
H. 1/2-inch end caps are inserted at the end away from the reservoir. Soaking tubing in hot water allows for easier connections.
I. 1/2-inch black poly tubing should be connected to the 1/2-inch PVC T or 4-way fitting and the pump.
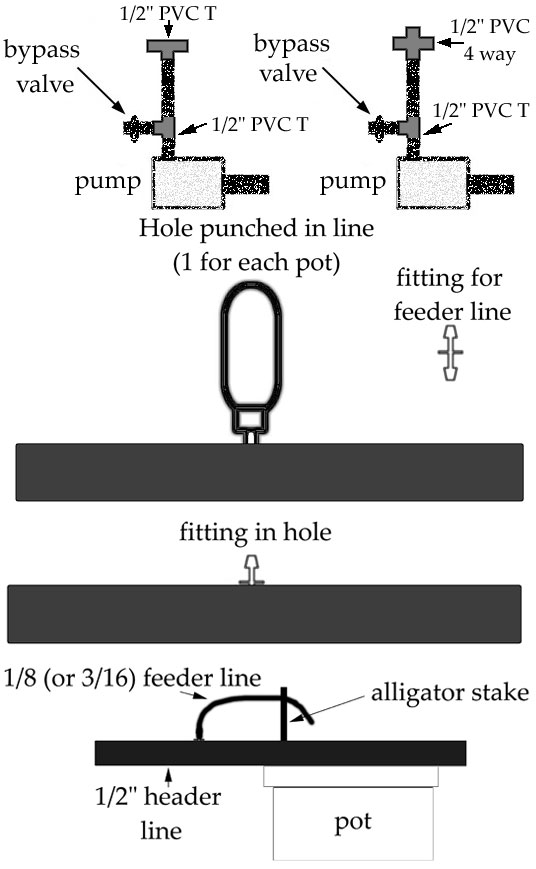
A recommended option is to put a bypass valve just above the pump so that the solution stays aerated and agitated, and the flow can be controlled. More 1/2-inch fittings can be placed on the bypass valve so that the aerated liquid is forced to the bottom near the pump. Forcing water downward can reduce any possibilities of splashing and making a mess on the floor. (Figure 4.65)
J. Small holes should be poked into the 1/2-inch poly header line. A punch or small drill bit can be used to make the holes for the fittings.
K. 1/8, 3/16-inch or 1/4-inch tubing is connected to the fittings and secured to each pot using alligator stakes. Supplies for 1/4-inch tubing is usually easier to find. In addition to the feeder lines, we do have the option to insert drippers at the end of the feeder lines to control flow rate and minimize mishaps. Drippers come in flow rate like 1/2 gallon per hour and 1 gallon per hour. All we have to do is push them in the end of each feeder line. The plants can be transplanted into the buckets with the medium of choice at this time. Clay pellets (Hydroton) is the popular medium for this system.
Inserting Feeder Lines Into Bucket System
Complete Hydro Top Feeding 9-bucket system.
Lighting Strategies
Midsize Plants (Vegetative Growth)
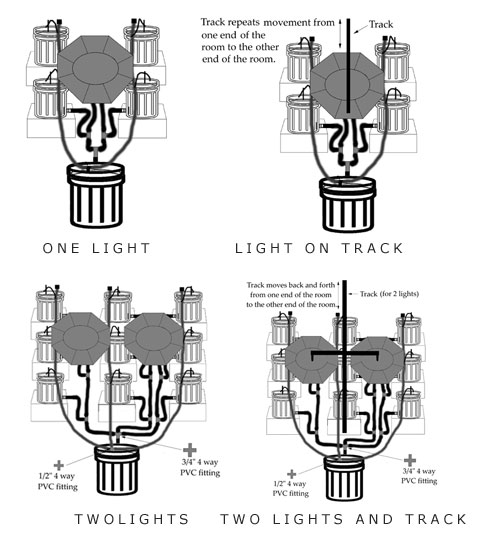
Lights can be placed above the plants during vegetative growth.
Large Plants (Flowering)
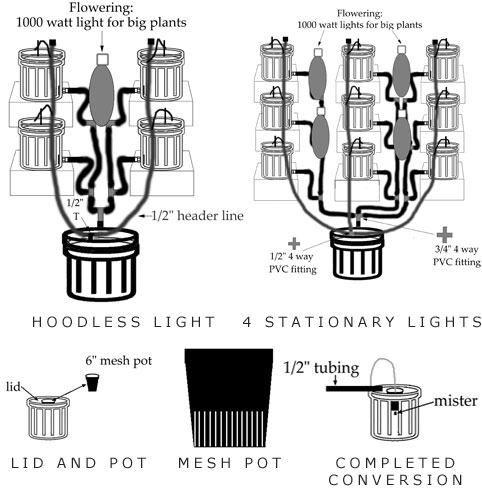
During flowering, lights without hoods can be placed in between the plants to give plenty of light.
For a 4 plant system, one 400, 600, or 1,000-watt bulbs could be used. Stronger bulbs can give a greater yield. Plants can be rotated frequently to illuminate them all evenly.
For a 9 plant system, four 400, 600, or 1,000-watt bulbs could be used.
Feeding
It is easiest to feed the plants with the pump running full-time during the light hours. But, plants can be fed continuously (all day and all night). Also, plants can be fed intermittently, like 2 minutes every 20 minutes during the light hours, or perpetually. An hourly timer is a cheap gadget to run the pump on a schedule such as on for 2 minutes, off for 20 minutes.
Aeroponic Conversion
A. A lid is placed on an empty top bucket.
B. A hole is made in the lid with a jigsaw or holesaw for a 31/2 to 6-inch mesh pot. The mesh pot should fit snugly.
C. The feeder line is drawn through the middle of the bottom the mesh pot until it is about 1/2-inch below it. (Figure 4.78 and 4.79)
D. A mister is placed into the end of the feeder line. Misters come in all sizes for every tubing size. 11 to 13 Pounds per square inch (PSI) mister allows a mist at low PSI. Some misters produce a mist from 60 to 250 PSI.
E. The pump must be able to supply a mist. A 1,200-gallon per hour pump will work for a small number or large number of pots with 11 to 13 PSI misters.
Note:
If there are leaks in the system, silicon sealant can be used to repair them after the tubing is dry. Using new 1/2-inch tubing and threaded fittings with teflon tape can eliminate leaks, too.