
Billy Bob’s Organic Hydroponic System
Introduction
This type of system is very popular among growers. In fact, I remember one hydroponic shop owner telling me that somewhere around 90% of customers used soilless mix. The reason for its popularity could be familiarity as seedlings and house plants are often grown with soilless mix, in addition to the fact it looks and feels similar to potting soil.
Soilless mix is placed in a pot and plants are given water with fertilizer on a regular basis.
Small pots (1 to 3 gallons) can be used for growing smaller plants while large pots can be used for growing larger plants. Growing larger plants is less maintenance because there is less transplanting, less plants are needed for each crop, a smaller number of plants is faster to hand feed, and it is easier to remember to water a plant if there are fewer plants to water. Soilless mix is unquestionably the most versatile horticultural medium. It comes under trade names such as Sunshine Mix and Jiffy Mix.
With this system, a grower can use one of 3 feeding options:
A. Feeding when the mix begins to dry out.
B. Feeding once a day with 20% runoff waste.
C. Continuous feeding.
Feeding could be as minimal as once a week, such as when the medium begins to dry out. Soilless mix is best used to keep the workload down because it retains a lot of moisture and nutrients between periodic feedings (ie. feeding once a week). Immediately after it is daylight or when lights start up is a good time to periodically saturate this medium.
Feeding daily with run-off waste is the easiest way to get high production. This will allow the plant adequate access to nutrients, water, and air to the roots. Since the solution is delivered once a day, the grower can leave the grow room without any worry of damaging water leaks than can occur in hydroponic systems that irrigate at regular intervals or continuously.
Nevertheless, if a plant in soilless mix is fed daily or continuously with a top-feeding hydroponic system, plant growth will be much faster than periodic feeding. However, flow rate is critical with Sunshine Mix. If the flow is too fast, water will form puddles and overflow out of the containers.
With soilless mix, continuous feeding works best with slow feeding and large containers. Putting 2 quart (or litre) per hour drippers in the ends of the feeder tubing or slowing the flow to the header line with an open bypass valve will keep the flow rate slow. Drippers come in all sizes for the individual feeder lines.
Another way to run solution through soilless mix is to set an intermittent timer to operate for a couple of minutes at a time, several (say, six) times per day.
Easy Perpetual Harvesting
A grower can use one room for vegetative growth and one for flowering. The vegetative room can be about 1/2 to 2/3 the size of the flower room. The grower can cut clones from plants in the vegetative room before they are induced to flower, then the plants can go into the flower room. When the clones root, they can be transplanted into 5-gallon pots that go into the vegetative room until the next crop is harvested. This cycle is easy and very low maintenance.
Materials
1. Means of Solution Collecting Under the Buckets
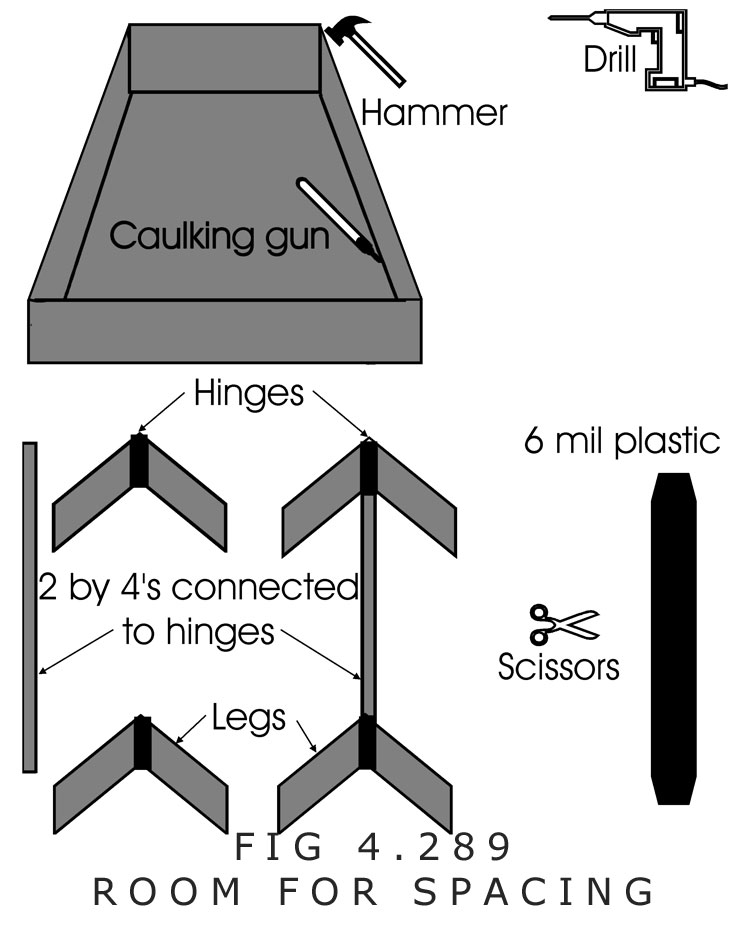
Option A: Commercial plastic flood table(s); they come in sizes like 3×4, 4×4, and 4×8.
Option B: Homemade flood table(s):
1. One to two 4×8 sheets of 3/4-inch plywood.
2. Two 4-foot pieces of 1×2-inch wood for each sheet.
3. Two 8-foot pieces of 1×2-inch wood for each sheet.
4. 6ml black poly plastic.
5. Seventeen feet of 10-foot wide plastic.
Option C: Plant dishes.
2. Sawhorses to support tables.
3. One 5-gallon bucket for each flood table, to catch runoff solution.
4. One or two bales (3.8 cubic foot / bale; bales are usually found in this or 2 cubic foot sizes) of soilless mix: Sunshine #2 mix, Pro-Mix, or Jiffy Mix. Note: one 3.8 cubic foot bale fills about ten 5-gallon containers.
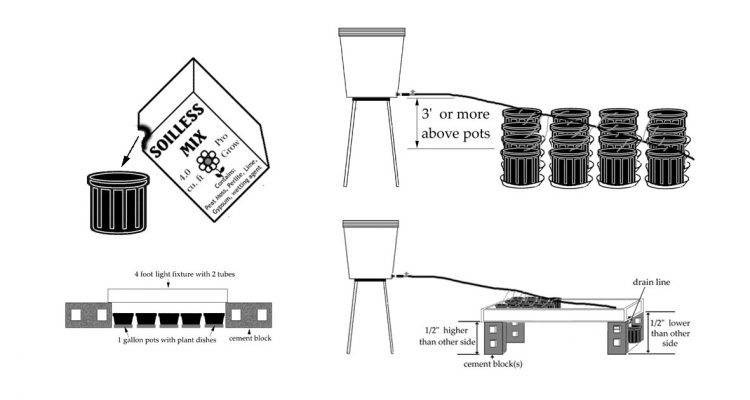
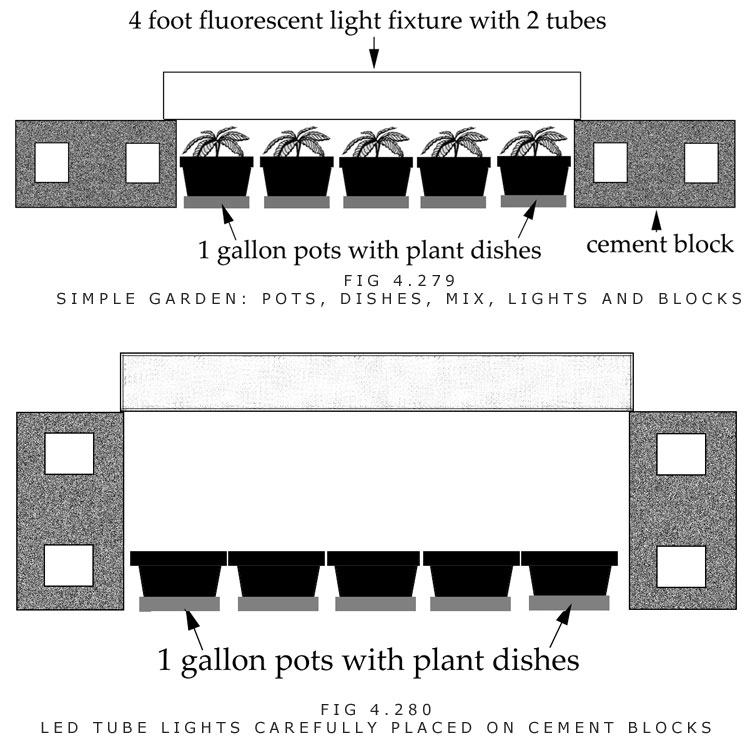
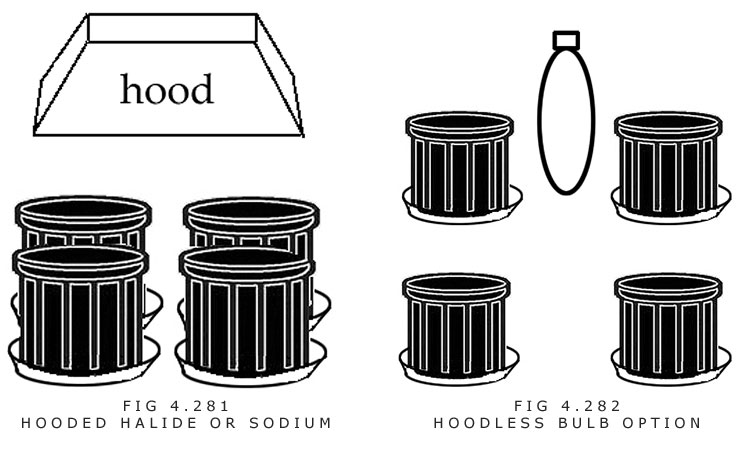
5. 2 to 20 buckets (or 2 to 20 nursery pots). Smaller gallon buckets (such as 1 to 3-gallon sizes) are good for growing a large number of small plants. Larger containers (such as 5 to 20-gallon buckets) are good for growing a small number of large plants. Both methods are effective. (Figures 4.279, 4.281, and 4.283 show various growing strategies.)
6. Fertilizing materials. Chapter 5 discusses feeding and formulas.
Setting Up
A. The soilless mix is placed into the buckets. A tarp should be laid down for placing and breaking up the chunks of soilless mix.
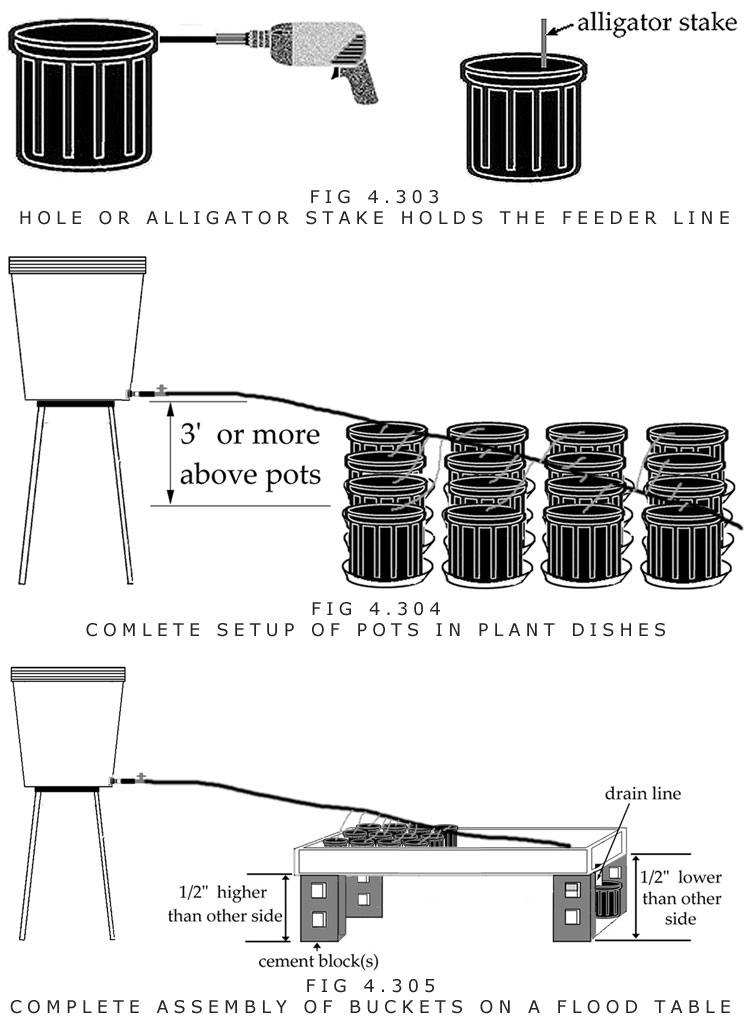
B. Several drainage holes (up to 75% hole space, meaning that only 25% of the bottom will be showing plastic) should be inserted into the bucket bottoms, using a sharp knife, unless you are using nursery containers with premade holes.
C. The containers with mix can be placed on a flood table with a bucket placed under each table to catch the runoff. Buckets go under the hole in the flood table to capture the wasted nutrient solution. Alternatively, plant dishes can go under each pot to collect the waste from going onto the floor. If plant dishes are used, the solution should be removed from every dish after the feeding so that the bottom roots don’t sit in stagnant solution. (Figures 4.281 and 4.287)
The mix in this program is organic hydroponic quality; to qualify in the soilless mix category, a formula must be less than 10% inorganic soil. This formula is much more than 90% soilless. The organic peat, gypsum, dolomite lime, and perlite all qualify as soilless.
The buckets should be filled to about 1 inch from the top. The mixture in the buckets should be watered until it gets a good soaking.
D. Plants can now be transplanted into the mix.
E. Feeding
With soilless mix, a grower can feed anytime. But, the mix should never become dry and compacted. Daily feeding gives faster growth than feeding at longer intervals like every three days or once a week.
Option A: When mix begins to dry up (Lazy Man’s Method)
This is the easiest way to feed. A grower applies water with fertilizer every few days. A grower can apply 1/2 strength fertilizer every feeding. Organic fertilizer will produce “organic hydroponic flowers,” and chemical fertilizer produces “hydroponic quality flowers.” Some companies have specific formulas and instructions for soilless mix, such as General Hydroponics. A safe rule would be to have 10 to 20% waste running through each pot after each feeding. An added option is to flush the mix every month with a large dose of plain water.
Note: If the pots are in plant dishes, the solution should be sucked out of each plant dish with a shop vac about 30 minutes after the feeding. If the solution is not sucked out, the plant may spread its bottom feeder roots into the solution of the plant dish. This can alter its feeding routine and cause nutrient deficiencies.
Option B: Daily
This method allows plants to grow rapidly because daily feeding draws in plant food and air to the roots.
A grower can apply 1/2 strength fertilizer every feeding. A safe rule would be to have 10 to 20% waste running through each pot. Once a week, the mix can be flushed with a large dose of plain water. Or a grower can apply 1/2 strength fertilizer for one feeding, then plain water every second feeding. This pattern can be repeated until plants are 2 weeks before harvest.
The next few pages show the set-ups for three different size spaces.
System Sizes
Billy Bob’s Basic
Introduction
The Billy Bob Basic is for growing small plants for nice tops.
A. 24 seedlings can be started under one 4-foot fluorescent fixture.
B. 5 to 6 plants can occupy all of the space under one 4-foot fluorescent light fixture during the flowering cycle. Seedlings or clones can be induced to flower with a 12 hour on / 12 hour off light cycle. Seedlings are induced at 4 to 5 weeks old, clones at 6 inches high.
Notes: One fixture could be used to start 24 seedlings and two fixtures could be used for flowering. One fixture could produce well per crop. Using three fixtures, one for veg and two for flower could yield a decent harvest, depending on the strain.
Billy Bob’s One Lighter
Introduction
This system is used to grow 4 plants around a single light.
If a grower wants midsize plants, a 400-watt halide, a 400-watt sodium, LED lighting or 200-watt compact fluorescent will work.
If a grower wants midsize to large plants, a 600-watt metal halide (or sodium) or 1,000-watt halide (sodium) is fine.
Vegetative Growth
A grow light with hood can be placed above the plants during vegetative growth.
Flowering
A grow light without a hood can be placed in between all 4 plants during flowering. Plants can be rotated so that they all get illuminated.
If midsize plants are the objective, they can be induced to flower when they are 2 to 3 feet high.
If large plants are the objective, they can be induced to flower when they are 3 to 4 feet high.
Billy Bob’s Full Bedroom
Introduction
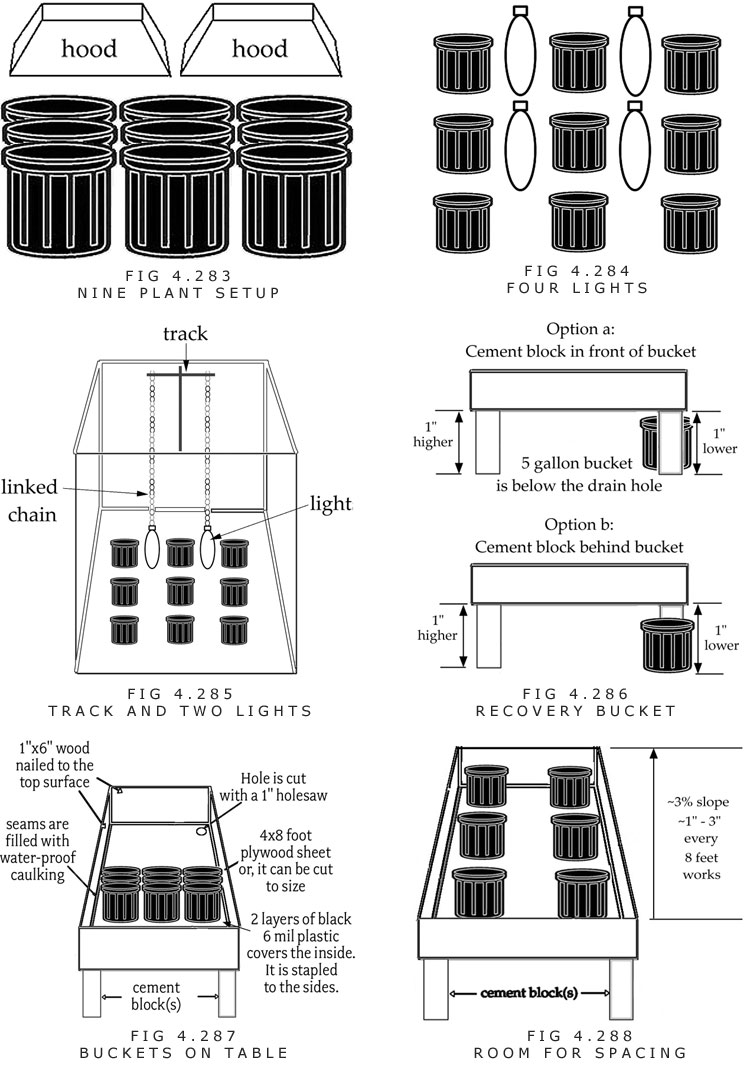
This system can be used to fill up a typical bedroom with midsize to large plants. A grower could grow 9 large plants with this system or 16 midsize plants. The buckets can be placed directly on the floor, in plant dishes, or on top of a flood table. (Figures 4.283 and 4.287 show the options.)
If plants go on the floor, there should be a tarp or black plastic on the floor because the solution can make a little mess if it runs onto a carpet.
Vegetative Growth
Two 400-watt grow lights with hoods can be placed above the plants during vegetative growth. (Figure 4.283)
Flowering
Four stationary grow lights can be placed in between all 9 plants during flowering. (Figure 4.284) They can be rotated so that they all get illuminated. Or two lights and a track can be used. (Figure 4.285)
If midsize plants are the objective, they can be induced to flower when they are 2 to 3 feet high.
If large plants are the objective, they can be induced to flower when they are 3 to 4 feet high.
System Automation Options
Option A: Flood and Drain Add-On
Instead of feeding the plants periodically from the top, a grower can feed the plants by flooding and draining the bottom roots on a flood table when they reach the bottom. The flood table can have a layer (e.g. 1 inch) of a medium like perlite. Or the roots can run freely on the flood table if they have the light blocked using non-toxic reflectix insulation. The pots would have to fit snug into the reflectix to block out the light.
The plants will adjust and roots will feed while growing out the bottoms of the containers. This will be more productive than regular feeding. Plants will no longer need to be fed from the top. The bottom roots will form a thick matt along the flood table. These bottom roots search for food under these new conditions.
Adding this flood and drain option is possible during any part of the program. Constructing the flood and drain system is described on page 49.
Option B: Top-Feeding Add-On
Plants can be fed periodically or continuously with top-feeding. For organic fertilizers, 1/4-inch lines are recommended to feed the plants. Plants can be top-fed in the soilless mix, or they can be transplanted into a larger container of a different grow medium, such as clay, and then top-fed from there. Top-feeding details and full setup are explained elsewhere in this chapter.
If a grower cannot afford a pump to top feed the plants, the drip system can be used. The construction of the drip system is described on pages 159 to 167. But a $40 investment for a 250 to 350-gallon per hour mag-drive pump is a better option because the solution is delivered faster. Not only is life easier, but slow dripping systems have greater potential to develop clogs in the system than a pumping system that uses a little more force, especially with organic fertilizers.
Option C: Drip-Watering System
Hand watering is a relatively quick and cheap way to go. However, installing a drip system (with or without a computer timer) may allow for easy living. With a drip system, gravity causes liquid to flow from a high elevation downward into the pots. Hand-feeding is recommended for the beginner, to develop a more hands-on, personal feel to nutrient solution volumes.
If the proper amounts of solution are given so that the mix stays gets saturated, the results are respectable. Normally, a few quarts per plant is plenty for plants in 1 to 5-gallon containers, if they are watered before they get too dry. Also, getting close to the plants allows for bug inspections, dead leaf picking, and leaf stroking.
Materials
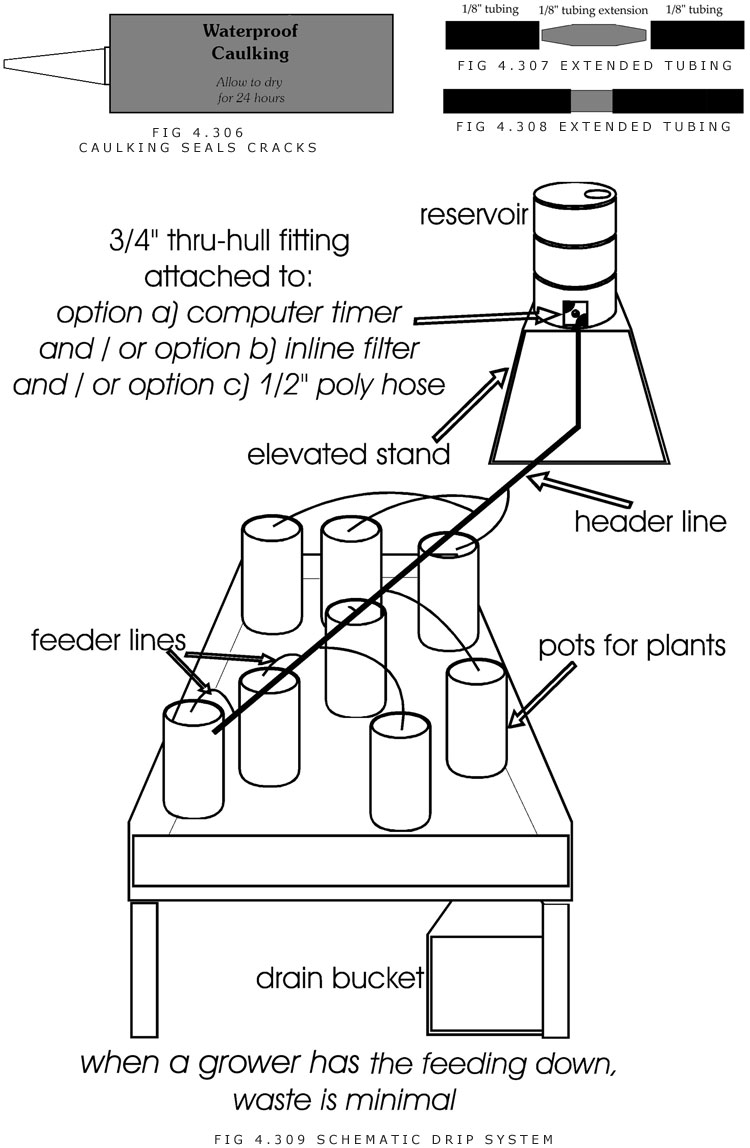
1. Twenty gallon plastic garbage can for larger rooms, 10-gallon can for smaller rooms. Any size can be used in order to hold the adequate amount of solution (i.e. 2 quarts).
2. 3/4-inch thru-hull fitting with O-ring.
3. Tap (for turning off and on).
4. PVC fitting with a 3/4-inch threaded female end and a 1/2-inch end for the to fiton the polybutylene tubing.
5. 1/2-inch PVC end cap.
6. 1/8-inch fittings to plug into header line (one for each plant).
7. Twenty feet of 1/2-inch polybutylene tubing (or as much as needed).
8. Fifty feet of 1/8-inch polybutylene tubing.
9. Silicone.
10. Inline filter unit and filter with 3/4-inch threads (male and female).
11. Computerized water timer (optional).
12. Support system for the garbage can, as high as possible (to be placed in a corner of the room). A very tall stool on top of a platform would be suitable.
13. Sandpaper for plastic (100 to 300 coarse).
14. Small C-clamp (optional).
15. Hole punch for 1/8-inch fittings into header line.
16. Teflon tape.
Tools
1. Drill.
2. One-inch holesaw.
3. A small drill bit (less than 1/8-inch).
4. Handsaw.
SetUp
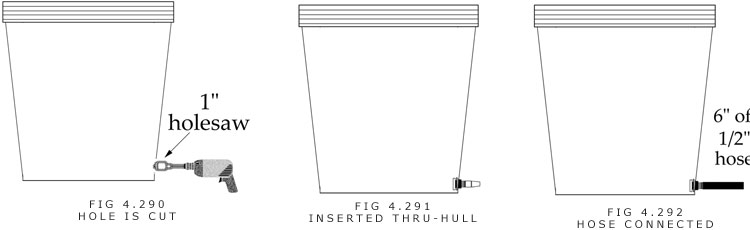
A. A 1-inch hole is drilled into the side of the garbage can with a 1-inch holesaw. The hole should be 2 to 3 inches from the bottom.
B. Insert the 3/4-inch hull-thru fitting into the 1-inch hole. The O-ring is on the inside of the can, and the threads are on the outside of the can.
Option A:
A 6-inch piece of 1/2-inch tubing can be connected the end of the 3/4-inch thru-hull fitting.
Option B:
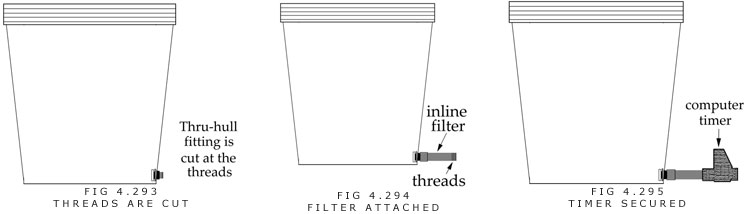
1. The fitting should be cut at the end of the threads located furthest from the garbage can. This cut should be vertical and uniform. The plastic particulate must be sanded before screwing the tap on. Teflon tape can be placed on the threads to prevent leaks.
2. The inline filter is connected. (Figure 4.294) An option is to install a computerized timer to the inline filter. (Figure 4.295)
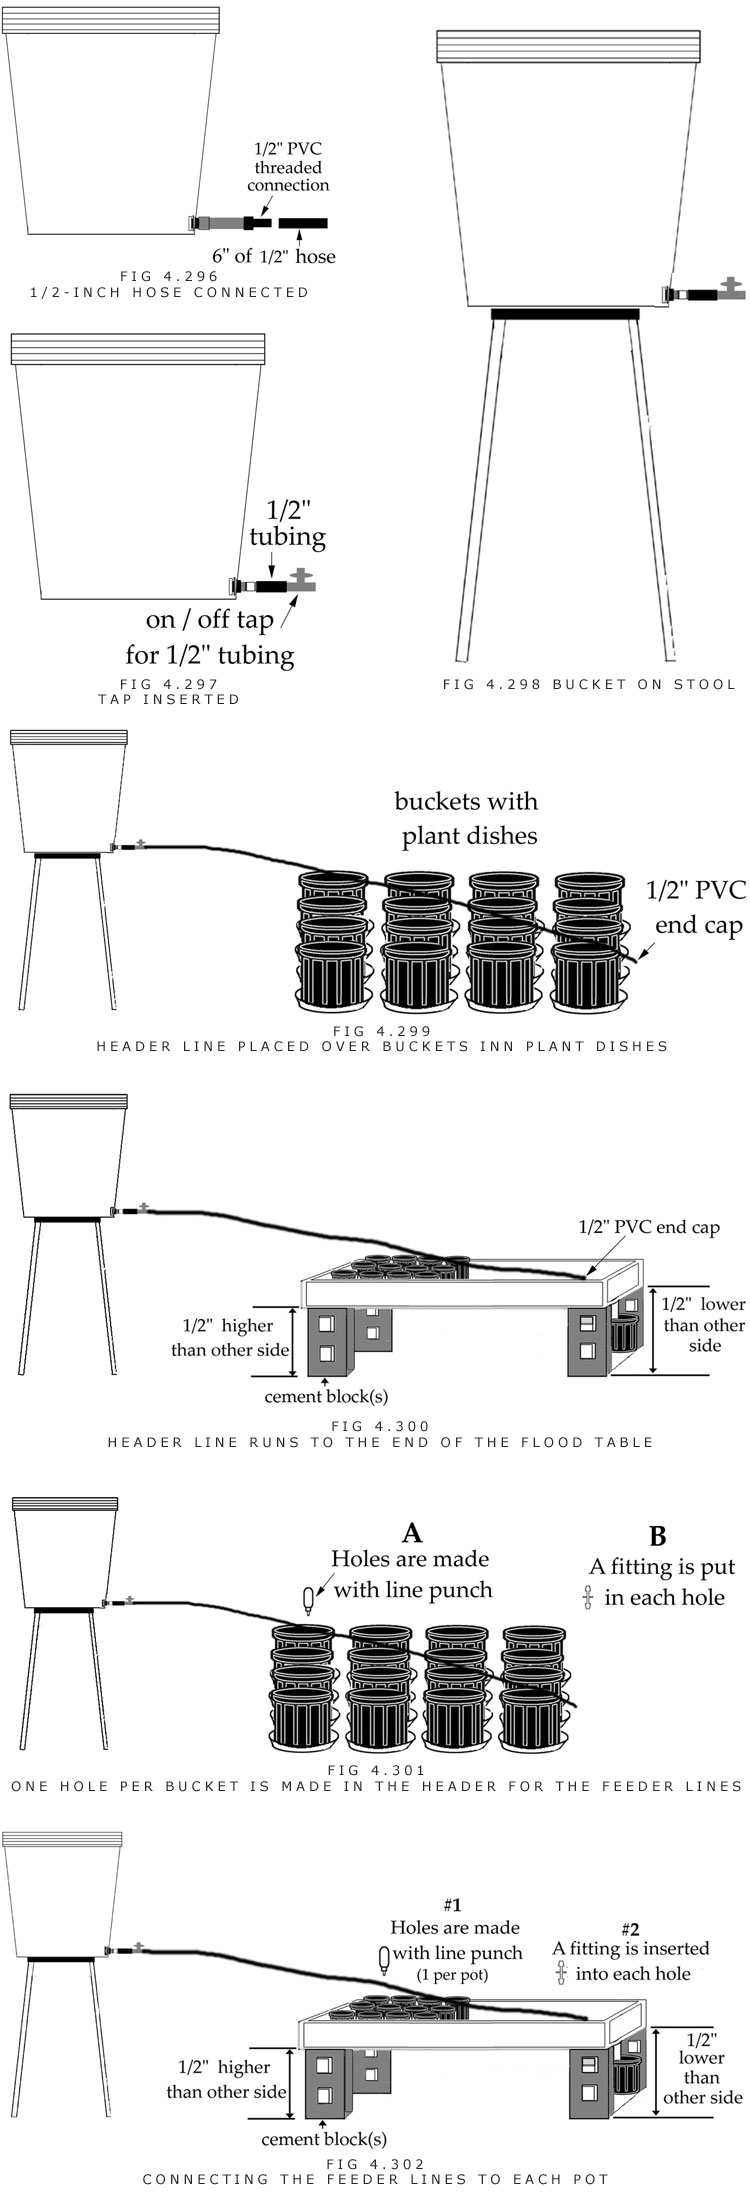
3. A 1/2-inch PVC fitting with standard female threads is fastened to the inline filter or computer timer. (Figure 4.296)
4. A 6-inch piece of 1/2-inch tubing is attached to the 1/2-inch PVC fitting.
C. A 1/2-inch on / off tap is attached to the 1/2-inch tubing.
D. The bucket is placed on top of a high stool. (Figure 4.298)
E. The 1/2-inch tubing is extended diagonally across the room until it reaches the far end corner of a flood table and rests on the surface. The 1/2-inch tubing should be gently connected to the last fitting so that it is secure yet allows for easy removal of the line to clean the filter. This should hold sufficiently, but a small C-clamp may be used for extra safety. (Figures 4.299 and 4.300)
F. The end of the 1/2-inch tubing is cut and a 1/2-inch end cap is inserted. That joint may be C-clamped. (Figures 4.299 and 4.300)
G. Somewhere along the lower elevated part of the header line (but higher than the containers), holes should be punched into the line. The number of holes should be equal to the number of plant containers.
H. Small holes are drilled into the tops of the containers (above the mix) for the 1/8-inch tubing to be inserted snuggly, or the tubing can be placed into alligator stakes. If too many holes are made by accident, plugs can be used to fill them.
I. The 1/2-inch tubing is linked between each individual 1/8-inch fitting from the header and each individual container hole, without leaving too much slack. Option: Drippers can be inserted into the end of each feeder line to control the flow rate.
J. If there are any leaks in the polybutylene after testing (such as leaks in the joints), silicone can be used to seal them. Silicon must be applied to dry tubing and it must be allowed to dry. Chances are that if there is a leak, it would only be the odd drop of liquid and not a big deal.
K. As plants get larger and need to be spaced out, more 1/8-inch tubing will be needed to replace some of the existing tubing. Extensions or longer tubing can solve this problem. Using tubing extensions is the easier choice. An exacto knife is used to cut away the old tubing from the fittings in the line.
Note: Although this system works with a handful of plants, you could build the system so that a pump is used to deliver the nutrient instead of gravity. With this method, you would only need to add self-cleaning drippers to the ends of each line and run the pump on a timer. Drippers vary, thus, 1/2-gallon(2 litre) per hour drippers emit more slowly than say, 1 gallon per hour drippers.
Using drippers, you just run the timer to deliver the required solution.
Drip System Maintenance
This drip system will be trouble-free when plain water is passed through the tubing.
Some fertilizers, such as bat guano and Sea mix, water with particulate, and other forms of debris can clog the inline filter, 1/8-inch fittings, or 1/2-inch tubing. However, many fertilizing mixes will not clog the lines. The drip system can be carefully monitored so that disasters, such as plants going without solution, do not occur. The filter can be cleaned often by rinsing it with plain water. Removing the 1/2-inch end cap and flushing the system with plain water on a regular basis avoids problems.
Small tubing may get clogs. Blowing or sucking into the ends of 1/8-inch end tubing helps remove clogs. But if that is necessary, a flush of the system is also necessary.
If the computer timer is part of the program, it should be set to run for plenty of time, so that it will not shut off during the drip process. Using the computer is a risky business, because it may be used when nobody is home. Why else would it be needed? If premises are vacated, electronic malfunctions, battery failure, clogs in the system, or fluke leaks are all possible.
Going without the computer and taking advantage of a drip system is beneficial. The entire two-room system offers the opportunity to take up to five days off at a time without missing a feeding once watering frequencies are known. Since raising lights, cleanup work, misting, picking dead leaves, bending plants, checking for bugs, checking timers, etc., go along with the job, any more than a few days off is foolish. Freedom is an advantage of this cultivation system because maintenance can be minimal.
If a grower is keen, daily feeding maintenance will get a larger yield in less time. If a grower is lazy or does not have the time, feeding and garden maintenance can be done on the same day every few days. Most other sophisticated hydroponic systems have greater potential for error such as leaks and nutrition problems.
The disadvantage of a drip system is that the solution drains into a waste bucket, which then must be manually returned to the reservoir. This manual step can be eliminated when a top-feeding system is built. The top-feeding system recirculates the solution so that the feeding can be effortless, since all feeding maintenance is done in one bucket. The top-feeding system is shown in complete detail starting on page 66.