
Top-Feeding Vertical Hydroponic System Using 4-inch PVC Pipe
Column System C
Materials
1. One reservoir for feeding.
2. One reservoir for flushing.
3. Four-inch PVC pipe; 6 feet per column.
4. Pump.
5. Bypass valve.
6. 1/2-inch black poly tubing for header lines.
7. 1/2-inch black poly elbows.
8. 1/2-inch black poly T’s.
9. 1/2-inch black poly end caps.
10. 3/4-inch flex hose.
11. One bucket per pipe to collect runoff solution.
12. 3/4-inch thru-hull fittings.
13. 3/4-inch end cap.
14. 1/8-inch tubing for feeder lines (1-foot per plant).
15. Twine.
16. PVC glue.
17. Contact cement.
Tools
1. Exacto knife.
2. Crescent wrench.
3. Scissors.
4. Drill.
Introduction
In most cases this system is used to grow small plants.Seedlings can be induced to flower at 5 weeks old, while clones can be induced to flower when they are 6 inches tall.
Typical uses for this system are to set up 12 pipes at 8-inch centers or 10 pipes at 10-inch centers using two 1,000-watt lights.
The pipes will be filled with a medium; anything from soilless mix to a homemade blend like 30% coco fibres / 70% perlite.
With this system, the pipes can be empty so that the roots run freely down the inside of the pipes, or the pipes can be filled with a medium like soilless mix. If they have mix, feeding once a day will ensure that the medium does not dry out and plants get ample nutrition. If the pipes are empty, having the pump run for 2 minutes every 20 minutes will keep the root zone moist and with a good supply of plant food.
Procedure
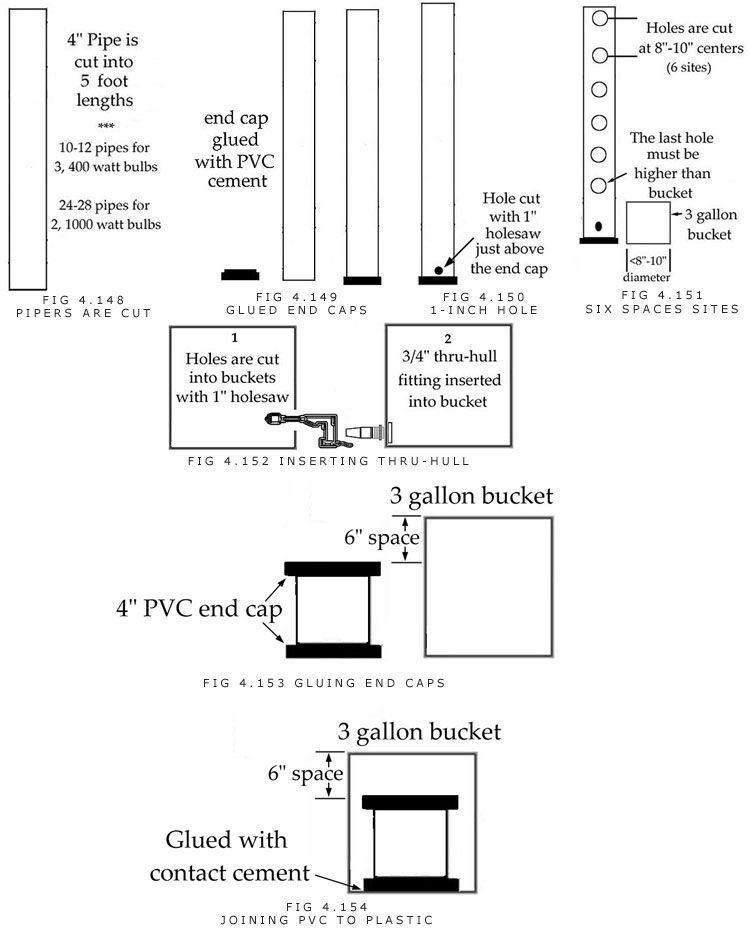
A. All 4-inch piping should be cut to 5 feet. (Figure 4.148)
B. An end cap is glued into the bottom of each pipe with PVC glue. (Figure 4.149)
C. A hole is made with a 1-inch holesaw just above the end cap. (Figure 4.150)
D. Holes are drilled into the 6-foot PVC pipe at 8 to 10-inch centers with a holesaw. The holes need to be large enough for the plant and its roots. Smaller plants such as rooted clones are easier to work with.
E. A thru-hull fitting is inserted into each bucket. A 1-inch holesaw is used to make the hole. A crescent wrench is used to fasten it securely in place. (Figure 4.152)
F. The support system is now built: there are two options.
Option A:
1. A piece of 4-inch PVC is cut and has an end cap glued to both sides with PVC cement. The whole piece should be 6 inches lower than the bucket. (Figure 4.153)
2. This piece of pipe (with end caps) is glued to the bottom of a bucket with contact cement.
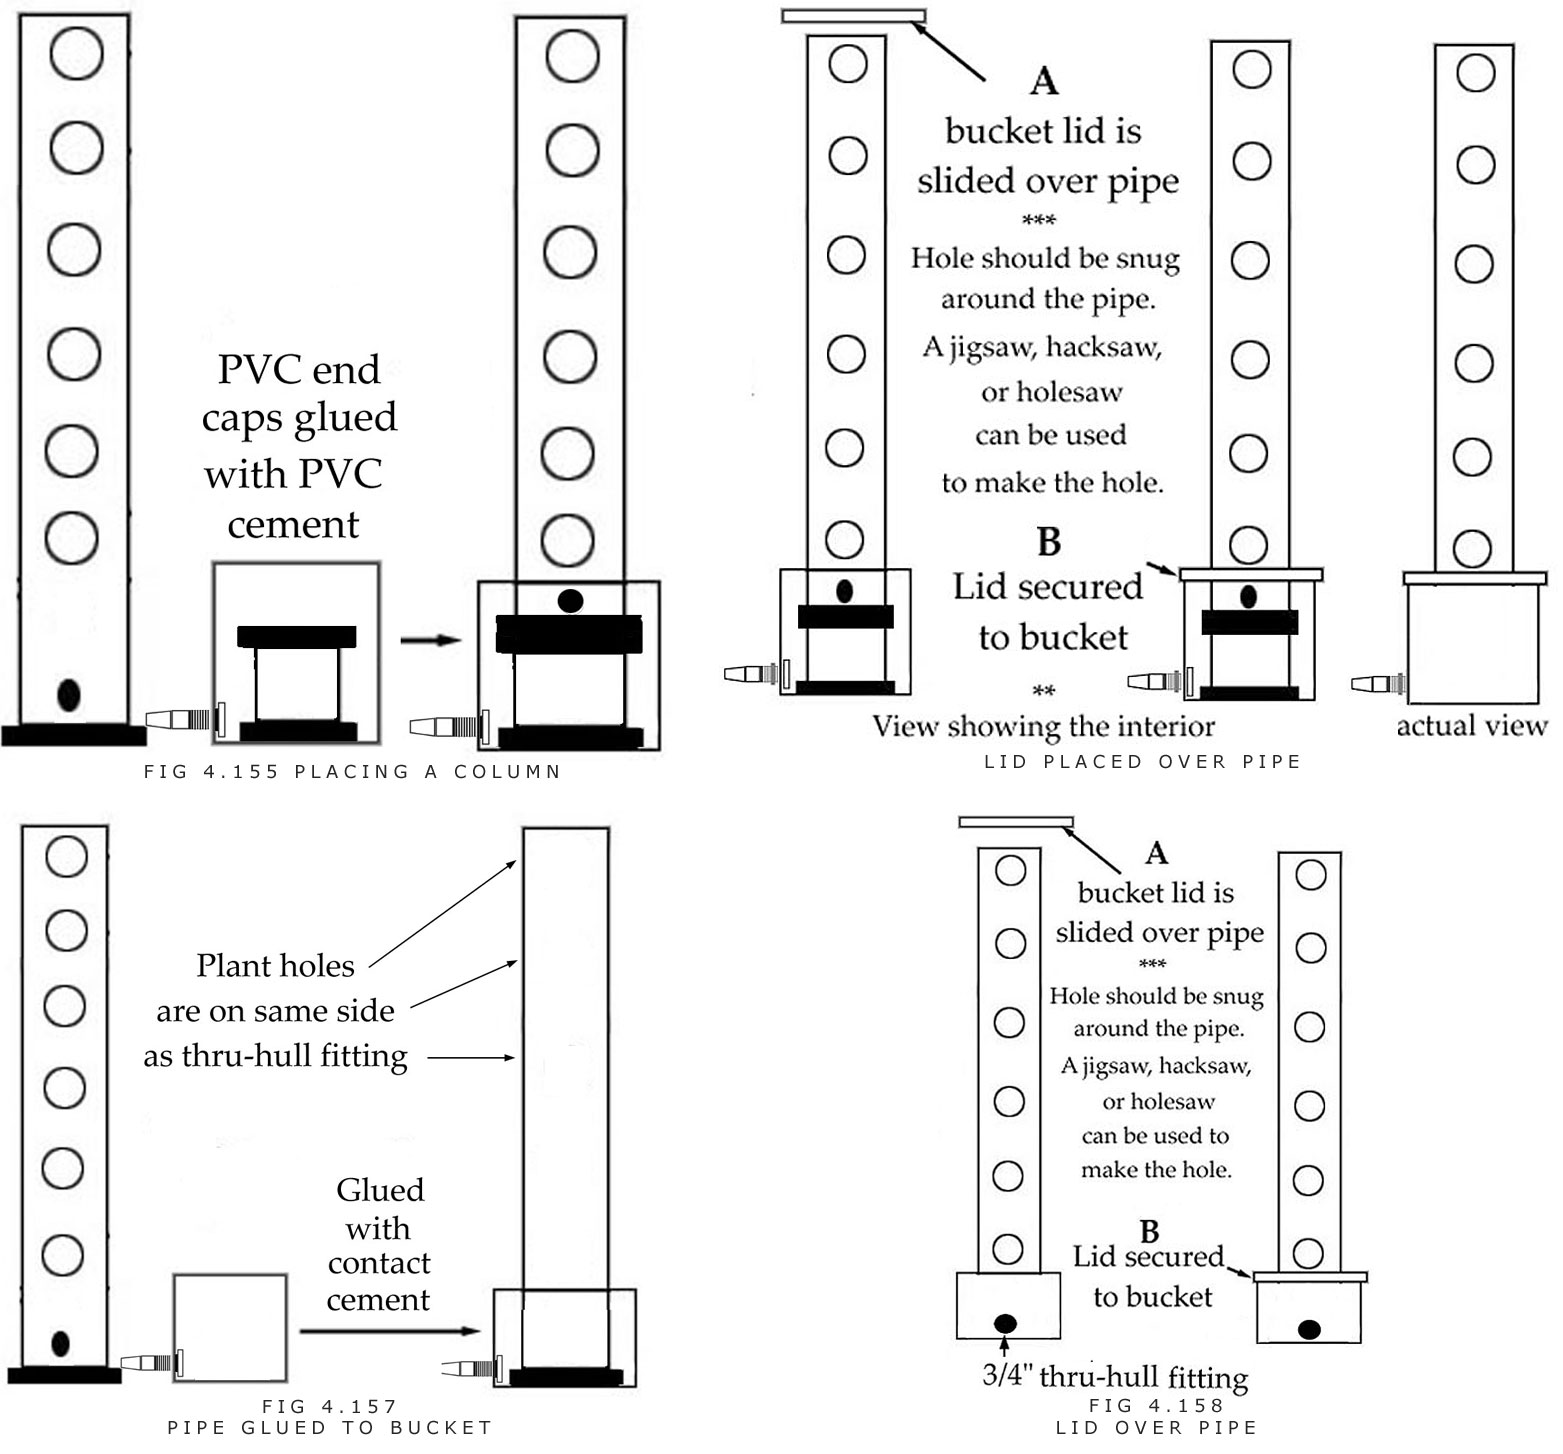
3. The end caps of the long pipe and short pipe are glued together with PVC cement. The holes in the long pipe should be aligned above the thru-hull fitting. (Figure 4.155)
3. The bucket lid is placed over the pipe and secured to the bucket.
The lids are placed over the tops of the pipes to give a tight fit. Holes can be cut into the center of the lids with a holesaw, jigsaw, or hacksaw.
4. Four-inch PVC pipes are filled up with medium (i.e. soilless mix) or they can be filled after the complete setup. Duct tape placed over the holes will prevent the mix from leaking. The mix should be nice and wet before the holes are exposed so that it does not fall out.
Option B:
1. The end cap of the long pipe is glued to the bottom of the 3-gallon bucket with contact cement.
2. The lids are placed over the tops of the pipes to give a tight fit. Holes can be cut in the centers of the lids with a 4 1/4-inch holesaw, jigsaw, or hacksaw.
3. Four-inch PVC pipes are filled up with medium (i.e. soilless mix). This can also be done after complete setup. Duct tape placed over the holes will prevent the mix from leaking. The mix should be nice and wet before the holes are exposed.
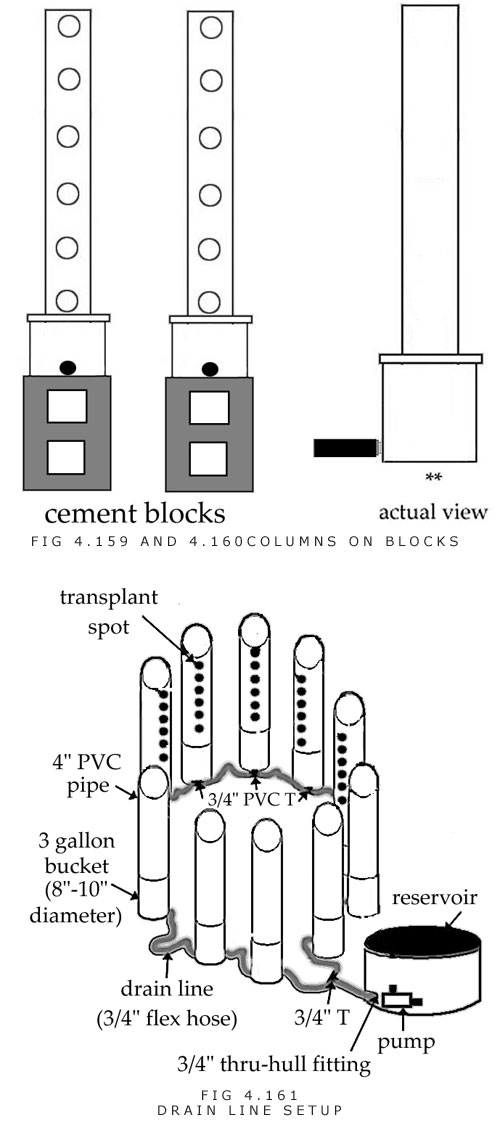
4. The buckets can be placed on top of cement blocks for better drainage.
G. 6 inches of 3/4-inch drain hose is attached to each thru-hull fitting. (Figure 4.160)
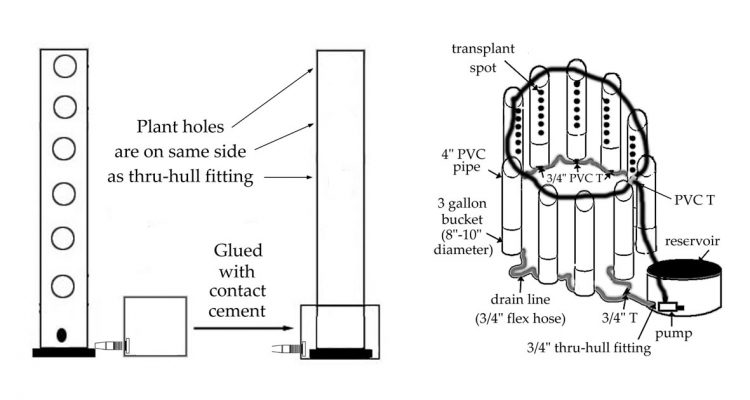
H. The pipes should be placed in a circle to be 1-foot + plant distance from bulbs in middle. (Figure 4.160)
I. A 3/4-inch PVC T is attached to each piece of 6-inch hose. (Figure 4.161)
J. All drain buckets are connected to each other with tubing that is connected to 3/4-inch thru-hull fittings. (Figure 4.161) This is like a chain that can be shaped any way that is desired to place plants at optimum light distances. (Figure 4.161)
K. The drain lines of the first two buckets nearest the reservoir will connect to a 3/4-inch PVC T and the 3/4-inch thru-hull fitting in the reservoir. (Figure 4.161)
Feeder Line Components
L. A long piece of 1/2-inch poly tubing should be run along the tops of the pipes until it reaches the last one in the circle. A 1/2-inch PVC T is inserted at the end. (Figure 4.162) Fittings are inserted into main line to let solution run into each pipe. (Figure 4.163)
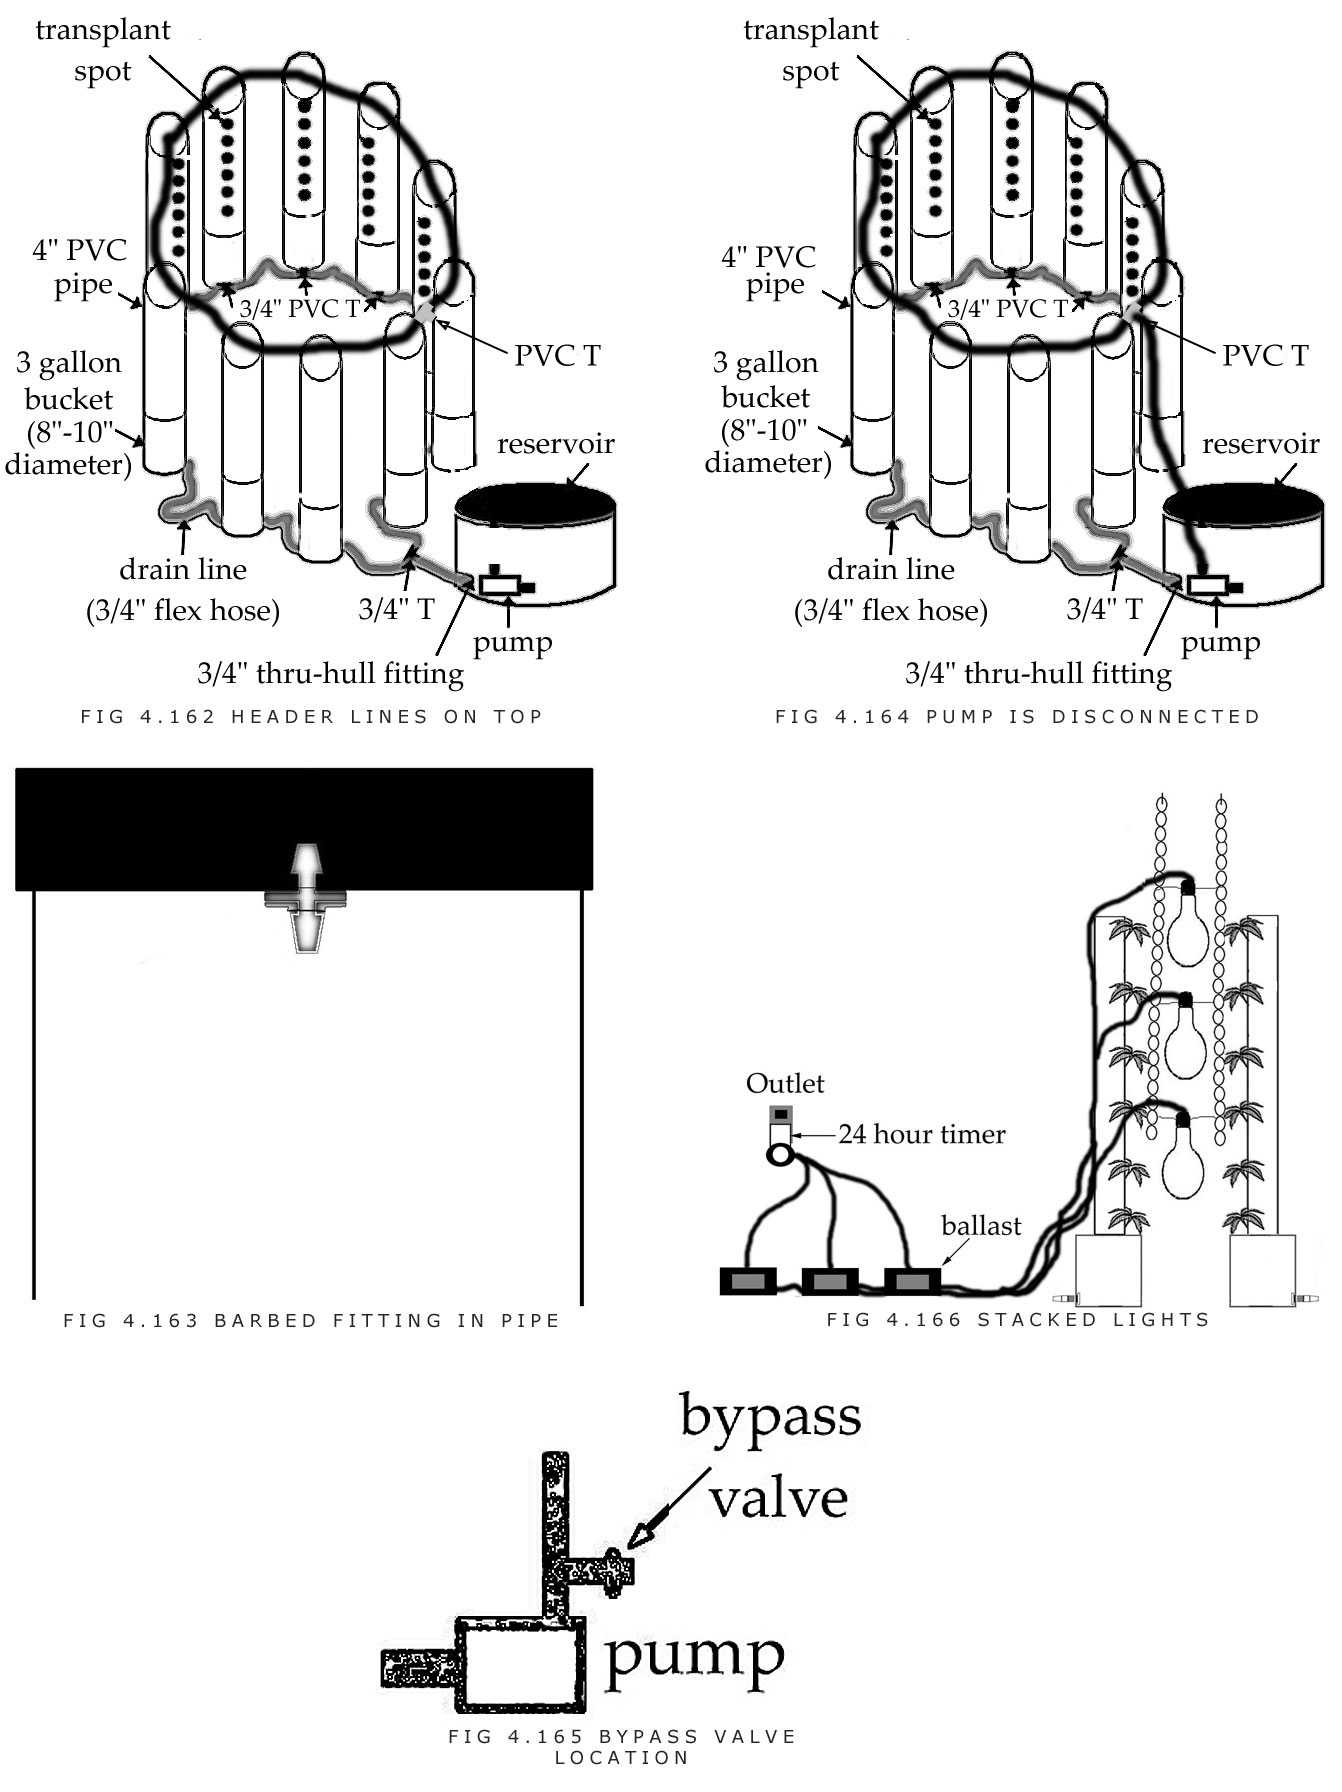
M. The pump is connected to a piece of poly tubing that reaches the outside of the reservoir. (Figure 4.164)
Option: A bypass valve can be inserted between the pump and the first 1/2-inch PVC elbow. To insert a bypass valve, a 1-inch chunk is cut out of the 1/2-inch poly line. Then a 1/2-inch PVC T is inserted into the cutout section. A 5-inch chunk of 1/2-inch poly plastic is connected to the 1/2-inch PVC T, and a lightweight plastic tap is connected to the 5-inch chunk of black poly piece.
Lighting
N. Lights are hung in between the plants without hoods. For example, three to four 400-watt lights (2 to 3 sodiums and 1 halide in middle) can be placed on top of each other in order to illuminate the plants grown in 6-foot high pipe.