

Option A: Top Feeding System Using Flood Table
Introduction To making a Top Feeding System
This top feeding system using a Flood table is not a typical version of a commercial hydroponic system, but it can be put together with simple materials that can be found in any hardware store. If a grower happens to be in a remote location with no way out and wants a system to grow big plants quickly, this system is a valid, guaranteed option.
This system is very cheap to make and has less fittings than other top-feeding systems for big plants. Also, if a line accidentally comes out of a container, the solution will leak on the table rather than all over the floor.
Materials
1. Flood table made to size or plastic store-bought model.
2. Two 1/2-inch poly elbows.
3. Two 1/2-inch poly Ts.
4. One roll of 1/2-inch poly tubing.
5. Two 3/4-inch thru-hull fittings.
6. One reservoir (should hold about 12 gallons of fertilized solution per each 4×4-foot table space).
7. 6ml black plastic.
8. Pump. (250 to 350 mag drive for 4×4 to 12×12-foot space. Stronger pumps can be used for larger tables.)
9. Panty hose to cover pump (optional).
10. Table support (4 cement blocks or 2 sawhorses).
11. Four sawhorse hinges per table.
12. 1/2-inch poly threaded female fitting to attach to pump.
13. Intermittent timer.
Tools
1. Drill.
2. One-inch holesaw.
3. Saw.
4. Pipe wrench or crescent wrench.
5. Knife.
Setting Up the System
Commercial Flood Table
A commercial flood table can be placed on top of a 3/4-inch plywood sheet supported with 4 cement blocks or 2 sawhorses. (Figure 4.38) Using cement blocks is the fastest, easiest, and cheapest method.
For a sawhorse, 2x4s should be cut to a length such that when the sawhorse legs are set up, the reservoir will be slightly lower than the table. Each pair of sawhorse brackets will be joined with another 2×4 to give the table support. One or two holes will be drilled into the flood table with a 1-inch holesaw. The manufacturer will specify where the holes are made. Figure 4.38 shows a typical setup.
Homemade Flood Table
A homemade flood table will be made of 3/4-inch plywood. Anything smaller warps easily.
For simplicity, the following instructions assume that a 4×8 sheet of plywood is used for the table, which is the size of many commercial flood tables.
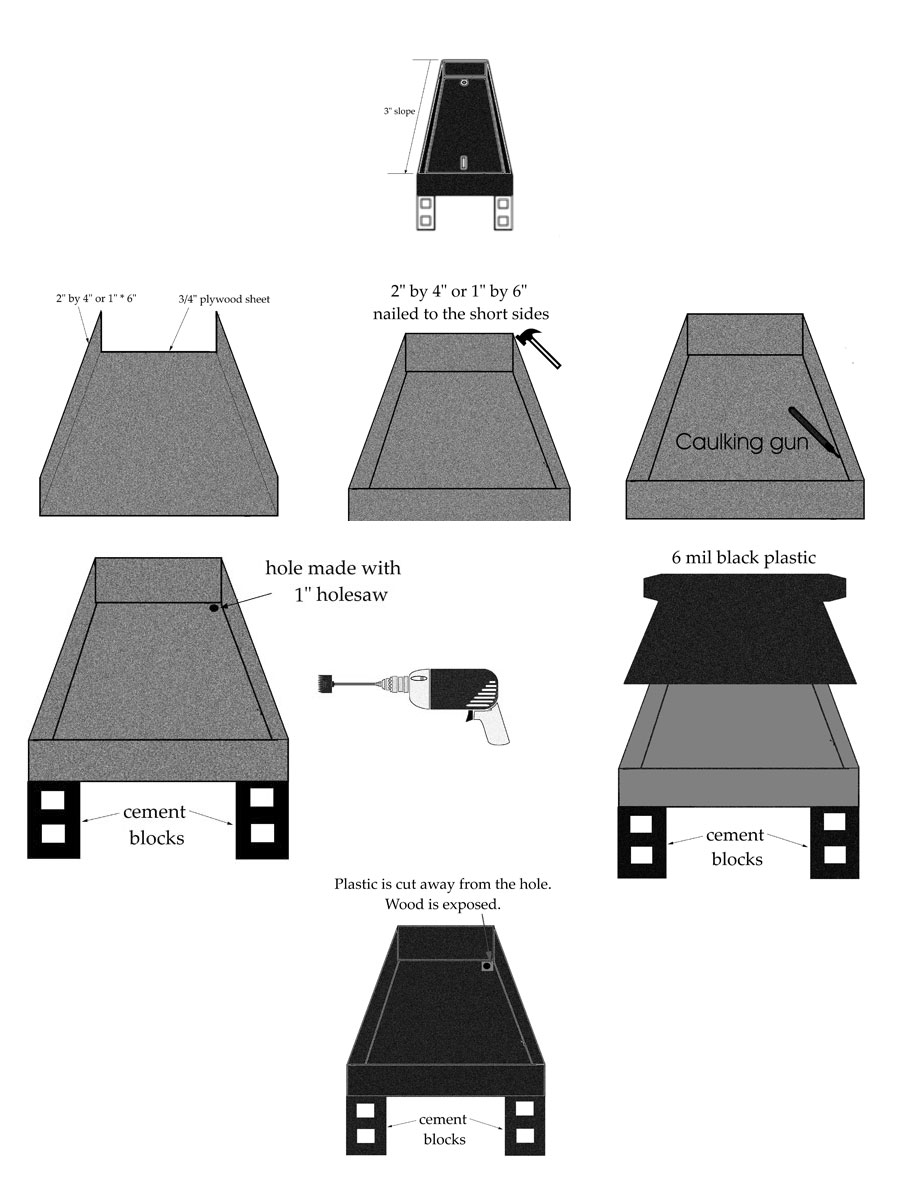
Two 8-foot lengths of 1×4 or 1×6 wood should be nailed to the long lengths of the plywood. (Figure 4.39)
One 8-foot length of 1×4 or 1×6 wood that is cut in half can be used for the short sides. The small sides are nailed together from the bottom of the plywood. (Figure 4.40)
Caulking should be applied along the nailed seems for extra waterproofing. (Figure 4.41)
The table should be placed on something that supports it, such as two sawhorses or cement blocks. Using cement blocks is the easiest method. A quick sawhorse can be made with cheap 2×4 wood with hinges that the 2×4 wood slides into. Another 2×4 (i.e. an eight-footer for an 8×4 flood table) is placed between the hinges to complete an instant sawhorse. One end should be an inch or so higher than the other end so that the solution can be recirculated. (Figure 4.42)
At the lowest corner a hole is made 2 inches from the end of the table using a 1-inch holesaw. (Figure 4.43)
Now two layers of 6ml black poly plastic should be used to cover the bottom and sides of the table. (Figure 4.44) It should lie nice and flat on the flood table. It can be stapled to all four sides.
A 2-foot piece of 3/4-inch PVC pipe is inserted into the hole. (Figure 4.46) Cutting plastic away from the PVC pipe will prevent any water being trapped under the 6ml black plastic. (Figure 4.45)
A reservoir is placed under the drainpipe. (Figure 4.46)
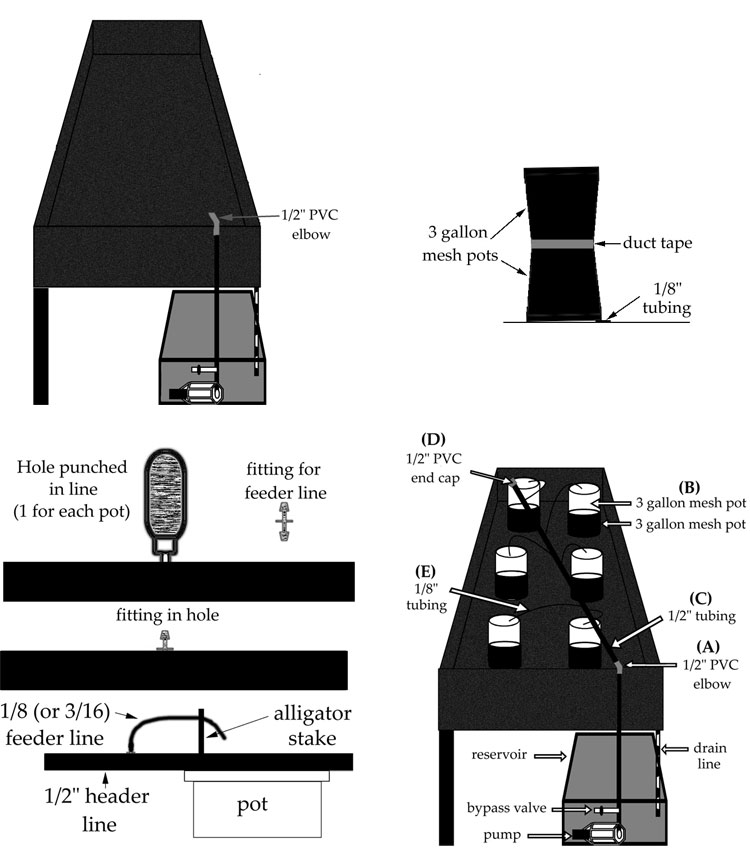
B. The pump is placed in the bottom of the reservoir and a 1/2-inch PVC female threaded fitting is attached to the pump. (Figure 4.47)

Flood table bypass valve and pump
Option: Bypass valve
Just above the pump, a piece of the 1/2-inch tubing should be cut out and a 1/2-inch T should be inserted. The exposed end of the T should be connected to 1/2-inch tubing and then to an on/off tap that will act as a bypass valve.
C. A 1/2-inch line is connected from the pump or the bypass valve. The hose should reach the top of the flood table. (Figure 4.48)
D. A 1/2-inch PVC elbow is inserted into the end of the hose.
E. A mesh pot can be stacked on an upside down mesh pot: 3 to 5-gallon mesh pots are good sizes for this system. Duct tape can be used to connect them together. (Figure 4.50) Any hydroponic medium can be used to grow the plants, such as clay, perlite, soilless mix, perlite/coconut fibers, or perlite / vermiculite. Six plants per flood table is a safe number to use to cover all square footage on the table. A small piece of tubing or a popsicle stick can be placed under the front of each bottom bucket to guarantee that the solution will drain from the bucket. (Figures 4.50)
F. 1/2-inch hose is run along each flood table near all of the pots. (Figure 4.52)
G. The line is cut after it reaches the last pot and a 1/2-inch PVC end cap is inserted. (Figure 4.52)
H. Small holes should be inserted into the 1/2-inch tubing that is on the flood table. A hole punch or 1/16-inch drill bit can be used to make the holes for the fittings. (Figure 4.51)
I. 1/8 or 3/16-inch tubing is connected to the fittings and each line is attached to each pot using alligator stakes. Each line should have a foot of slack because plant spacing will change as they grow larger. (Figures 4.51 and 4.52)
Feeding
If the pump runs full time the plants will grow well, especially if the water temp is near 70°F. Pumps do not use much electricity and it would be cheaper to run it full time than to buy a timer. However, the pump can be timed to run with the light cycle. There will be enough moisture left on the table to keep the bottom roots moist during the light hours. This method may be better, especially in an unattended garden where a fluke leak at night could lead to a disastrous situation if the pump was on.
But plants can be fed continuously (all day and all night), or plants can be fed intermittently. The timer can turn on and run the water for 2 minutes every 20 minutes during the light hours, or perpetually.
Cannabis has a tremendous ability to adjust to its feeding schedule. The plants will intake similar levels of water whether the pump runs intermittently or full time.