
Building Hydroponic Wick Systems
Wick System A: Buckets
Materials
1. Two 2 to 5-gallon buckets per plant.
2. One thru-hull fitting per plant.
3. One 4-way 3/4-inch fitting.
4. 3/4-inch flex hose, 1 yard (meter) per plant.
5. Soilless mix, one 3.0 to 4.0 cubic foot bale.
Tools
1. Drill and 1-inch holesaw.
2. Knife.
3. Wrench.
Introduction
The wick system is a very cheap and easy hydroponic system to build. Natural cotton fibers or a lantern wick is placed 1/3 to 1/2 of the distance from the bottom in the top bucket that contains soilless mix. The wick must be long enough to reach the bottom of the bottom bucket to draw the solution upward with capillary action.
This system does not require a pump. Figure 4.18 shows the set up and assembly of wick systems for a one plant system and figure 4.21 for a system with many plants.
Maintaining the system is simple. A master reservoir is filled with water, fertilizer is added, and the solution is delivered to the bottom container of each plant that it will feed.
There are explanations for systems with one plant or with multiple plants because the setup is slightly different.
One Plant Procedure
A. A hole is cut into the middle of the bottom of each top bucket with a 1-inch holesaw. (Figure 4.17)
B. The wick is placed into the hole so that it will be 1/3 to 1/2 the distance of the top bucket and long enough to contact the bottom of the lower bucket. (Figure 4.18) The wick should be of a size that will fit tightly into the hole. For example, natural cotton fibers can be twisted and tied into a 1-inch rope.
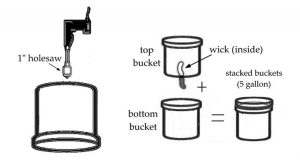
One plant wick setup.
C. The soilless mix is placed into the top bucket. Use your hand to hold the wick in the right place, 1/3 to 1/2 of the height of the bucket. The fibers can be loosened so that they spread laterally toward the sides of the bucket, but they must maintain the same height: the 1/3 to 1/2 rule. After the soilless mix covers the wick, let go of the wick and place more mix on top until it reaches 1 inch below the top of the bucket.
D. Top buckets with wicks are stacked into lower buckets. (Figure 4.18)
E. Mix is well moistened with water. More can be added after so that the wet soilless mix is 1 inch lower than the top.
F. The top pot is lifted out of the bottom bucket. Approximately 2 gallons of solution is added to the bottom when needed. You can use a fertilized solution for one feeding and plain water for the next. This pattern can be repeated until 2 weeks before harvest. For the last 2 weeks, the bottom wick should be cut off and the plants should be fed from the top to remove excess salts. During the flushing, the salty waste is removed from the bottom bucket.
Lighting: 1,200-watt compact fluorescent or 1,400-watt halide would be adequate lighting for one plant.
Multiple Plant Procedure
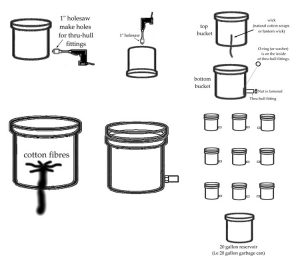
A. A hole is cut into the side of each bottom bucket and the 20-gallon reservoir. The hole is made 2 inches above the bottom with a 1-inch holesaw.
B. A 3/4-inch thru-hull fitting is inserted into each hole and tightened with a crescent wrench. (Figure 4.21)
C. A hole is cut into the middle of the bottom of each top bucket with a 1-inch holesaw. (Figure 4.20)
D. The wick is placed into the hole so that it will be 1/3 to 1/2 the distance of the top bucket and long enough to contact the bottom of the lower bucket. (Figure 4.21) The wick should be of a size the will fit tightly into the hole. For example, natural cotton fibers can be twisted and tied into a 1-inch wide piece of rope.
E. The soilless mix is placed into the top buckets. A hand is used to hold the wick in the right place, 1/3 to 1/2 of the distance from the bottom of the bucket.
The cotton fibers can be loosened so that they spread laterally towards the sides of the bucket. But, they should maintain the same height: the 1/3 to 1/2 rule.
After the soilless mix covers the wick, the hand can let go of the wick and more mix is placed on top until it reaches 1 inch below the top of the bucket.
F. Top buckets with wicks are stacked into lower buckets. (Figure 4.23)
Multiple pot wick system
G. Mix should be well-moistened with water. More can be added after so that the wet soilless mix is 1 inch lower than the top.
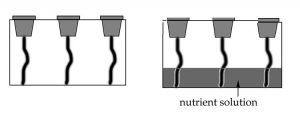
H. Buckets can be put into the position of choice. Having buckets closer together for vegetative growth is recommended so that the plants are side by side, but not touching each other. This allows maximum usage of light energy. (Figure 4.24)
I. Buckets are connected to the master reservoir with 3/4-inch hose and 3/4 T’s. (Figures 4.25 and 4.26)
J. As plants grow, more tubing can be connected with 3/4-inch extensions to space the plants apart. (Figure 4.27) Or plants can be transplanted into an identical flowering system, except with further spacing. (Figure 4.28) Growers that grow continually will use one system for vegetative growth and one for flowering.
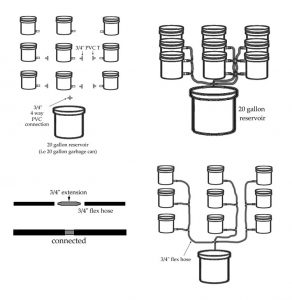
Connecting and spacing all the flower pots.
Feeding
Maintaining the system is simple. A master reservoir is filled with water, fertilizer is added, and the solution is delivered to the bottom container of each plant it will feed.
When the solution at the bottom of the master reservoir is almost dry, more solution is added. You can use a fertilized solution for one feeding and plain water for the next. This pattern can be repeated until two weeks before harvest.
For the last two weeks, the bottom wick should be cut off and the plants should be fed from the top to remove excess salts. During the flushing, a shop vac can be used to vacuum the wasted salty water from the master reservoir. The level of the solution will be equal in all buckets. Therefore, when the master reservoir is empty, all buckets are empty.
Wick System B: Plastic Tubs
Materials
1. Plastic tub (refer to figures 4.32 for specific systems for a given space).
2. Six wicks; natural cotton fiber or lantern wicks.
3. Twenty quarts (liters) soilless mix.
Tools
1. Drill and 31/2-inch holesaw or sharp knife.
2. Exacto knife or sharp knife.
3. Crescent wrench.
Introduction
This wick system is very easy to build and use. In fact, a grower can get a crop as long as there is water on the bottom of each tub. This system is used to grow a few small plants to get a series of top flowers.
Pots inserted into Totes
Many salespeople in the marketplace try to dazzle buyers with reinventions, but this prehistoric growing method still has a place because small plants do not need the latest and greatest lighting, especially if the strain grows well under fluorescent lights. And these lights do not have too much heat at the source, but rather spread the heat out over a long distance. This is a fine method to grow for personal use, especially with the best light tubes available on the market. There is no work, no suspicion, and no gadgets.
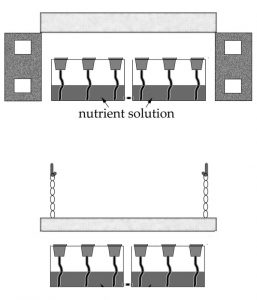
Using cement blocks or chains to position lights.
Maintaining the system is simple. Water, or water and fertilizer can be added to the tub. The options will be fully illustrated in this section. Soilless mix is used in each pot because it is very user-friendly and it saturates perfectly with the wick system.
Procedure
A. Holes are cut into the plastic tubs at 8-inch centers. Many plastic tubs will accommodate 5 to 6 sites; a 4-foot tub can support 10 to 12 sites. 5 to 6 plants is the perfect number for each 4-foot fluorescent fixture. (Figure 4.32) One tub will work fine with one 125-watt compact fluorescent light. (Figure 4.29)
Two tubs placed side-by-side, or one long tub 4 feet long will work well with two 4-foot fluorescent light fixtures. (Figure 4.32)
B. One foot wicks can be drawn through one of the holes in the bottom of each pot until each wick is 1/3 to 1/2 an inch from the bottom of each pot. The wick must reach the bottom of the tub. Natural cotton fibers or strings twisted and tied into a small rope 1/2 to 1-inch thick works well.

Positioning the wick
C. Soilless mix is put into each container until it is about 1 inch from the top.
D. The soilless mix can be soaked until it is saturated. At this point, more soilless mix can be added and soaked until the mix is again 1 inch from the top of the pot.
E. Plants can be transplanted into each pot. A grower should use 4 to 5-week-old seedlings or newly rooted clones.
F. Plants can be kept 1 to 3 inches from the lights.
G. A grower can use fertilizer at 1/2 strength. A liquid organic or chemical fertilizer can be used; such as Plant Prod 20-20-20, General Hydroponics, Greenfire Earth Juice / Bloom, Peter’s 20-20-20, Supernatural BC, Dyna Bloom, or Alaska Fish Fertilizer / Alaska Bloom.
One quart (liter) of fertilized solution per plant can be put in the bottom of the tub. For example, 6 quarts for 6 plants, 12 quarts for 12 plants. The bottom of the tub can be refilled when it dries up.
H. Two weeks before harvest, the wick can be cut from each pot and the plants can be flushed from the top to remove fertilizer salts in the mix. This will upgrade the quality. A few gallons per plant should do.
I. The tubs and all pots can be reused, but they should be given a good scrub with a 10% bleach solution in water, then rinsed well of all residues with plain water. The soilless mix should be new for each crop to be on the safe side so that there are no potential disease problems.
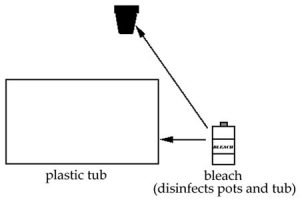
Sanitary pots and equipment prevents disease and other problems.