
Building a Flood and
Drain System
Materials (for each flood table)
1. Flood table made to size or plastic store-bought model.
2. Two 1/2-inch poly elbows.
3. Two 1/2-inch poly Ts.
4. One role of 1/2-inch poly tubing.
5. Two 3/4-inch thru-hull fittings.
6. One reservoir (should hold about 12 gallons of fertilized solution per each 4×4 table space).
7. Plastic covering for tray, or a growing medium such as perlite, perlite / vermiculite, coco fibers / perlite, or expanded clay.
8. Pump (250 to 350 mag drive for 4×4 to 12×12-foot space. Stronger pumps can be used for larger tables).
9. Panty hose to cover pump (optional).
10. 3/4-inch plywood to support table.
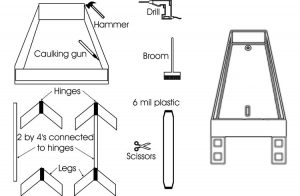
11. Four sawhorse hinges per table
12. Eight pieces of 2x4s cut to identical lengths for the legs. 2 pieces of 2x4s for table support. They will connect two sets of legs.
13. Poly threaded female fitting to attach to pump.
14. Intermittent timer
Flood table materials and tools.
Tools
1. Drill.
2. 1-inch holesaw.
3. Saw.
4. Pipe wrench or crescent wrench.
5. Knife.
Setting Up the System
A. The Table
Commercial Flood Table
A commercial flood table can be placed on top of a 3/4-inch plywood sheet supported with 4 cement blocks or 2 sawhorses. (Figures 4.1 and 4.2) The 2x4s should be cut to length so that when the sawhorse legs are set up, the reservoir will be slightly lower than the table. Each pair of sawhorse brackets will be joined with another 2×4 to give the table support. One or two holes will be drilled into the flood table with a holesaw. The manufacturer should specify where. Figure 4.1 shows drill with holesaw. Figure 4.2 shows the complete assembly.
Homemade Flood Table
A homemade flood table will be made of 3/4-inch plywood. Anything smaller warps easily.
For simplicity, the following instructions assume that a 4×8-foot sheet of plywood is used for the table which is the size of many commercial flood tables.
Two 8-foot lengths of 1×4 or 1×6-inch wood should be nailed to the long lengths of the plywood.
One 8-foot length of 1×4 or 1×6-inch wood that is cut in half can be used for the short sides. The small sides are nailed together from the bottom of the plywood.
Caulking should be applied along the nailed seams for extra waterproofing.
The table should be placed on something that supports it, such as two sawhorses or cement blocks. Using cement blocks is the easiest method. (Figure 4.6) A quick sawhorse can be made with cheap 2x4s and hinges that the 2x4s slide into. Another 2×4 (i.e. an eight-footer for a 4×8 flood table) is placed between the hinges to complete an instant sawhorse. One end should be an inch or so higher than the other end so that the solution can be recirculated. (Figure 4.6)
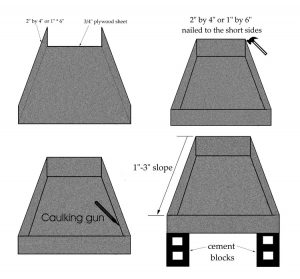
Sides are attached. Caulking is applied. Slope allows draining.
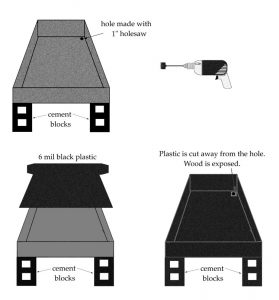
Drain hole made with holesaw and table is covered with black plastic.
In the middles of the two widths, two holes should be made about 2 inches from each end of the table using a 1-inch holesaw. Figure 4.16 shows a table with tubing connected to thru-hull fittings underneath the table.
Now, two layers of 6mm black poly plastic should be used to cover the bottom and sides of the table. It should lie nice and flat on the flood table. It can be stapled to all four sides.
A 3/4-inch thru-hull fitting is inserted into the hole. Cutting plastic away from the thru-hull fitting can prevent water from trapping between the plastic layers. Cutting plastic 1 inch from the thru-hull fitting will do. (Figure 4.9)
Options:
A grower can put perlite, 70% perlite / 30% vermiculite, a Bud Blanket, or a coco mat on top of the plastic of the flood table to allow water and nutrient to be available between flood cycles. Bud blankets and Coco Mats come precut for this standard 4×8 table.
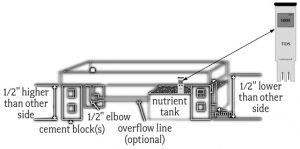
B. The pump is placed in the bottom of the reservoir and a 1/2-inch PVC female fitting is attached to the pump.
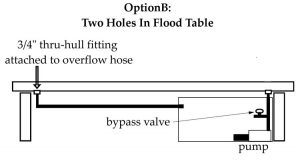
C. A piece of 3/4-inch flex hose can be connected from the overflow pipe to the reservoir. The hose can be fed directly to the reservoir or a PVC elbow can be used. The pump can be connected to the thru-hull fitting with 1/2-inch tubing. Heating the 1/2-inch tubing with hot water will make the connection easier. Figure 4.10 shows the pump and overflow pipe connected to the reservoir.
Schematic view of assembled flood table.
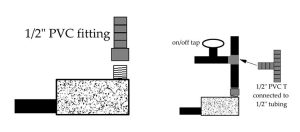
Pump attachment. On right a bypass valve is inserted for those pumps without flow control.
Option : Bypass valve
Just above the pump, a piece of the 1/2-inch tubing should be cut out and a 1/2-inch T should be inserted. The exposed end of the T should be connected to 1/2-inch tubing and then to an on/off tap that will act as a bypass valve.
Note:
Commercial manufacturers will have custom setups for the drain and feeding. Figures 4.13 to 4.16 show other ways that flood tables can be set up.
Feeding Methods
Rockwool or Clay
Method A: for small to larger plants
Rockwool or clay (Hydroton) in mesh pots are common mediums to use for a flood and drain system.
A grower can:
Put a 1-inch layer of perlite, 70% perlite / 30% vermiculite, a Bud Blanket, or Coco Mat on the table. This will hold air and nutrients between feedings. The flooding intervals can be once a day, or more often.
Side view of flood table.
One study done under identical growing conditions showed yields that were almost identical with one batch that was flooded continually (1/4 to 1-inch flood) and the other batch that was fed in the morning.
Or:
Put a sheet of reflectix material on top of the flood table with holes cut to size to fit the containers. Reflectix will help keep the roots cooler in the day and warmer at night. The reflectix can be used without a medium on the flood table, but if there is no medium, a grower should feed a few times a day and once in the middle of darkness, if possible.
Method B: (for midsize to large plants)
A custom-sized sheet of reflectix material is precut. This material will cover the table and will fit securely over each 1-foot rockwool slab. The 1-foot rockwool slabs are placed under the holes with a secure fit. Plants can be fed 6 (or more) times during the light hours. Solution can be flooded during darkness, too.
Soilless Mix
Method A: (for small to large plants)
1 to 4-gallon containers (mesh pots) can be placed on the table and filled with soilless mix (i.e. Sunshine #2 mix). The plants should at first be top-fed continually (for fastest growth ) or periodically (slower growth with a lot less maintenance) until the roots are visible at the bottom of the container. When the roots are visible on the bottom, a grower can feed with methods A or B above.