
Building an Indoor Grow Room
The vegetative room is where the young clones or seedlings will begin as tiny plants and eventually grow into robust plants before they start the flowering process. The sex of a flowering plant is either male, female, or hermaphrodite. The flower-producing females are the desired producers of flowers.
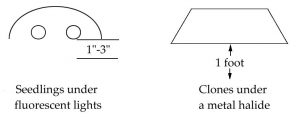
Flowering plants from seed can be started under fluorescent lights for the first 4 to 6 weeks after germination because most strains grow well from seed for 3 to 6 weeks under this type of light without any problems. This is the first stage, before the seedlings receive the metal halide light treatment in the full vegetative room setup. (Seedlings are discussed in depth in chapter 1.)
Clones can go directly under the metal halide light(s) when they have made roots, as discussed in chapter 2.
Grow Room Supplies and Building Materials
All the materials in the following list are designed for grow rooms of any size. The rules are basic in order to calculate the equipment needed for any size room. All the information regarding the proper gear is explained below under vegetative / flower room setup.
1. Lights and hoods
Important Rules of Vegetative Room Lighting
A stationary 400-watt bulb effectively covers up to 16 square feet of space. Using a light mover adds another one-third of usable space, resulting in about 21 square feet. A stationary 1,000-watt bulb effectively covers up to 64 square feet. A track or Sun Circle adds another one-third of usable square footage. Ideally, the ceiling height is between 7 and 10 feet. A 95-watt Envirolite covers 2.6 square feet.
There are many different qualities of metal halide and sodium lights on the market. It is recommended that a grower ask about the life of a bulb at the time of purchase. Light meters can be used to determine light quality, too.
Bulbs should be washed with a citrus cleanser like TKO between crops to remove dust, bugs, and mist residue.
There is more information about lights and lighting accessories on pages 209 to 215.
2. Thermometer / humidistat or high-tech climate controller.
3. Squirrel or in-line exhaust fan (265cfm [cubic feet per minute] or more) will be adequate for rooms up to 12×12-feet.
4. Oscillating fan, 12 to 18 inches.
5. One heavy-duty grounded timer.
6. Hooks to suspend the lights.
7. Linked chain for hanging the lamps.
8. Reflective material: flat white latex, alumicool, white plastic, or reflective Mylar for wall reflection. Mylar is expensive, while alumicool is moderately cheap.
9. One-gallon pump sprayer.
10. Proper size vacuum hose (i.e. 5 to 6 inches) for exhaust fan (approximately 10-feet will be required).
11. pH pens for liquid (optional, but highly recommended).
12. pH buffer 7 solution (optional).
13. One-arm or two-arm Sun Circle for one or two lights, or track for one or two lights (optional).
14. Fire extinguisher.
15. Grounded adapter to modify timer to three outlets when running the 18-hour equipment.
A timer board can also be used to run a larger system using more lights, such as 240-volt. Available from electrical shops and hydroponic stores.
Vegetative / Flower Room Setup
The room circuit should check in with at least 15 amps. Circuit checks can be done by leaving a stereo on while flipping the main breaker switches off and on. When the stereo shuts down, a grower should read the amperage on the switch at the main breaker. The stereo can be plugged into other circuits to see which other wall outlets are running on the same breaker.
Regular household circuits run on 120 volts, with the 240-volt exception of dryers and ovens.
Watts = volts x amps
Amps = watts ÷ volts
For example, with a 1,000-watt light running on a 120-volt circuit:
1,000 watts ÷ 120 volts = 9.1 amps
This leaves about 4 more amps as a margin of safety on a 15-amp circuit. Equipment normally uses more amps than a formula indicates, so it is a good idea to allow 10 to 15% unused amperage, to max out the circuit. If too many amps are used on one circuit, a fuse will blow, and all gear on the circuit will shut down.
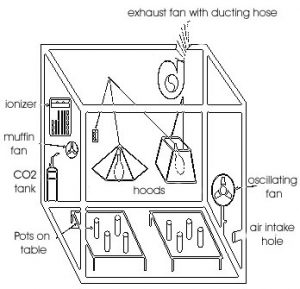
A. The room should be cleaned and disinfected because a dirty or moldy room invites bug or mildew problems, which can lead to plant stress and disease, all of which affect yields.
B. The walls should be painted with flat white latex or covered with reflective Mylar, white plastic, or alumicool. Reflective material is important because light will hit the walls and reflect back, adding more usable light to the plants, which means greater yields. Alumicool, white plastic, and paint are fairly cheap options that work well. Paint is permanent, while alumicool and white plastic are user-friendly and easy to use over and over again should the room be torn down. Mylar reflects best, but it costs the most and must be handled very carefully, for it crinkles easily and, as a result, loses its reflective ability.
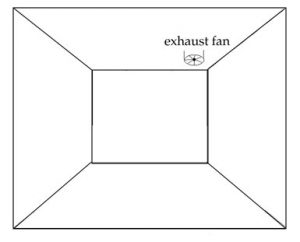
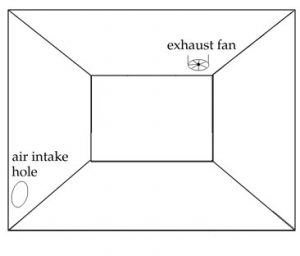
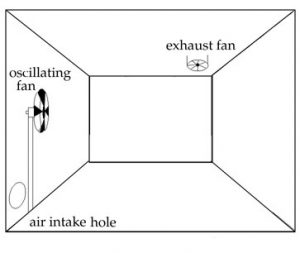
C. A place should be found in a high space, such as the attic or fireplace, for air to exhaust with an exhaust fan. A grower can go without an exhaust fan, but the plants will be weaker and grow slower than they will in a room with quality air. As a result of an insufficient climate, plants are often less healthy, and that invites predators such as spider mites to take advantage of the weak plants. Air ventilation is extremely important so that CO2 can be replenished from the outside environment, to avoid stagnant air problems. Plants respond much better to a higher air quality.
Inserting an Exhaust Fan
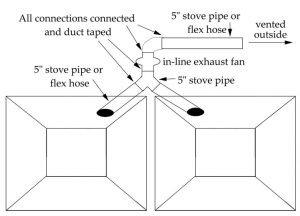
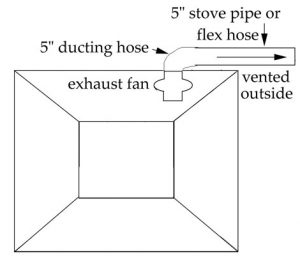
A proper-sized hole should be cut with a jigsaw for the vacuum hose and / or stovepipe to go through. (Figure 3.3) This job is easy if the pipe can be placed in a straight line to a vent on the side of the house with little distance to travel. Some growers just vent the air into the attic without sending it directly outdoors. This helps the plants get decent air, but this method can leave a mess behind for the homeowner if excessive humidity is continually sent into this space without care. Molds and mildew can thrive in moist areas, leaving black, greasy stains behind. However, there are mold removers on the market. Stovepipe is cheap, comes in a variety of sizes, and can be directed to various locations via flexible elbows that connect the sections of the metal stovepipe. Vacuum hose, on the other hand, has the best flexibility for awkward locations. The two can be used together and this is often a good match because pipe is sturdier, while the vacuum hose offers needed flexibility.
Make hole for exhaust fan
attach exhaust fan
Exhaust fan attached to hose
If a squirrel fan is used, it should be suspended from two hooks screwed into the ceiling, or hung with a coat hanger. Duct tape is handy for connecting the exhaust fan to the hose.
If an in-line fan is used for exhausting, it can be mounted inside or outside the room, because hose can be attached to both ends. The advantages of an in-line fan are that it is quiet and an adapter can be attached at one end so air can be sucked from more than one room at a time. Adding pipe or hose on the end of an in-line fan helps keep the noise down. Fans will be most effective when the air travels in a straight line. Fortunately, some in-line fans have more torque than others and therefore can push air effectively even when air is not moved in a straight line.
Purchasing an Exhaust Fan
The room volume can be calculated by multiplying length x width x height. For example, a room may be 10 feet long, 10 feet wide, and 8 feet high, to give 800 cubic feet. Exhaust fans will remove so many cubic feet per minute (cfm). If an exhaust fan can remove 800 cubic feet (the room’s volume) in 1 to 5 minutes, it will do fine. In this case, a 265-cfm fan will remove all the air from a room in about 3 minutes:
265 cfm x 3 minutes = 795 cubic feet
A fan of this size is recommended for rooms from 265 to 1,325 cubic feet.
Smell Removal
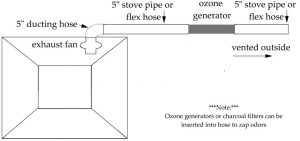
A device to remove smell can be inserted into the exhaust pipe after the exhaust fan. Boxes with charcoal filters or ozone generators can be used to zap unwanted skunklike odors before they are sent outside. There are ready-made products, such as Magic Dragon and Uvonair that can be inserted easily into exhaust pipes. (Figure 3.7)
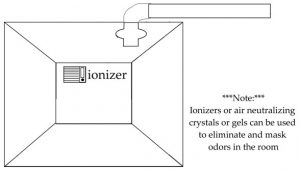
The proper ionizer may remove odors inside of the room, and it removes pollen that may make more seeds than desired. An ionizer can be used in an enclosed room or a room where is exhausted outside of the grow room. However, if the air is not sent outside, carbon dioxide enrichment is a must so that the air does not get stagnant.
An air conditioner can be used to cool a room and exhaust the air into another location. In this case, a charcoal filter can be used to eliminate odors inside of a grow room without sending the air running through the filter outside. This is a popular set-up for trailer gardens that fit into garages, warehouses, and outside. The trailers are mobile and discreet.
Some strains are almost 100% odor free while growing, while others will smell like a stinky skunk. It is up to the grower to figure out what combination of smell removers will work best under a given condition. If the odor factor is not dealt with, the penalty can be harsh.
D. Besides air exhaust, air intake is a must. A small hole (low in room and diagonal to the exhaust fan), about 6 inches in diameter, directed into another cool room will do, although adding an air intake fan to bring fresh air from outside via ducting or vacuum hose would allow for fresher air. For extra air quality, a filter, such as an ionizer, may also be added to keep particulate from entering the room.
E. An oscillating fan should be placed in the corner of the room to circulate air by pushing it away from the fan. Air movement is important to stir up the air and bring windlike conditions resembling those of the great outdoors. Blowing air under the bulbs helps to avoid burning of top shoots if the lights happen to get close to the plants. Air-cooled lights are a good option for bulbs.
Lights and Garden System Setup
The gardening system and lights can be set up at the same time because they will make a custom match, but before the lights are set up, the grower should decide which type of gardening system is going to be used. A grower will choose between a “flat garden,” “V-system,” or “column system.” Flat gardens can be used to grow plants of all sizes, but V-systems and column systems are used to grow small plants for the top buds.
How to build each system will be described below, and I will include appropriate lighting strategies. Basic to every setup is having a system with sufficient lighting and the proper plant supply. If one crop is grown, a grower can acquire clones, make clones, or use seedlings to get the proper plant supply.
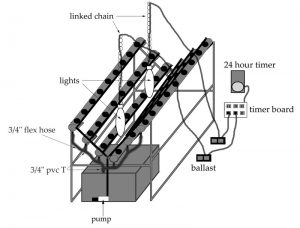
The hooks are screwed into the ceiling studs. To locate the 2×6 or 2×4 stud, tapping the ceiling and listening for a strong, dull sound or using a stud sensor will locate it. The linked chain will be hung on the hook(s) to suspend the light kit(s). The area should be covered effectively, using the following rules for light placement. Plywood sheets or 2x4s can be nailed to the ceiling to support lights in the desired spot.
The next section covers the three possible systems that can be used: flat garden, V-system, or column system.
Flat Garden
A flat garden is a garden for which the plants are all at the same level, such as on the floor. (Figure 3.11) The flat garden could be a simple dirt garden or an elaborate hydroponic system. Here is a list of building plans and maintenance for flat garden systems. They are listed from easiest to hardest.
Flat Garden Systems
1. Billy Bob’s Organic Hydroponic System, p. 150
2. Soilless Mix Improvisation, p. 175
3. Soil, p. 179
4. Wick System, p. 54
5. Flood and Drain, p. 49
6. Top-Feeding Bucket System, p. 66
7. PVC Pipe Systems; NFT, p. 116; top feed, p. 86; aero, p. 129
Single Crop
The easiest way to grow a flat garden is to grow midsize or large plants because they do not require too many plants and a grower can use all of the space from floor to ceiling.
Continual Crops
Billy Bob’s System on page 150, Wick System #1, Flood and Drain System on page 49, and Top-feeding buckets on page 66 explain easy ways to get continual crops in a flat garden.
Using flood tables is the easiest way to mass-produce seedlings for all growing systems: dirt, hydroponic, and aeroponic. For example, one standard 4×8-foot flood table with 2,200-watt compact fluorescent lights or 1,400-watt halide with track could be used to grow 288 seedlings for five weeks before they can be transplanted. A 4×4-foot table and a 200-watt compact fluorescent or 1, 400-watt halide could be used to start 144 seedlings until they are transplanted at 4 to 5 weeks old. A standard cloning flat can be used to root 96 clones; 2 flats fit under one 2-tube 4-foot fluorescent light fixture.
Important Rules of Vegetative Room Lighting
A stationary 400-watt bulb effectively covers up to 16 square feet of space. Using a light mover adds another 1/3 of usable space, resulting in about 21 square feet. A stationary 1,000-watt bulb effectively covers up to 64 square feet. A track or Sun Circle adds another 1/3 of usable square footage. Ideally, the ceiling height is between 7 to 10 feet. Figures 5.16 and 5.14 on page 213 in this chapter show a track and a circular mover like the Sun Circle. Many systems in this guide show light movers. Lights should run for 18 hours, with 6 hours of darkness.
If a Sun Circle is used, it should be placed in the middle of the room. The Sun Circle can move from 1 to 3 lights slowly around in a circle so that overhead lighting can cover an area effectively and bulbs can be positioned close to the plant tops. The Sun Circle is best used in a circular or square room.
If one track is used for the 1,000-watt halide, the best placement is in the middle of the room. Using an extension works well to make the track travel further. If one track is used for two 400-watt halides, the lights can be moved further apart as the plants get larger. Using a track allows the lightbulbs to get within inches of the plant tops. Tracks are advantageous when used in a rectangular room, because they move back and forth in a straight line.
Patience is necessary when wiring all light-moving gear together, especially the Sun Circle.
The safety box with the ballast and capacitor should be placed on insulation board on top of a brick or cement block. These materials can absorb the heat produced from a ballast. The ballast and capacitor could be placed in another room to keep the room temperature down, or placed somewhere a little heat is needed, such as a cool corner near an air-intake vent. The ballast can be hung with a sturdy coat hanger, or it can be surrounded with cinder blocks to keep down the humming noise.
Warning: Rubber shoes should always be worn in the room, because accidentally touching the capacitor connections with wet hands can send an unforgettable shock through the body.
Important Flower Room Rule
For every 4 to 25 square feet in the flower room, a 400-watt sodium or halide can be used for the light source. For every 16 to 64 square feet in the flower room, a 1,000-watt sodium or halide can be used. More light per square foot will give more productive results during budding if the climate is proper. These light-per-square-footage ranges are the high and low ends of the production scale and will affect crop yield if all other variables, such as proper airflow and fertilization, are met. Staying within these ranges is advised.
To keep it simple, the light kits should be plugged into a timer(s) set for 12 hours for the entire flowering process. Short day flowering plants need about 12 hours to produce the flowers. However, the time can be adjusted for the serious grower, such as using 13 hours of light for flowering with a particular strain, or using 10 hours at the end of the flowering process.
Lights may have to go into separate outlets, depending on the circuit amperage. A 1,000-watt, 400-watt kit and an oscillating fan will normally max out a regular household 15-amp circuit and an 1,875-watt timer. Regular household circuits in the U.S. and Canada run on 120 volts. Dryer and ovens run on 240 volts.
It is important to note that an old circuit in an old home may work fine for days at a time, then for whatever weird reason suddenly blow. These circuits are probably made with old wiring that is not up to code. Another possibility is that the circuit is shared with another suite in the building, and another tenant’s blow-dryer is causing the problem.
To bring electricity to a desired location, one option is to extend household wire to make another outlet; another is to use 10 to 12-gauge extension cord from another outlet. Using a 14-gauge or higher extension cord results in loss of voltage, especially if the electricity travels far distances. A 10-gauge extension cord will not have a voltage drop over 100 feet.
The small light timers that run only up to 1,875 watts cannot run two 1,000-watt light kits, even if the power is there. However, using two small timers (set exactly the same) in separate circuits of regular household current is effective, but the timers should be checked periodically to make sure that they go on and off at roughly the same time.
Using a dryer or oven circuit and having the light ballasts set for 240 volts would easily run all these lights in the bud room and more, but this requires a special timer from a hydroponic shop to run them all.
Changing voltages on the ballasts is simple. The wire with the volt reading is disconnected, e.g., 120 volts, and one of the other wires at the ballast and the 240-volt wire is connected in its place. The ballast will have a series of wires, 2 will say common (or com), and the others will have voltage readings, like 120v and 240v. Since one of the voltage wires will be connected (or the light will not work), it is easy to find that wire connected to electrical cord. That wire connected to the cord can be disconnected and the 240v wire can be connected in its place. Normally wire nuts are used to connect the wires or cap the unused wires with voltage readings. In the worst case scenario, electrical tape is used to keep the wires connected.
Since several lights can be used in a 240-volt outlet, growers tend to plug the lights into a metal box that has several outlets and the right plug for the outlet.
In a typical grow room that runs lights on a 240-volt circuit, only the lights will run on the different voltage; while the other grow room equipment will run in standard 120-volt household circuits.
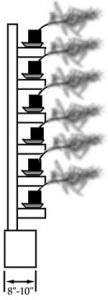
V-System
A V-system is a garden in which the plants are stacked in a V-shape to cover more space than a flat garden. The V-system could be a simple dirt garden or an elaborate hydroponic system. (Figure 3.12) Here is a list of the building plans and maintenance for V-systems, listed from easiest to hardest: NFT, top-feeding, aeroponic.

Single Crop
Growing one crop requires using the correct amount of plants for the system. A grower can acquire clones for the systems or make more clones, start seeds and clone the females, or use seedlings from start to finish.
Continual Crops
If a grower uses a V-system, plants can be acquired from another room that can produce a sufficient amount of clones or seedlings. All plants can be transplanted at the same time or at different stages of growth. For example, two 6-pipe V-systems for a bedroom will need 120 clones or 120 female seedlings if they are transplanted at once.
It is possible to make over 100 clones every 7 to 10 days with two 6-pipe V-systems.
Over the course of a 6-week crop, this system could make 400 or more clones, which is enough clones for 6 to 8 6-pipe V-systems.
Clones
A grower could keep a few mother plants, like 4 females, alive under a couple of 400-watt halides. Every week, every 2 weeks, or every complete harvest new clones can be transplanted into the pipes.
Plants that are in vegetative growth in a hydroponic system will grow much faster than plants that get fed every few days in dirt. A flood and drain system is the easiest way to grow mother plants for cuttings.
If a grower has space, 1 V-system could supply clones to 2 identical V-systems every week or two.
Seedlings
Five 4-foot fluorescent fixtures with female seedlings could provide this number at one time. A grower could use fluorescent fixtures with plants that are all 1 week different in age. At 5 weeks old, they can be transplanted into the pipes. Every week, 20 plants could be transplanted into the pipes to get a weekly harvest.
Column System
A column system is a garden in which the plants are placed in a circle around two or more bulbs. (Figure 3.14) Here is a list of the systems with building plans and maintenance instructions from easiest to most sophisticated: hand-feed, p. 94; top-feed #1, p. 97; plastic sacks, p. 112; top-feed #2, p. 105; aeroponic, p. 142.

Single Crop
Growing one crop requires using the correct amount of plants for the system. A grower can acquire clones for the systems or make more clones, start seeds and clone the females, or use seeds.
Continual Crops
If a grower uses a column system, plants can be acquired from another room that can produce sufficient amount of clones or seedlings. All plants can be transplanted at the same time or at different stages of growth. For example, one 12-pipe column system in a bedroom could use 72 to 100 clones or 72 to 100 female seedlings at one time if they are transplanted at once; 72 plants for the pipes, 28 plants for the floor.
It is possible to make over 100 clones every 7 to 10 days with one 12-pipe column system. Over the course of a 6-week crop, this system could make 400 or more clones, which is enough clones for 4 more column systems.
Clones
A grower could keep a few mother plants (e.g. 4 to 16) alive under a 1,000 to 2,400-watt halides in a flat garden consisting of 5 to 7-gallon pots. 4 to 8 plants would be plenty for continual harvesting while 8 to 16 should be plenty to get clones for a complete set-up. Every week, every 2 weeks, or every complete harvest new clones can be transplanted into the pipes. If a grower cuts 12 clones a week, or 24 clones every 2 weeks, he can keep a 72 plant system full of plants and harvest every week or two. Four plants is plenty to get 24 clones every 2 weeks .
If a grower has space, one V-system could supply clones to 2 identical V-systems every week or two.
Seedlings
Four 4-foot fluorescent fixtures with female seedlings could provide plants for a 72-plant column system at one time. A grower could use fluorescent fixtures with plants that are all 1 week different in age. At 5 weeks old, they can be transplanted into the pipes. Every week, 12 plants could be transplanted into the pipes to get a weekly harvest.
Starting the Equipment
The next step is to set one of the timers for 18 hours. A standard grounded household timer can handle 1,875-watts of power.
Next, the grounded adapter ( i.e. the power bar ) should be plugged into the timer. The lights and oscillating fan should also be plugged into that adapter. The timer is plugged into the wall. If more lights are used that would exceed the 1,875 watts, then a different timer that can run several lights at once is recommended. If a grower is running several lights, such as 3 to 8, it is best to use a 240-volt dryer or oven circuit because that circuit can handle more amperage. With a more powerful timer purchased from a hydroponic store, more lights can be hooked up to one circuit if they are running on a 240-volt circuit. The oscillating fan can be programmed to give intermittent cool breezes throughout the hours of darkness or it can run full-time.
The exhaust fan should be plugged into a separate outlet and left on. Things have now begun.
All lights and power-consuming gadgets in the vegetative room can run effectively on one standard 15-amp household circuit, if excessive power is not being used by other items. However, rooms larger than the size of common bedrooms will use more juice (electricity), since more lights will be used.
A fire extinguisher should be placed in an easily accessible location, because faulty household wiring and faulty ballast wiring have the potential to start a fire.
Transplanting
Now, the plants (clones and / or seedlings ) can be transplanted into the growing system of choice, for example the organic hydroponic technique discussed later on in this chapter. It’s more productive to grow flowering plants from cuttings, since the females, not the males, produce the desired flowers, and this way you can be assured of having female plants.
Clones: A clone may now be transplanted into the mix of each container. Clones are cuttings of plants taken from a mother plant. The clone will be genetically similar to the mother plant. Besides assuring female plants, clones are more productive because they grow quickly after they have formed roots, and they are “knowns,” unlike some seeds, which have scattered genetics and unpredictable growth cycles. A grower can buy clones or grow his own mother plant for his cuttings.
Chapter 2 explains cloning procedures and other facts regarding clones.
Seedlings: To transplant seedlings, 1 to 3 seedlings should be placed in each bucket at equal distances from each other and from the sides of the container, in a triangular pattern. One plant may do for a strain that grows large, but more may be needed for varieties that produce more volume. A grower can use female seeds or 0sex regular seeds that will have males and females. Sexing is described on page 15. Chapter 1 has more detailed instructions about starting plants from seed. Female seeds or sexing seedlings of a pure strain will be the most predictable way to use seedlings.
There are major disadvantages when seedlings are used to grow flowering plants. One problem is that they take about 5 weeks to outgrow the seedling phase to the point where they will put on quick mass similar to that of a newly rooted clone. Another setback is that seedlings might be males that do not produce the flowers, and that brings waste into the program as well as the chance of producing a seed crop rather than the desired seedless flowers.