
Top feeding with pipe has been a common way to grow small plants with narrow spacing. Plants like peppers and particularly lettuce are two plants that come to mind. The grade of pipe varies. Some growers only use recycle HDPE 2 while others use pvc and gutter pipe.
Top Feeding With Pipe
Option C: Top Feeding with PVC or Gutter Pipe
Tools
1. Drill and 31/2-inch hole saw.
2. Knife.
3. Wrench.
4. Handsaw or skill saw.
Materials
1. One small mesh per plant (i.e. 31/2 inches).
2. Two sawhorses to support the 8 to 12-foot lengths of pipe.
3. One alligator stake per plant.
4. One 1/8-inch fitting per plant.
5. One piece of 1/8-inch tubing connected from header line to an alligator stake per plant.
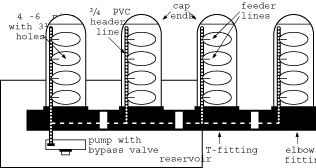
6. One reservoir.
7. Two 6-inch elbow fittings.
8. Six-inch pipe cut to equal lengths that are used to hold the plants.
9. Six-inch T-fittings for each length of 6-inch pipe, less the last pipe.
10. Mag drive pump.
11. Bypass valve.
12. 1/2-inch black poly tubing for header lines.
13. Two 1/2-inch black poly elbows.
14. 1/2-inch black poly Ts for each pipe, less the last pipe.
15. 1/2-inch black poly end cap for each that runs inside of the 6-inch pipe.
16. One 6 to 10-inch piece of PVC to connect drain line.
Procedure
A. The 4 to 6-inch pipe will be placed on something that supports it. A quick sawhorse can be made with cheap 2×4-inch wood (i.e. 2 to 3-foot lengths) with hinges that the 2×4 wood slides into. Another 2×4 (i.e. an 8-foot length) is placed between the hinges to complete an instant sawhorse.
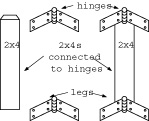
B. Two (or more) sawhorses can be used to support the connected pipes. Two sawhorses support an 8 to 12-foot length of 2×4-inch wood.
When the sawhorses are made, the side furthest from the reservoir should be the highest and at equal height. The side nearest the reservoir should be an inch or so lower for every 8-foot length so that the solution drains back into the reservoir.
C. All piping (i.e. 6-inch PVC) should be cut to the desired length.
D. Holes (3 1/2 inches) should be cut in the pipe at the desired spacing (i.e. 8 to 12-inch centers). The hole sizes must match the pot sizes in order to make a custom fit.
E. All lengths of large pipe must have end caps attached to the higher ends (i.e 1-inch higher) that are located at the far side from the reservoir.
F. 1/2-inch poly tubing should be run along the inside of the pipes until it reaches the end. It should be cut to a length that reaches the middle of the T-fittings and elbow fitting that will be connected to the larger pipe at the shorter end. The 1/2-inch poly tubing must have a 1/2-inch end cap at the end. The 1/2-inch poly tubing should have small holes punched into the tubing at the desired spacing (i.e. 10-inch centers); it should have fittings (i.e. 3/16, 1/8, 1/4-inch) inserted into each of the holes; and it should have a feeder line connected to the fitting.The appropriate sized tubing should be connected to the fittings in the header line. For example, 3/16-inch tubing should be connected to a 3/16-inch fitting. The tubing should be cut to a length that will reach the larger hole (for the pots) and with slack.
G. Small holes should be drilled into the pipe for the feeder tubing (i.e. 1/8, 3/16, 1/4-inch tubing) to be fed through. The hole should make for a snug fit.
H. All large 6-inch pipes (except the last pipe) are connected to their neighboring pipe with T-fittings. For example, 6-inch pipe will use 6-inch T-fittings. Small pieces of 6-inch pipe are placed between the T-fittings in order to connect the T-fittings and give the desired spacing (i.e. 10-inch centers).
I. The last pipe will have a 6-inch elbow fitting that connects to the 6-inch T-fitting of the second to last pipe. 6-inch pipe is placed between the 6-inch fittings.
J. The first 6-inch T-fitting (above the reservoir) can be connected to an elbow, then connected to larger pipe in order to send the solution downward into the reservoir without making a mess. A small piece of pipe is placed between the 6-inch T-fitting and elbow to secure the connection.
K. Another 1/2-inch poly line will run down through the 6-inch T-fittings and into the last elbow fitting of the large 6-inch pipe above the reservoir. This tubing will be connected to the other 1/2-inch poly tubing that runs through the lengths of pipe. All 1/2-inch tubing should have a 1/2-inch T-fitting inserted at the desired spacing (i.e. 10-inch centers), except for the very end. The very end will be attached to a 1/2-inch elbow. All of the fittings should be inserted before 1/2-inch tubing is run along the insides of the larger 6-inch T-fittings and elbow.
L. The 1/2-inch poly line with the 1/2-inch T-fittings and 1/2-inch elbow fitting should be run along the inside of the larger 6-inch T-fittings and elbow fittings.
M. The large 6-inch elbow fitting at the end (away from the reservoir) should be removed. The 1/2-inch elbow should be connected to the 1/2-inch line that runs through the inside of the large 6-inch pipe. Then the large 6-inch elbow and 6-inch T-fitting is reconnected. Piping and fittings can be glued with PVC cement (for PVC) pipe, but, the connections will be permanent. The system will not leak without glue; a little bit of duct tape can be used for securing connections so that disassembling is easy.
N. Each 6-inch T-fitting (starting from back to front) should be removed one at a time. When the 6-inch T-fitting is removed, the 1/2-inch poly lines should be connected together at the 1/2-inch T. Then, the larger pipe fittings are immediately connected back together after the smaller 1/2-inch tubing is connected to the inside of the larger T-fittings. Piping and fittings can be glued with PVC cement (for PVC) pipe, but, the connections will be permanent. The system will not leak without glue; a little bit of duct tape can be used for securing connections so that disassembling is easy.
O. At the first pipe (above the reservoir), there will be an open end of a 1/2-inch poly T. This loose end should be attached to a small piece (i.e. 3 inches) of 1/2-inch poly tubing. This tubing is connected to a 1/2-inch poly elbow. A proper length piece of 1/2-inch poly tubing is connected to the 1/2-inch elbow and connected to the pump. A 1/2-inch female fitting may need to be attached to the pump in order to connect the 1/2-inch tubing. This 1/2-inch tubing runs in the inside of the larger 6-inch piping.
P. Recommended Option: A 1/2-inch poly T should be inserted a few inches above the pump that sits at the bottom of the reservoir. A small piece (i.e. 3 Inches) of 1/2-inch poly tubing is connected to the 1/2-inch T. A bypass valve should be connected to the small piece of 1/2-inch tubing in order to control the flow rate.
Feeding
It is easiest to feed the plants with the pump timer running full-time, only during the light hours. A solar pump would run during these hours. But plants can be fed continuously (all day and all night). Also, plants can be fed intermittently (i.e. every 20 minutes for 2 minutes) during the light hours or perpertually.
Aeroponic Conversion
A. Each feeder line (i.e. 3/16-inch) that is connected to a pot is removed.
B. A mister should be inserted to the end of the feeder line. Another small hole should be drilled for the mister to fit into. The holes in the pipe should be made in between the pots. The fit for the feeder line must be snug and secure. If the original line is too short, a new line must be cut and put in its place.
C. The pump should be changed to a high-pressure pump designed for aeroponics. The pump should be the size required for the garden dimensions.
Note: With this aeroponic conversion, plants will need to be top-fed until the roots go through the bottom of the medium. Then the plants can misted intermittently (i.e. every 20 minutes for 2 minutes) during light. hours, and one misting in the middle of darkness.