
Soilless Mix / Forest Compost / Peat Moss
Step 1: Planning the Garden Dimensions or
Determining the Container Size.
Matching the right plant to the right place is the secret to success.
Option A: The Underground Garden
Digging a hole 1 to 2 feet deep in spring or up to a month before transplanting gives a plant a place to grow in the ground. The hole’s diameter should fall between 1 to 4 feet, though 1 to 2-foot holes may be preferred for smaller plants or non-bumper-crop years. The four-footer used in a hot summer in full sun would be a high-yielding, low-maintenance choice.
Another option is to dig a 1 to 2-foot deep trench that is 1-foot wide (or more).
Where should the digging take place?
In sandy soil if it is possible to water frequently in hot summer months. Excellent for regular feedings, sand helps warm the soil.
In clay soil if decent water and nutrient retention is wanted so that only a few visits are needed. Clay soil is cooler than sandy soil.
In bog soil if it is not too mucky. Good bog soil / peat will compact when it is squeezed and crumble when it is broken up. Watering is eliminated in a good bog. A grower must be careful because a good bog one year may flood in another year. Developing a relationship with the water table is necessary when planting in a bog. If the bog contains water pools and it is coated with sphagnum peat moss, flooding should not be a problem, even in the wettest years.
On a rock cliff. Here, instead of a digging a hole, the site is made 2 to 4 feet high with mix. This is the best bet for a wet season because of drainage, electromagnetism possibilities, and the possibilities of altering root temperature for proper warmth.
Option B: Container Garden
Using the proper container size is the first step. In other words, how big should the plants be grown? All things being equal in the mix, the larger the container, the larger the plant. However, to grow the larger plants, capitalizing on a full growing season is a must.
Late-starting plants have a limited growth potential, so in this case growers often use more plants to grow big flowers on the smaller plants.
For the highest possible yield when putting plants out in the early spring after the last threat of frost, it is recommended to use at least 15 to 20 gallons of mix per plant in a garbage bag, garbage can, or a box 3 feet square x 2 feet high (all well-draining). For smaller plants and late starts, using less mix is less wasteful.
A 1 to 3-inch layer of mushroom manure or steer manure in the bottom of the containers will provide nutritional fuel for the feeder roots that will bunch up at the bottom. Forgetting to feed the bottom roots is probably the biggest omission in the plant’s diet, unless supplemental feedings are frequently applied. A layer on the bottom cuts down on feeding maintenance.
For late transplanting, using a container ranging from 2 to 5 gallons will work fine, depending on how much of the season will be dedicated to vegetative growth. For example, in Northwest Washington State, a female clone transplanted in July may begin to flower soon after the transplant, leaving only a top flower. Therefore, a 2-gallon container will be sufficient. Lining up all the containers side by side and growing a Sea of Green is a possibility when small plants are grown for the top flowers. Another female clone may vegetate for 2 months, and finish flowering in mid-October. In this case, a 3 to 5-gallon container could fill up with roots.
Getting to know strains inside and out allows a grower to learn how to match the right plant with the right container.
The advantage of container plants is that they can be brought indoors to finish budding (i.e. at 2 to 3 weeks) under lights. This can make some plants more potent, looking like they were grown indoors. Some plants will be less potent grown outdoors. Sometimes when plants are grown outdoors, making a quick decision is part of the program, such as saving plants from molding.
Step 2: Making a Top-Quality Mix for the Plants
A quality homemade mix can be made with peat moss or forest compost, or may be prepared with a soilless mix that is purchased from the store. Store-bought goods are easier to work with because the pH is at the desired level and it is mixed with perlite and / or vermiculite, lime, and other goodies. On the other hand, homemade mixes are a lot cheaper, often less than half the price.
When soilless mix is purchased, it is sterilized and has a pH that needs no further adjusting. However, forest compost and peat moss can be substituted with soilless mix. The key is to get the pH right (5.5 to 7.0). Most forest compost has a pH of 5.2 to 5.5, while peat moss has a pH of 4.0 to 5.5, depending upon the source. When perlite and lime are added to peat moss or forest compost, the outcome is a basic soilless mix.
Here is a formula to raise the pH and prepare a quality mix using forest compost or peat moss:
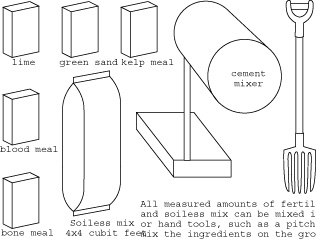
A. A 20-gallon garbage can (like the cheap Rubbermaid®) is filled 2/3 full with rich, black forest compost or peat moss.
B. Perlite is then added to the top. Then the mix is mixed thoroughly in the can, or it can be emptied onto the ground and mixed with a pitchfork or gloves. A respirator or good dust mask should be worn for all mixing.
C. 5 to 6 cups of fine dolomite lime and 3/4 to 1 cup of hydrated lime is added and thoroughly mixed in.
Forest compost and peat moss are good mediums for affordable homemade recipes. A grower can make homemade mixes before following the examples for adding fertilizers to the homemade soilless mix. The pH should be higher than 5.5 and less than 7.0.
Forest compost comes from a mature forest. It exists in a mature forest under a layer of sticks and needles. It is located a few inches beneath the needle layer. Some stores sell forest compost mixtures. It is usually free of stones and has a ph greater than 5. All loose roots should be removed from forest compost before it is used.
Peat moss comes from peat bogs. Peat bogs exist in areas of poor drainage that stay wet all year long.
D. A fertilizer combination is added to the soilless mix. There are 8 recipe examples on the next pages.
Organic Fertilizing Recipes for Soilless Mix, Forest Compost, and Peat Moss Mix
Note: mix without soil is classed as organic hydroponic.
1. Four 3.8 to 4 cubic foot bales of Sunshine® #2 Mix, Jiffy Mixtm, Pro Mixtm, or other soilless mix.
2. Four bags of composted steer manure (20 to 30 quarts each bag).
3. One gallon of blood meal.
4. One gallon of steamed bonemeal.
5. One gallon of greensand.
6. Two quarts of kelp meal.
7. 0 to 50 quarts of perlite and / or 0 to 50 quarts of vermiculite.
8. Up to one-third parts soil.
1. One 3.8 to 4.0 cubic foot bale of Sunshine® #2 Mix, Jiffy Mixtm, Pro Mixtm, or other soilless mix.
2. One 10kg bag of Welcome Harvest Farmtm Flower Power.
3. 1/2 to 1 bag of composted steer manure (10 to 30 quarts).
4. One quart of alfalfa meal.
5. 0 to 40 quarts of perlite.
6. Up to one-third parts soil.
1. One 3.8 to 4.0 cubic foot bale of Sunshine® #2 Mix, Jiffy Mixtm, or Pro Mixtm.
2. 5kg of Welcome Harvest Farmtm Flower Power.
3. One 20 to 30 quart bag of composted steer manure.
4. Eight cups of canola meal.
5. Three cups of blood meal.
6. 1 quart of greensand.
7. Perlite and vermiculite, as desired.
8. Up to one-third parts soil.
1. One 3.8 to 4.0 cubic foot bale of Sunshine #2 Mixtm, Jiffy Mixtm, or Pro Mixtm.
2. 1/2 bag (10 to 15 quarts) of chicken manure.
3. 1/2 bag (10 to 15 quarts) of composted steer manure.
4. Four cups of blood meal.
5. Four cups of kelp meal.
6. Four cups of greensand.
7. Four cups of steamed bonemeal (pellet form).
8. 0 to 4 quarts (liters) well-decomposed compost.
9. 0 to 50 quarts of any combination of perlite and vermiculite.
10. Up to one-third parts soil.
1. One 3.8 to 4.0 cubic foot bale of Sunshine® #2 Mix, Jiffy Mixtm, Pro Mixtm, or other soilless mix.
2. One bag of mushroom manure (20 to 30 quarts [liters]).
3. Two cups of langbeinite.
4. Four cups of greensand.
5. Four cups of kelp meal.
6. One quart of blood meal.
7. One quart of steamed bonemeal.
8. 2.2kg of Welcome Harvest Farmtm Flower Power.
9. 0 to 30 quarts of vermiculite and / or perlite.
10. Up to one-third parts soil.
1. One 3.8 to 4.0 cubic foot bale of Sunshine® #2 Mix, Jiffy Mixtm, Pro Mixtm, or other soilless mix.
2. 9kg (20lbs) of pure earthworm castings (beware of imitators).
3. One 20 to 30 quart bag of composted steer manure.
4. One 5kg bag of Welcome Harvest Farmtm Flower Power.
5. Perlite / vermiculite combination, as desired.
6. Up to one-third parts soil.
1. One 3.8 to 4.0 cubic foot bale of Sunshine® #2 Mix, Jiffy Mixtm, Pro Mixtm, or other soilless mix.
2. 9kg (20lbs) of pure earthworm castings.
3. One 20 to 30 quart bag of composted steer manure.
4. One quart of blood meal.
5. Two quarts of steamed bonemeal.
6. One quart of kelp meal.
7. One quart of greensand.
8. 0 to 50 quarts or any perlite / vermiculite combination.
9. Up to one-third parts soil.
1. One 3.8 to 4.0 cubic foot bale of Sunshine® #2 Mix, Jiffy Mixtm, Pro Mixtm, or other soilless mix.
2. 9kg (20lbs) of pure earthworm castings.
3. 20 quarts of well decomposed compost.
4. One quart of bonemeal.
5. One quart of greensand.
6. 0 to 50 quarts of any perlite / vermiculite combination.
7. Up to one-third parts soil.
Why is soilless mix used?
It is made from organic peat, which holds nutrients, moisture, and air very effectively. It is versatile for all climates, and the grower has complete control over the fertilizing of the grow medium. Also, it is pH buffered which allows pH control. To put it simply, it allows the grower to get high-end results with minimal effort, for it does most of the work.
Calcium peroxide, available under many trade names, can be added to any mixture. It breaks down into oxygen and lime.
Other Organic Fertilizer Substitutes
Nitrogen
Some people don’t like using blood meal, although it is one of the cheapest and strongest-acting dried nitrogen sources for the amount used. The numbers on the organic fertilizer packs do not represent the nitrogen of value to the plant, they represent the percentage of the fertilizer in the product. All organic nitrogen fertilizers release nitrogen at different rates. Other nitrogen sources are composted chicken manure, earthworm castings, fish meal, alfalfa meal, feather meal, and canola meal.
Phosphorous
Rock phosphate is a phosphorous additive. This can work well on its own or in combination with bonemeal. Bonemeal and rock phosphate release phosphorous for an entire growing season.
Potash
Kelp meal and greensand are good sources, and so is langbeinite. Crushed granite is good too, but it should be the type that contains a decent supply of potassium feldspar. Greensand releases slowly and for more than a season. Nevertheless, a cup per plant each year is good to add. Kelp has a single-season limitation.
Trace Minerals
There is no substitute for the many trace elements that kelp releases. However, many mined minerals work well too, such as greensand, Pyro Claytm, and Mineral Magictm.
Some liquid organic fertilizers, such as Earth Juice® and Meta Naturalstm have formulas that are made to contain trace elements.
Organic Fertilizer Chart (N=Nitrogen, P=Phosphorous, K=Potash)
Fertilizer N P K Sea Mixtm 3-2-2 3 2 2
best, all-purpose-water-soluble fertilizer
alfalfa meal 3 0 2
contains fatty acid, triaconatol, to stimulate growth
bat guano 2 11 0
can be top-dressed over soil, or dissolved in water
blood meal 14 0 0
fast and long-acting supply of nitrogen (6 months +)
bonemeal (steamed) 3 15 0
fast and long-acting source of phosphorous (5 months +)
canola meal 6 2.5 1
very affordable
chicken manure (composted) 2 7 2
numbers vary; adds organic matter; makes a good fertilizer tea
compost 1 1 1
adds organic matter and is a good use of household waste
cottonseed meal 7 3 2
good amendment for a soil with worm activity
earthworm castings 5 1 1
acidic; improves soil structure, makes a good fertilizer tea
Epsom salts 0 0 0
a water-soluble source for magnesium and sulphur
feather meal 14 0 0
good nitrogen source
fish and crab meal 8 5 1
trace elements
fish-bone meal 5 22 1
lots of calcium
fish emulsion or powder 5 to 12 1 to 2 1 to 2
water soluble
flaxseed meal 6 3 2
mix into soil
Organic Fertilizer Chart continued
Fertilizer N P K Flower Powertm 4 10 4
an organic blend containing a variety of fertilizers
granite (crushed) 0 0 8
best with high potassium feldspar content
greensand 0 1 8
releases potassium for several years
horn and hoof meal 14 1 0
strong source of nitrogen
kelp meal 1 1 2
the king of naturally occurring trace minerals
langbeinite 0 0 22
can be agitated and dissolved for faster availability
limestone 0 0 0
for calcium, and to neutralize pH of soil / mix
mushroom manure 1 1 1
adds organic matter and provides many nutrients
rock phosphate 0 27 0
contains a good supply of calcium
steer manure 1 1 1
near neutral pH, and adds trace minerals and organic matter
sunflower hull ash 0 0 44
one of the strongest fast-acting sources of potash available
Super Grow Mixtm 4 4 4
an organic fertilizer mix for general gardening needs
wood ashes 0 0 8
increases pH, water soluble
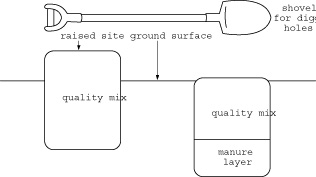
Step 3 : Putting the Mix in the Desired Spot
For an underground garden, the mix should be placed into a proper hole. Building a 6-inch to 2-foot raised bed above the hole allows for extra drainage, warmer roots, and more predator control. An option is to apply a manure layer on the bottom of the hole, before the mix is deposited into the hole. For a container garden, a grower should fill up the containers and moisten the mix before transplanting. Transplanting is discussed on pages 106 to 107.
Step 4 : Supplemental Fertilization and Watering
Additional liquid, or water-soluble powder fertilizers used at half strength to full strength, are safe additives every week or two.
Chemical Cheat Sheet
Organic fertilizers work well on their own, but they can be used in conjunction with chemical fertilizers.
Many growers use dried and water-soluble organic fertilizers throughout vegetative growth, then switch to chemical fertilizers during bloom.
Another approach is to use a synthetic blend of water-soluble chemical fertilizers during vegetative growth as well. Often a single application of a cheap chemical fertilizer during vegetative growth will push a plant further than no application at all.
All formulas given already in this chapter will work, but here are some more that have done well for plants in vegetative growth or flowering.
Water-Soluble Fertilizers
Vegetative Growth
During vegetative growth, applying one or more applications of a water-soluble chemical fertilizer, such as half to full strength 20-20-20, will produce more vigorous growth. Adding epsom salts (1/2-teaspoon per gallon) and the recommended rate of liquid kelp works well with a synthetic chemical blend.
The beauty of adding the odd chemical fertilizer application with the organic mix is that plants do not need these chemicals on a regular basis, since so many other sources of the nutrition are already available. And the odd shot of chemical fertilizer will not build up salts in the soil to the point where reusing the grow medium in the future will give deficient results.
Product quality will not be sacrificed if chemical and organic fertilizers reach a harmonic balance when used together.
Note: Since every part of the world has different environmental conditions, optimal combinations of organic and chemical fertilizers will be different in different areas. For example, in areas of high rainfall, rain leaches the soil every year. In the desert, salts will accumulate.
Studies have shown that in the rainforest, upwards of five chemical fertilizations in a single season would not repel earthworms from a mix the following year. This may not hold true in another location.
Bloom
During bloom, use one to three applications of a water-soluble chemical fertilizer such as Miracle Grow® 15-30-15, Plant Prod 15-30-15, General Hydroponics® Bloom, Supernatural®, Advance Nutrients, or Dyna Bloom. The dose can range anywhere from half to full strength. Epsom salts (added at 1/2-teaspoon per gallon) and the recommended rate of liquid kelp can be added to the chemical fertilizer, too. Fertilizers should not be added for the last two to three weeks of blooming. If a grower forgets, plants must get a good flushing to remove salts in the growing medium no less than a week before harvesting. Quality will be a borderline issue.
However, flushing with plain water or a flushing solution may be needed to give the product a final, quality touch, especially for those plants receiving heavy feedings.
Watering
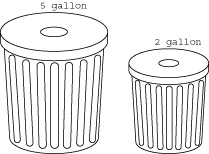
In addition to supplemental feeding, frequent watering during the hot summer months may be needed. When the mix feels dry to a depth of 6 to 8 inches or more in a 1 to 2-foot raised bed or other permanent site, a grower should water the plants. Container plants will consume different amounts of water for different container sizes. For example, a dry 5-gallon bucket with a plant may need 1 to 5 gallons of water, depending on the situation. Another plant in a dry 20-gallon can may need 5 gallons but prefer 10 gallons. Plants that receive a good supply of water grow better.
There are many possibilities for dealing with the water supply; for example, a gravity feeding unit, a portable electric pump, black plastic water traps, water drums, a solar pump, a gas water-pumping system, or a well. A sprinkler system can be attached to a flowing water supply.
Another approach is to cover a plant site with a thick layer of straw, bark, weed-free hay, sphagnum peat moss (if available at the site), black plastic, or wood chips, all of which help retain moisture in the mix. One grower placed a 45-gallon drum in a flowing body of water and connected a series of tubing that became gradually narrower, resulting in a lot of pressure buildup in the line, which forced the water uphill to the site.
Burying buckets and garbage bags instead of exposing them will cut back dramatically on watering maintenance, especially in moist areas.
Placing a Myco Pak under each plant at transplanting time seems to lower watering needs.
It is critical that a grower understand the direct and overlapping relationships between strain, timing of transplant, quality of mix, and container size, to mention only a few issues. A grower should get his feet in the water to get a grip on these realities.
Placing the garden in a moist location is the easiest and cheapest way to grow a low-maintenance garden.
Step 5: Flushing Out Fertilizer
When procedures in this manual are followed, the final product should be of top quality. However, flushing plants with lots of plain water two weeks before harvest and upwards until harvest can remove lots of salts.
This flushing will improve the final product. In general, these formulas with organic mixes should work out fine without the need for flushing, unless many supplemental feedings are added. A major benefit of organic fertilizer use, is that salts are not a by-product of organic fertilizers, unlike chemical fertilizers, especially the cheap ones.
Flushing is often more necessary for chemically grown plants, so that the outcome is produce of a higher quality. In most cases, using too many chemical fertilizers will affect the final quality if they are not flushed out of the mix.
If making one to five applications of chemical fertilizer in a single season during vegetative growth and the flowering process, the mix will not deal with the detrimental levels of salt buildup, even without doing a serious flush.
Nevertheless, adding a few doses of chemical fertilizer during cultivation can increase the volume, without sacrifice to quality.
If flushing is necessary, using large amounts of plain water or one of the many flushing formulas available in the market today is recommended. These flushing formulas attach to the fertilizer salts and unused elements in the growing medium so that they will be removed. Some clearing solutions come in flavors like pina colada and strawberry. Some flushing formulas should be followed up with a dose of plain water in order to remove an undesirable flavor.