
Soilless Mix Systems
Soilless mix composed chiefly of peat moss is unquestionably the most versatile horticultural medium. It comes under trade names such as Sunshine Mix, Pro Mix and Jiffy Mix.
If plenty is used, feeding could be as minimal as once a week when the medium begins to dry out. Soilless mix is best used to keep the workload down because it retains a lot of moisture and nutrients between periodic feedings. Feeding immediately after it is daylight or when lights start up is a good time to periodically saturate this medium.
Nevertheless, if soilless mix is fed continuously with a top-feeding hydroponic system, plant growth will be much faster. Note that flow rate is critical with Sunshine Mixtm. If the flow is too fast, water will form puddles and overflow out of the containers. With soilless mix, continuous feeding works best with slow feeding and large containers.
Another way to run solution through soilless mix is to set an intermittent timer to operate for a couple of minutes at a time, several times per day (i.e. 6 times).
Soilless mix systems are discussed on pages 48 to 75. Soilless Mix Improvisation on pages 56 to 75 gives popular methods for low-maintenance outdoor gardens.
Billy Bob’s Organic Hydroponic System Using Soilless Mix
Complete Set-Up
Materials
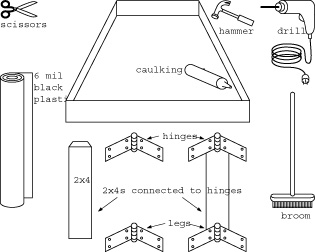
1. Two plastic flood tables, available at hydroponic shops; or two sheets of 3/4-inch plywood, six pieces of 1×2-inch wood (cheapest), and 17 feet of 10-foot wide black poly plastic (thick). Available at hardware stores or building supply shops. Custom sizing may be needed for a particular room size. As an easier option, plant dishes, which are cheap and available at garden centers, can be placed under the containers.
2. Sawhorses to support tables.
3. One 5-gallon bucket for each flood table, to catch runoff solution. Found all over the place.
4. One or two bales (3.0 to 8 cubic feet) of Sunshine® #2 mix, unfertilized Pro-Mixtm, Jiffy Mixtm, or other unfertilized soilless mix that is pH buffered at near neutral (6.0 to 7.0) and is mainly composed of peat, perlite, and lime. Available at garden centers, mercantile wholesalers, and hydroponic shops. Bales are often found in 2.0- and 3.8-cubic feet sizes. (Room size is the important factor in determining the correct size.) Note: one bale fills about ten 5-gallon containers.
5. 2 to 20 buckets (or 2 to 20 nursery pots). The number of buckets depends on the size of the room. Smaller gallon buckets (1 to 3-gallon sizes) are good for growing a large number of small plants. Larger containers (5 to 20-gallon buckets) are good for growing a small number of large plants. Both methods are effective.
6. Fertilizing materials. (Feeding and formulas are discussed on pages 84 to 103.)
Procedure
A. Now that the basic set-up is out of the way, the mix comes next. A tarp should be laid down for placing and breaking up the chunks of soilless mix.
B. Several drainage holes (up to 75% hole space, meaning that only 25% of the bottom will be showing plastic) should be inserted into the bucket bottoms, using a sharp knife, unless nursery containers with premade holes are used.
C. The containers with the mix can be placed on a flood table. Directions for building a flood table are described on pages 19 to 21. A simpler alternative to the flood table is to use plant dishes to catch runoff solution, or a bucket placed under each flood table to catch the runoff solution.
A respirator or at least some sort of dust mask should be worn when mixing all of the components. If care is not taken here, materials such as soilless mix and other fertilizers can get into the lungs.
The buckets should be filled about one-inch from the top with the soilless mixture.
The buckets are watered until they get a good soaking.
D. Plants can now be transplanted into the mix.
Other Mix-Making Options
An option is to add earthworm castings (9kg (20lbs) of castings per 3.8 to 4.0 cubic feet bale) and / or 1/4 to 1/2 bag of perlite or vermiculite. Adding inexpensive perlite is recommended for extra aeration in the mix and for its pH near neutral (7.0) characteristic.
The mix in this program is actually of organic hydroponic quality; to qualify in the soilless mix category, a formula must be less than 10% inorganic soil. This formula is much more than 90% soilless. The organic peat, gypsum, dolomite lime, earthworm castings, and perlite all qualify as soilless.
Technical Add-ons
Option A: Flood and Drain Add-on
Instead of feeding the plants periodically from the top, the plants can be fed from flooding and draining the bottom roots.
The plants will adjust and roots will feed while growing out the bottoms of the containers. This will be more productive than regular feeding. Plants will no longer need to be fed from the top.
When the top of the mix stays wet, air to the roots is lost. However, if the top of the mix stays wet, this moisture will act like a parachute if anything goes wrong with flooding and draining, such as perlite compaction clogging a filter, or bat guano clogging up panty hose which will restrict the pumping capacity of the pump.
Adding this flood and drain option is possible during any part of the program. (Building a flood and drain system is discussed in this chapter on pages 19 to 21.)
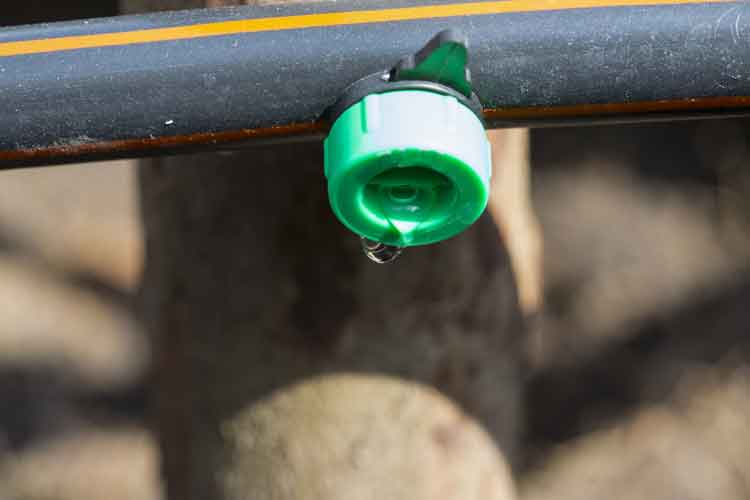
Watering made easy as dripper is inserted directly into feeder line
Option B: Top-Feeding Add-on
Plants can be fed periodically or continuously with top feeding. For organic fertilizers, 1/4-inch lines are recommended. Plants can be top-fed in the soilless mix, or they can be transplanted into a larger container of a different grow medium, such as clay, and then top-fed from there. (Top-feeding details and full set-up are explained in this chapter on pages 29 to 33.)
Option C: Drip-Watering System
Hand-watering can be done relatively quickly and is, of course, the cheapest way to go. However, installing a drip system (with or without a computer timer) may allow for easy living. With a drip system, gravity causes liquid to flow from a high elevation downward into the pots.
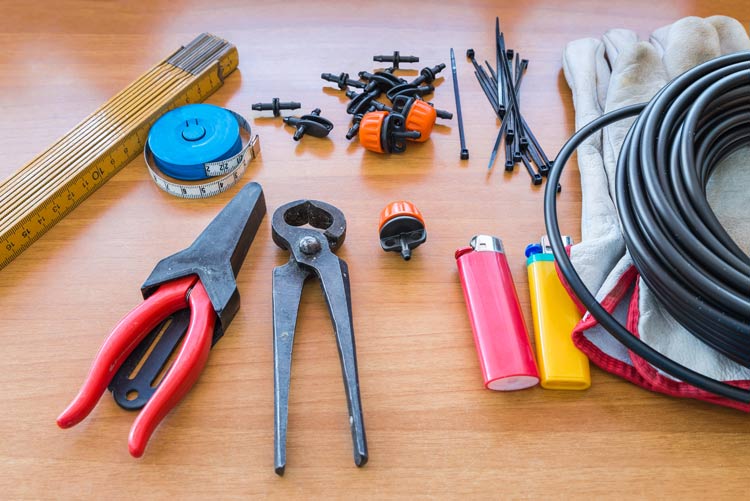
Typical parts for drip irrigation; tube cutter, stakes(in this case zap straps), barbed fittings and drippers
Note: The materials for this drip system use 1/4-inch sizes for the lines, barbed fittings and drippers. But, 1/8-inch sizes can be used for the lines, barbed fittings and drippers can be used as a replacement.
Tools
1. Drill.
2. One-inch hole saw.
3. A small drill bit (less than 1/8-inch).
4. Handsaw.
Materials
1. A container that holds at least 2 quarts (liters) per plant.
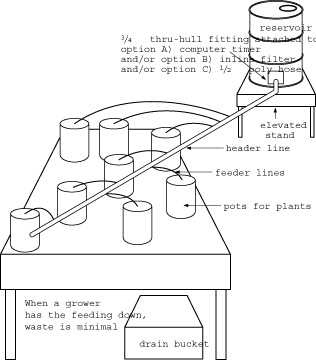
2. 3/4-inch thru-hull fitting with O-ring.
3. Tap (for turning off and on).
4. PVC fitting with a 3/4-inch threaded female end and a 1/2-inch end for the polybutylene tubing to fit on.
5. 1/2-inch PVC end cap.
6. 1/8-inch barbed fittings to plug into header line (one for each plant).
7. 1/4-inch drippers; one per plant.
8. 20 feet of 1/2-inch polybutylene tubing (or what is needed).
9. 50 feet and probably more of 1/8-inch polybutylene tubing.
10. Silicone.
11. In-line filter unit and filter with 3/4-inch threads (male and female).
12. Computerized water timer (optional) Should be available at garden centers, hydroponic shops, and water supply businesses.
13. Support system for the reservoir.
14. Sandpaper for plastic (any coarseness).
15. One small c-clamp (optional).
16. Hole punch for 1/8-inch fittings into header line.
17. Teflon tape.
Procedure
A. Using a 1-inch hole saw, a 1-inch hole is drilled into the side of the reservoir, 2 to 3 inches from the bottom.
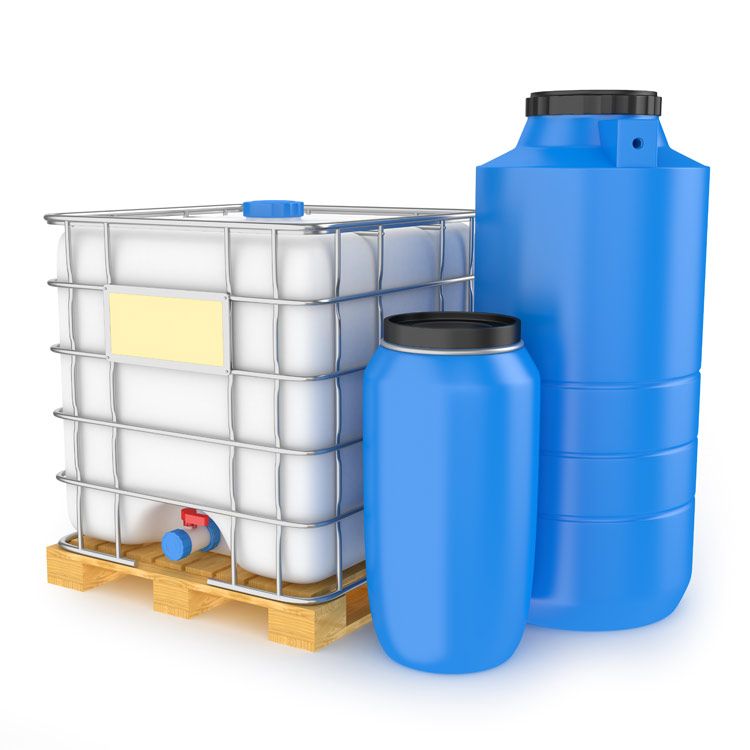
Reservoirs can be food grade items. Larger, cheap options are blue 55-gallon drums and white 250 gallon drums because they are used to ship food grade items in bulk and sell cheap when emptied.
B. Inserting the 3/4-inch thru-hull fitting into the 1-inch hole is next. The O-ring is on the inside of the reservoir, and the threads are on the outside of the can.
C. The fitting should be cut at the end of the threads located furthest from the garbage can. This cut should be vertical and uniform. The plastic particulate must be sanded before screwing the tap on. Teflon tape can be placed on the threads in order to prevent leaks.
D. The in-line filter is connected. This will give decent results and be easy to clean. The entire water-holding unit should be located high in the corner of the room. A platform built of plywood scraps (or other junk) gives support for the liquid solutions.
E. Optional. The computerized timer can be fastened. If it is not included, then the female end of the 3/4-inch PVC fitting is fastened to the in-line filter.
F. The 1/2-inch tubing should be gently connected to the last fitting so that it is secure, yet allows for easy removal of the line to clean the filter. This should hold sufficiently, but a small c-clamp may also be added to the connection for extra safety.
G. 1/2-inch tubing is extended diagonally across the garden until it reaches the far end corner of a flood table and rests on the surface.
H. The end of the 1/2-inch tubing is cut, and the 1/2-inch end cap is inserted. That joint may be c-clamped.
I. Somewhere along the lower elevated part of the header line (but higher than the containers), holes should be punched into the line. The number of holes should be equal to the number of plant containers.
J. Small holes are drilled into the tops of the containers (above the mix) for the 1/8-inch tubing to be inserted snugly, or the tubing can be placed into alligator stakes. If too many holes are made by accident, plugs can be used to fill the holes.
K. The 1/2-inch tubing is linked between each individual 1/8-inch fitting from the header and each individual plant, without leaving too much slack.
L. If there are any leaks in the polybutylene after testing (such as leaks in the joints), silicone can be used to seal leaks. Silicone must be applied to dry tubing and it must be allowed to dry.
M. As plants get larger and need to be spaced out, more 1/8-inch tubing will be needed to replace some of the existing tubing. Tubing can be reused.
N. Optional
Drippers can be inserted into the end of each line to control the flow rate. They can be purchased in rates like 21/2 quarts (or litres) per hour. Drippers allow the water to stay in an area about one-foot in diameter.
This drip system will be trouble-free when plain water is passed through the tubing.
Some fertilizers, such as bat guano and Sea mixtm, water with particulate, and other forms of debris can clog the in-line filter, the 1/8-inch fittings, or the 1/2-inch tubing.
However, many fertilizing mixes will not clog the lines. Monitor the system carefully so that disasters such as plants going without solution do not occur. Cleaning the filter frequently by rinsing it with plain water and removing the 1/2-inch end cap and flushing the system with plain water is a useful maintenance.
Blowing or sucking the ends of 1/8-inch end tubing helps remove clogs. But if that is necessary, a flush of the system may be necessary.
If the computer timer is part of the setup, it should be set to run for plenty of time, so that it will not shut off during the drip process. Using the computer is risky business, because it may be used when nobody is at the site. Why else would it be needed? If the site is vacated, electronic malfunctions, battery failure, clogs in the system, or fluke leaks are all possible. Leaks should not occur in any system that uses tubing to deliver solution to the plants. But, should one occur, silicone applied to clean, dry plastic will seal a leak.
Going without the computer and taking advantage of the ease of a drip system is already beneficial.