A Frame(Cascade) Hydroponic System Using PVC Pipe
NFT System B
Introduction
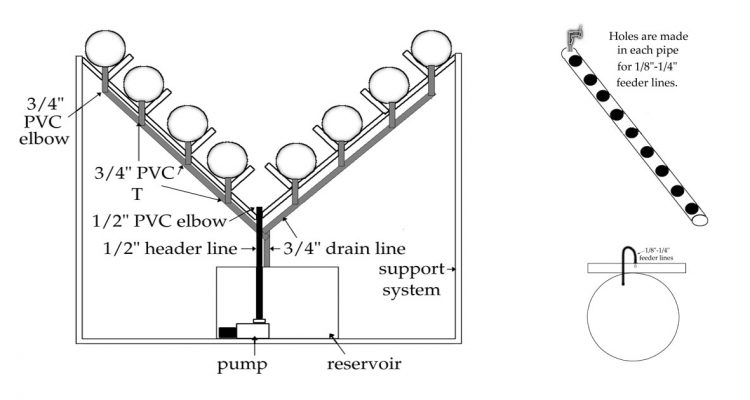
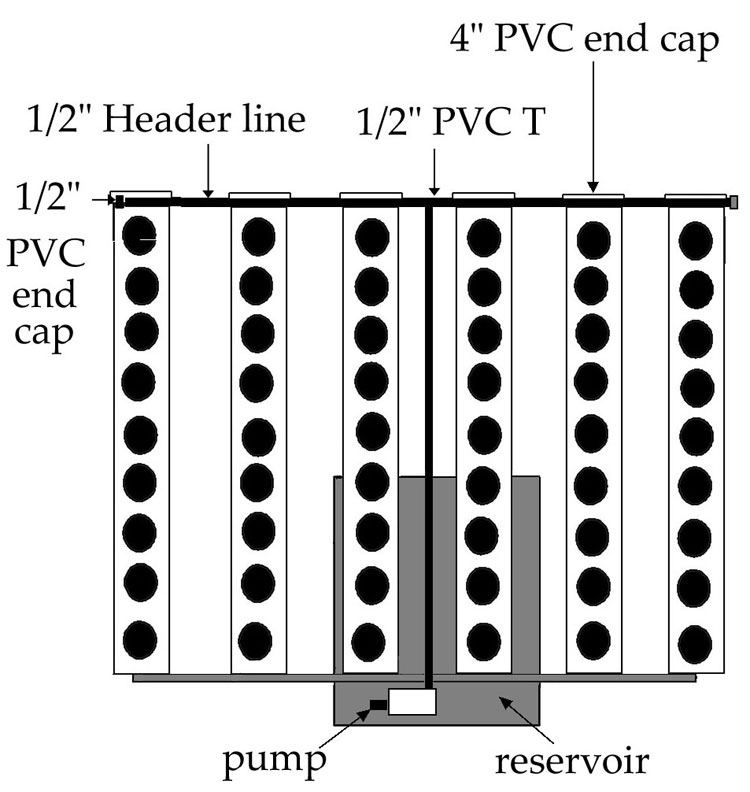
NFT works likes this: the solution is pumped from the reservoir along the 1/2-inch tubing that runs along the back of the 4-inch PVC pipes. Then, the solution leaves the 1/2-inch tubing through small holes under the tubing. This solution runs along the bottom of each 4-inch PVC pipe until it goes back to the reservoir.
The plant feeds from this solution running down the pipe. It is optional to put a medium in the pipe. It makes a garden more trouble free, but adds a higher cost and more work. All the same, since a grower only has to feed once per day, this is much easier on the head than having a garden with plumming running all day if the garden is in a risky spot like an apartment.
Light weight mediums like soilless mix, perlite, vermiculite or coco fibers could be used. Lightweight mediums that do not compact like clay, lavarock, perlite, vermiculite are good choices to use because compacting mediums like soilless mix and peat moss can be time consumming to re-moisten after they shrink into a compacted mess. They will repel more water than when they have somemoisture.
This system uses two lights and six 4 to 5-inch PVC pipes. The pipes are placed in a V position. This system can produce more volume per square foot than the flat PVC pipe system. The systems described in this section can be used in a 4×5 or 5×8 space.
Tools
1. Saw.
2. Drill
3. One-inch holesaw.
4. 3 to 31/2-inch holesaw.
5. Line punch or 1/16-inch drill bit.
6. Hammer.
7. Crescent wrench.
Construction
A. Two 3-foot pieces of 2×4 wood are nailed together with 3 to 4-inch nails to make a 90° angle. (Figure 4.192)
B. Both sides should be cut at a 45° angle at 2 feet high.
C. Three 6-inch pieces of 2×4 are nailed to each side of the V-shaped piece of wood.
D. The V is nailed to two 4-foot pieces of 2×4.
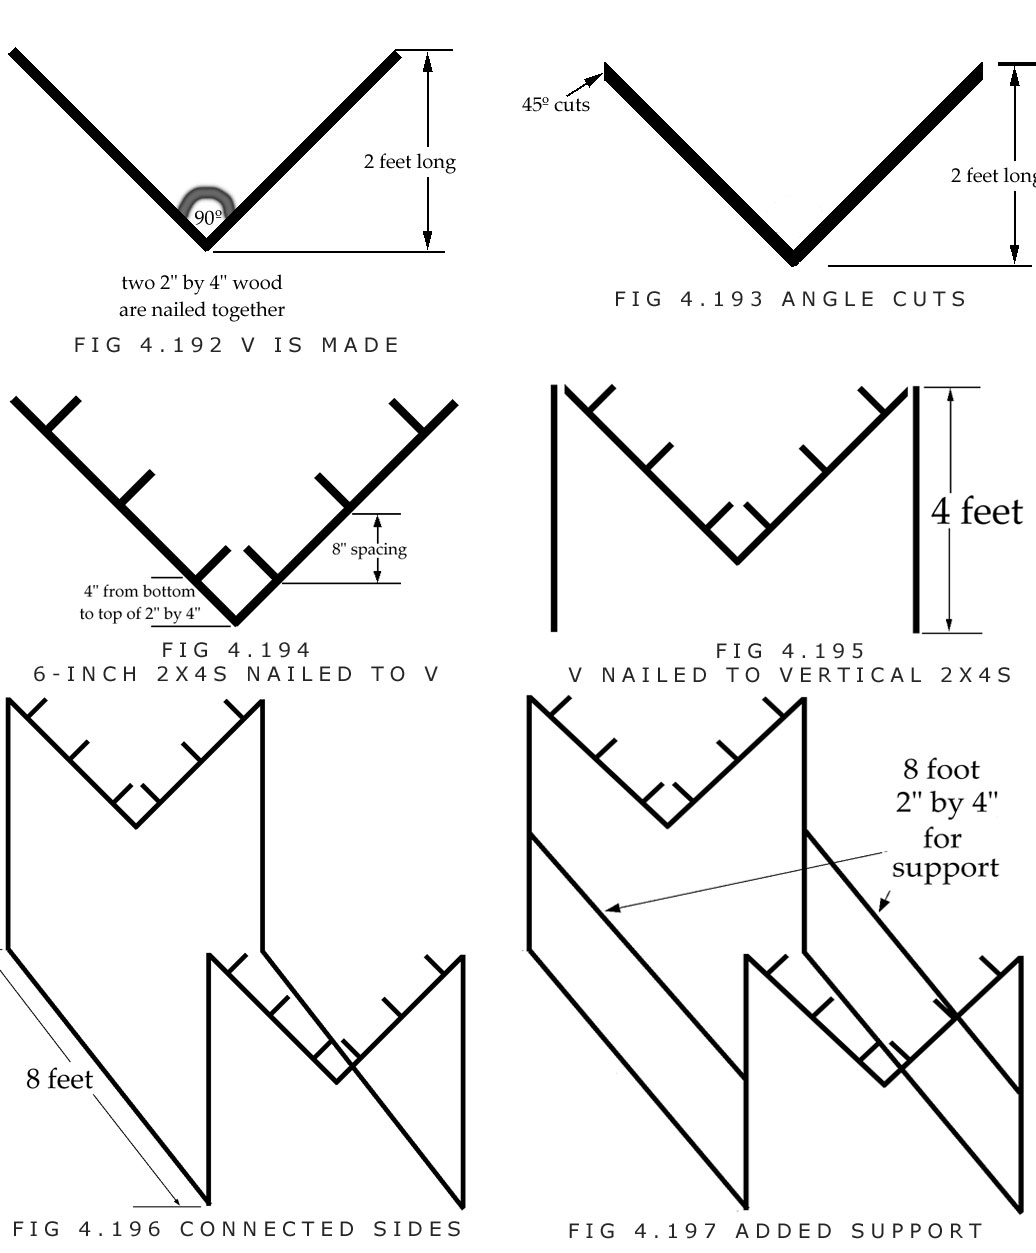
E. The M-shaped pieces are connected together with two 7 to 8-foot pieces of 2×4.
F. Two 7 to 8-foot pieces of 2×4 are nailed halfway up the lengths for additional support.
G. Two 2x4s are nailed from V to V.
H. Two pieces of 2×4 are nailed to the front and back of the frame for extra support.
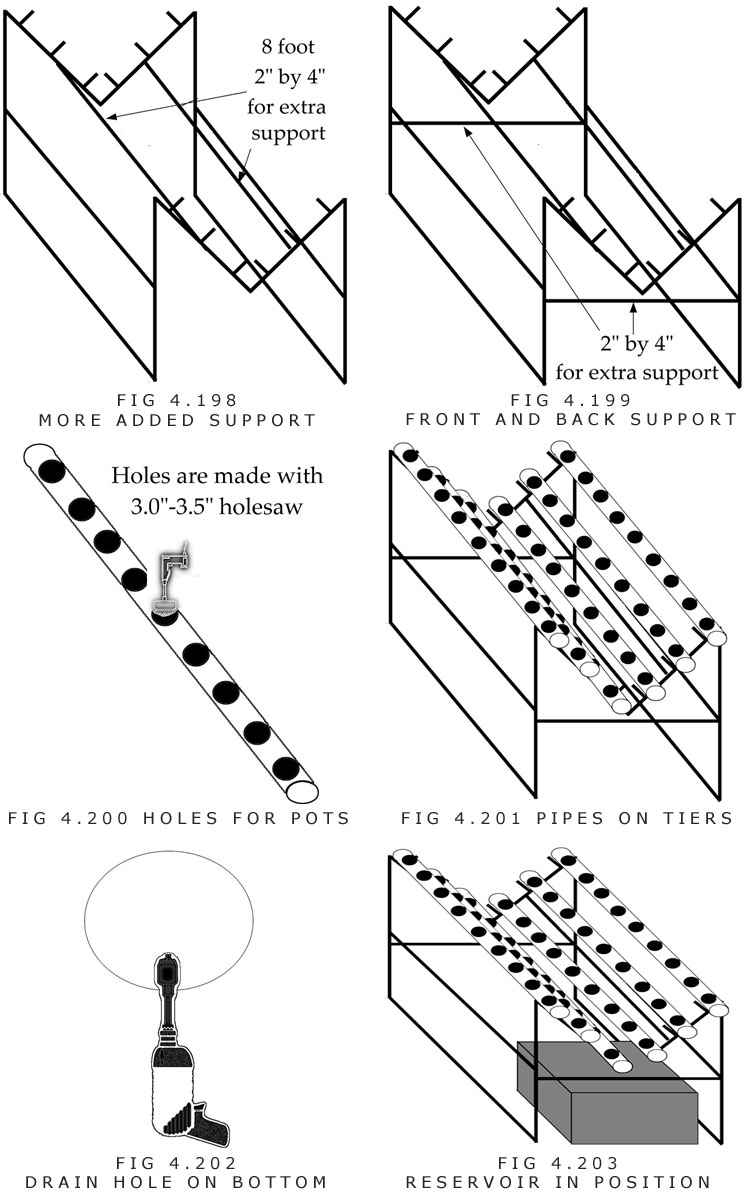
I. Holes are cut into the pipes at 8 to 10-inch centers. This makes 9 to 11 sites per 8-foot piece of pipe. Pipes are placed on stand.
J. A 1-inch holesaw is used to cut holes on the bottom of each pipe for thru-hull fittings. The hole is made in the front.
K. A reservoir is placed under the system.
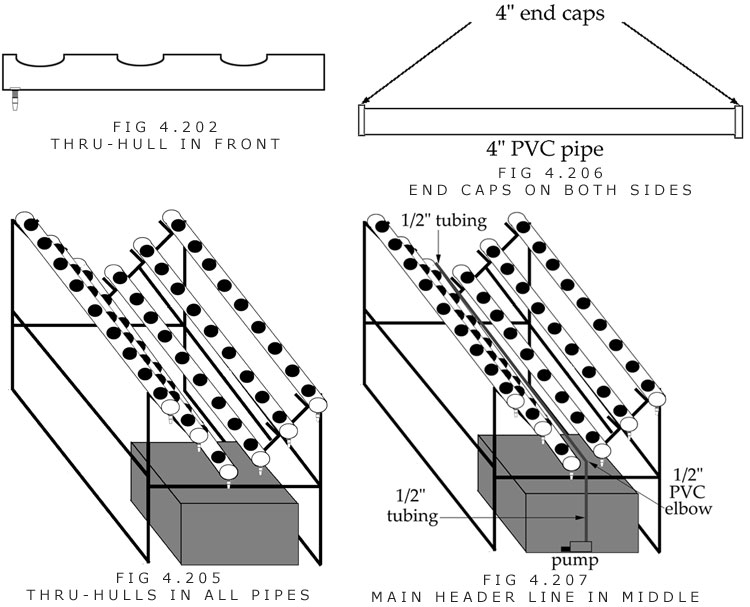
L. A 3/4-inch thru-hull fitting is inserted into each pipe.
M. 4-inch PVC end caps are connected to both ends of the PVC pipe. PVC glue is used to fasten the end caps.
N. A piece of 1/2-inch tubing is connected from the pump to a 1/2-inch PVC elbow. The elbow should be at the height of the two lowest pipes.
O. A 1/2-inch PVC T is inserted into the end of the line.
P. 1/2-inch tubing is connected to each side of the PVC T until it reaches the top.
Q. 1/2-inch end caps are inserted into each end.
R. A line punch, or small drill bit (1/16-inch) is used to make one hole per 4-inch PVC pipe in the 1/2-inch tubing.
S. A connection fitting is inserted into each hole. The fitting can be 1/8, 3/16, or 1/4-inch.
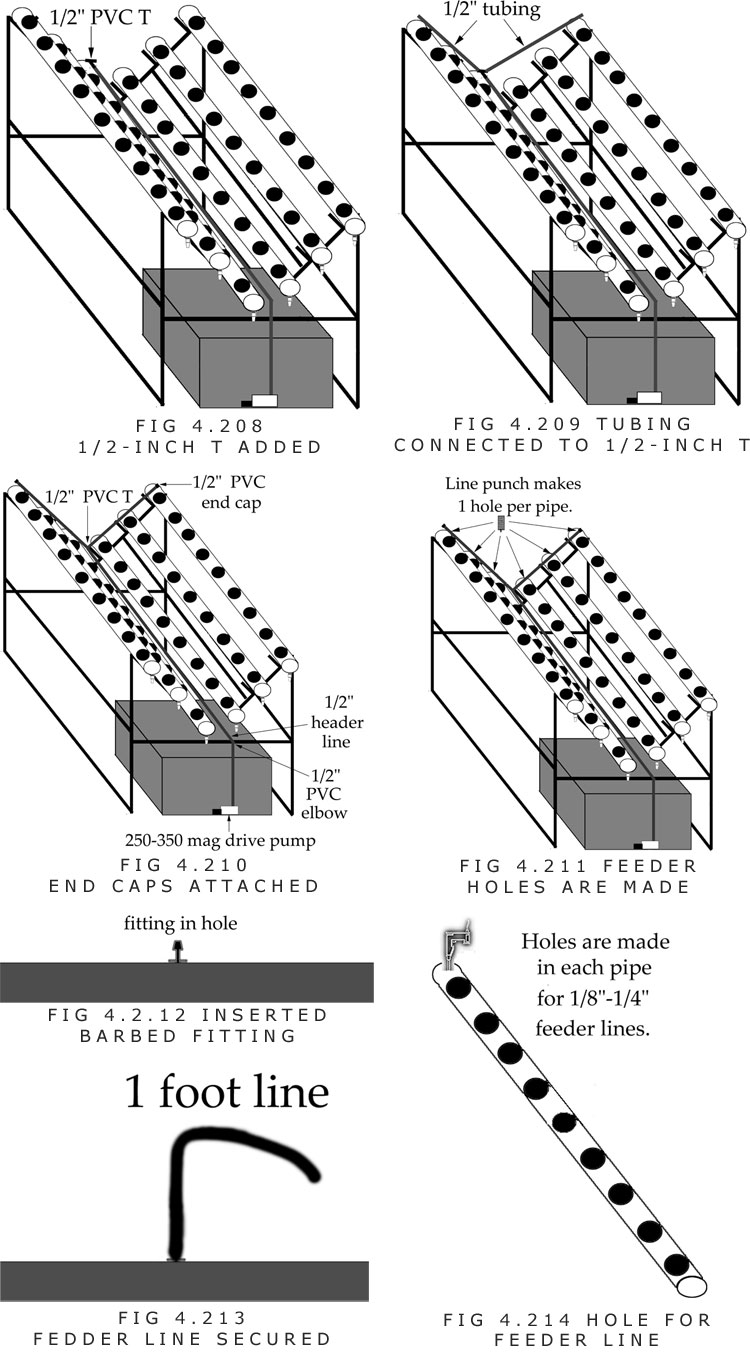
T. A piece of 1/8, 3/16, or 1/4-inch tubing that is 1-foot long is connected to the connection fitting. The size of tubing should match the size of the connection fitting.
U. A hole is drilled into the end of the pipe after the last plant site. The hole should be the same size as the tubing or one size smaller.
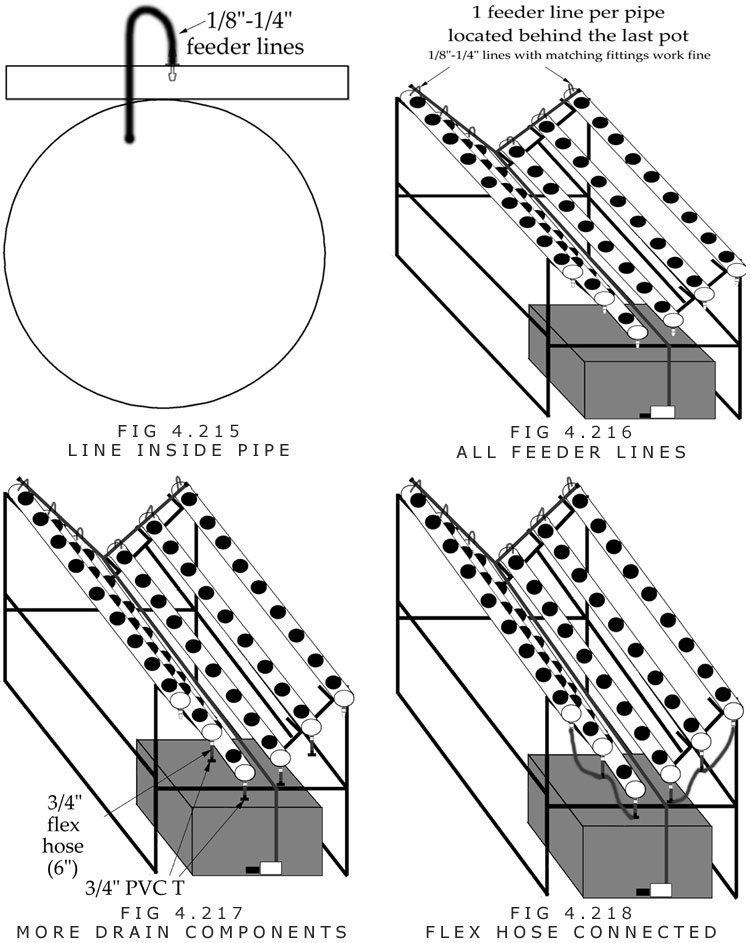
V. The 1-foot line is placed into the hole of the large PVC pipe.
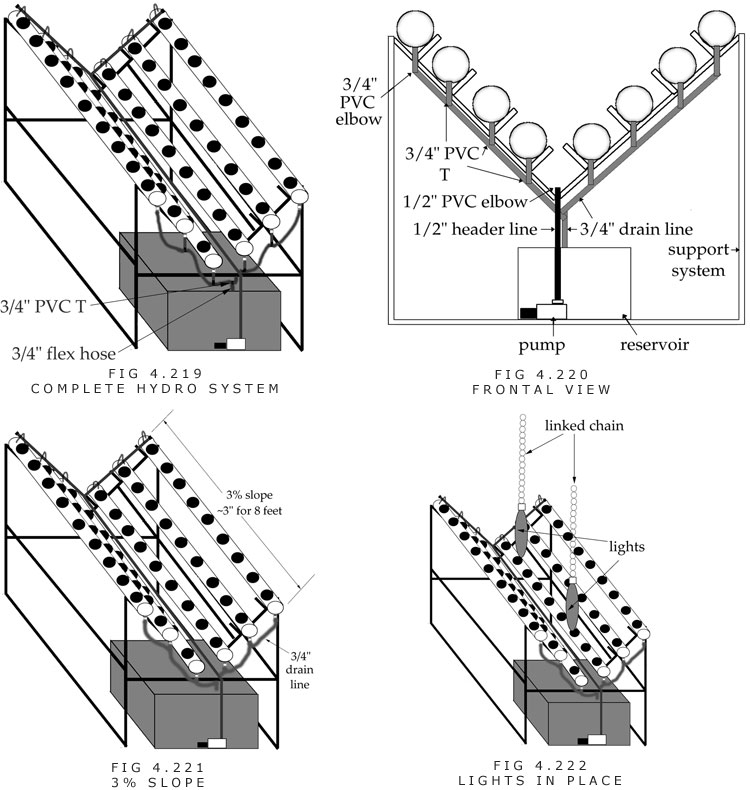
W. Four 6-inch pieces of 3/4-inch flex hose are attached to a 3/4-inch PVC T on one side and to the lowest four thru-hull fittings on the other side. (Figure 4.217)
X. The highest thru-hulls are connected to the middle thru-hulls with 3/4-inch flex hose. The middle thru-hulls are connected to the shortest thru-hulls.
Y. The two lowest 3/4-inch PVC Ts are connected to a 3/4-inch PVC T. The open end of the PVC T is connected to 3/4-inch hose that runs into the reservoir.
Z. The pots go into the pipes. (Figures 4.221 and 4.222)
