Hand-Feeding Vertical Hydroponic System
Using 2x4s and Pots
Materials
1. One 1-gallon pot per plant.
2. One 6-inch plant dish per plant.
3. Nails.
4. 2x4s: twelve 6-foot pieces for a twelve-column system; twenty-eight 6-foot pieces for a twenty-eight pipe column system.
2x4s options: twelve columns, seventy-two 8-inch pieces; twenty-eight columns, one-hundred-sixty-eight 8-inch pieces.
5. One 3-gallon pot for each column: 12 pots for 12 columns, 28 pots for 28 columns.
6. 20-gallon garbage can.
7. Hand-watering can.
8. Contact cement.
Tools
1. Handsaw or skillsaw.
2. Hammer.
3. Exacto knife (or sharp knife.)
Introduction
In most cases, this system is used to grow small plants. Seedlings can be induced to flower at 5 weeks old, clones at 6.
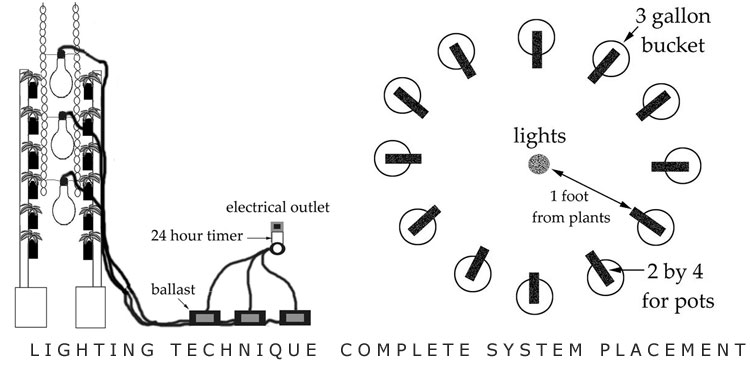
Typical uses for this system are 12 pipes at 8-inch centers or 10 pipes at 10-inch centers using three 400-watt lights. Or 28 pipes at 8-inch centers, or 24 pipes at 10-inch centers using two 1,000-watt lights. (Figure 4.126) This section describes a 12-pipe system.
This system is the cheapest and easiest column system to use for the novice. It will use soilless mix inside of each 1-gallon pot.
The feeding in this system can be done daily or weekly.
This system is not pretty, but it will cost less than $100 to build. Considering that competitive systems can run $2,000 to buy, this may be an option worth trying for those who need the look and feel of plants in pots rather than a gardening system that looks like something that could be used on Mars.
Procedure
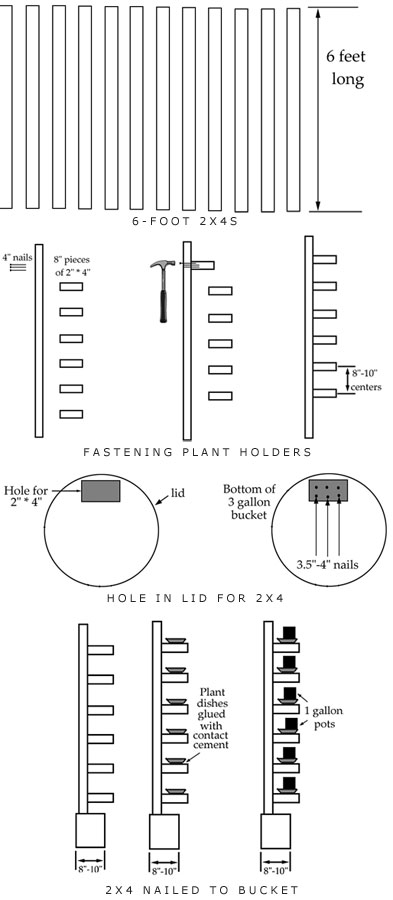
A. All 2x4s are cut to 6-foot lengths with a handsaw or skillsaw. This is really easy, especially if they are purchased in 12-foot lengths. (Figure 4.120)
B. Starting at 8 inches from the top of each 6-foot piece of wood, the small 8-inch pieces of 2×4 or 1×6 inches are nailed into the wood at 8-inch centers with 4-inch nails until there are 6 pieces nailed into each long length. (Figure 4.121)
C. Holes should be made in the center of each lid to fit the long 2×4-inch. (Figure 4.122) If there are no lids the construction can continue.
D. The lengths can be nailed into the center or backside of the 3-gallon buckets. (Figures 4.123 and 4.124)
E. The 3-gallon buckets should be filled with sand, stones, or cement to keep the wood in the center and give the system support. If the bucket has a lid, it can be secured after bucket is filled.
F. Plant dishes can be glued to the extended pieces of wood with contact cement. (Figure 4.124) Or 1×6-inch wood can be nailed to the extended pieces of 2×4-inch. If plant dishes are not used, a tarp or sheet of plastic should be placed on the floor so that the floor stays clean.
G. The 1-gallon pots can be filled with soilless mix and watered until they are soaked.
H. The plants can be transplanted into each pot and placed on top of the plant dishes; 20 to 30 plants can be placed on the floor to maximize the yield.

Lighting
I. Three 400-watt lights can be hung from the ceiling for a 10 to 12 pipe system. (Figure 4.125) Hooks for the lights should be screwed into a stud. But, if no stud is available in the desired spot, a 3 to 4-inch piece of 2×4 can be nailed to the nearest studs with 3 to 4-inch nails. The lights can be hung on any part of the 2×4. Or two 1,000-watt lights can be hung from the ceiling for a 28-pipe system.
J. The lights can placed 1-foot from each plant. The buckets can easily be moved to allow grower to increase or decrease light intensity. The buckets will be in a circle around the lights. (Figure 4.126)
Feeding
K. The feeding can either be daily, or when needed.

Novice Tip
A grower can water with fertilizer each time the plant needs water. Since these plants are small, that could be as little as once a week. Two weeks before harvesting, plants should get no more fertilizer, just plain water. A grower should flush each plant with a few gallons of water two weeks before harvest. Afterward, only plain water is added when necessary.
A grower can shoot for multiple pounds of dried veggies and flowers.


