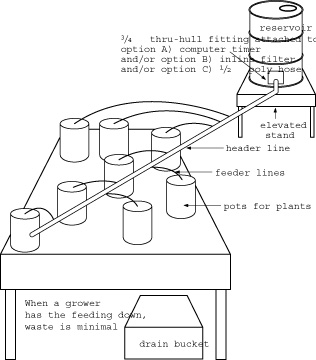
Top feeding allows you to be efficient to feed and water each and every individual plant. With top feeding, you can run solution through open ended 1/4-inch tube, or you can add drippers to the end of the tubing to control the flow rate. A good dripper will feed for quite some time without clogging and deliver solution at rates like 1/2 gallon per hour and 1 gallon per hour.
Building a Custom Top-Feeding System
Option A: Flood Table
The advantage of using a flood table in a top-feeding system is that it is very cheap to make and it has less fittings than most other systems. Also, if a line accidentally comes out of a container the solution will leak on the table, rather than all over the floor.
A. A grower should buy or build a flood table and a stand to support the table for the prescribed growing area. For a small closet, a plastic flood table made to size may be hard to find. If wood is used to make a flood table, it should be sturdy, like 3/4-inch plywood. For a small closet space, cutting a piece of plywood that leaves about 6 inches to each wall works in order to build a custom garden. For larger rooms, enough space should be left to walk around the tables and in between them (i.e. 1 to 2 feet between tables and walls).
Once plywood is cut to size, 1×4-inch wood should be nailed to the sides. For simplicity, this example will assume that a 4×8-foot sheet of plywood is used for the table.
Two 8-foot lengths of 1×4-inch wood should be nailed to the long lengths of the plywood.
One 8-foot length of 1×4-inch wood cut in half can be nailed to the short sides. The small sides are nailed together from the bottom of the plywood.
Caulking should be used as a waterproofing safety measure. Caulking is applied along the nailed seams.
Finally, black 6ml poly can be used to cover the wood table.
B. The table is placed on something that supports it. A quick sawhorse can be made with cheap 2×4-inch wood with hinges that the 2×4-inch wood slides into. Another 2×4 (i.e. an eight footer for an 8×4-foot flood table) is placed between the hinges to complete an instant sawhorse.
When a table is made, the sides furthest from the reservoir should be the highest and at equal height.
The sides nearest the reservoir should be an inch or so lower. One of the nearest sides near the reservoir should be slightly lower (i.e. 2 inches lower on an 8-foot table). The drain hole should be above the lowest corner.
C. In one corner of the flood table, a hole should be made using a 1-inch hole saw.
Homemade models: When using black poly plastic, the plastic should be cut away from the hole so that water will not get trapped in black poly layers. Then, a 3/4-inch PVC pipe is connected to the reservoir to allow for draining.
F. A piece of 1/2-inch poly tubing is cut about the same length as the flood table.
G. A 1/2-inch end cap is inserted at the end of the table.
H. A 1/2-inch poly elbow is inserted at the other end that is nearest the reservoir. The elbow should be directly above the reservoir.
I. A piece of 1/2-inch black poly tubing should be connected to the other end of the elbow, and then connected to the pump. A highly recommended option is to put a bypass valve or a 1/2-inch T just after the pump so that the solution stays aerated and agitated, and the flow can be controlled. More 1/2-inch fittings can be placed on the bypass valve so that the aerated liquid is forced to the bottom near the pump. Also, forcing water downward can reduce possibilities of splashing and making a mess on the floor.
J. Mesh pots (2 to 5-gallon) can be placed on the table with the plants. Using larger containers is recommended for longer growing cycles. Any hydroponic medium can be used to grow the plants, such as clay, perlite, soilless mix, perlite / coconut fibers, or perlite / vermiculite.
K. Small holes should be inserted into the 1/2-inch poly header line that is on the flood table. A punch or small drill bit can be used to make the holes for the fittings.
L. 1/8 or 3/16-inch tubing is connected to the fittings and each line is attached to each pot using alligator stakes. It is best to look ahead to see where the plants will be when it is harvest time so that the proper lengths will be cut.
M. When plant roots show out the bottoms of the containers, more hydroponic medium such as clay or perlite should be placed under the containers that are on the table so that the roots will be covered and aerated, or another mesh pot can be turned upside down and placed under the plants if duct tape is used to fasten them together. If the container sits on a flood table for too long, roots can turn brown from lack of oxygen.

Feeding
It is easiest to feed the plants with the pump timer running full-time only during the light hours. A solar pump would do this. But plants can be fed continuously (all day and all night). Also, plants can be fed intermittently (i.e. every 20 minutes for 2 minutes) during the light hours, or for all hours.


