
Intro
Growing with seeds is a very cheap option. While small seedling plants can easily cost dollars per plant, seedlings from seed are often in the penny range. The only factor which much takem on heavy consideration is the fact that you need to dedicate some time; such as 3-8 weeks to grow plants to the size where you would typically buy them in a store.
On the positive side, maintenance is very low and having exactly what you want is a great benefit. Setup details can be found below.
The Starter Room
This section is about closet growing with regard to using minimal space to start young plants, using fluorescent or halide lights for raising seedlings, or for growing mother plants that will be used for cloning. This method of starting seedlings indoors requires little space and it is advantageous, even though this manual is about outdoor growing.


Fluorescent Closet System
The advantage of fluorescent lights, especially T5 and T8 LEDs, is that they don’t generate too much heat, which means that a grower can get away with using the following materials.
Materials
- Fluoresecent lights (tubes or Envirolites®). Requirements: if tubes are used, they should fit in the desired space. If Envirolites® are used, one 95-watt bulb is used for every 2.6 square feet of growing space for vegetative growth and mother plants.
- A custom gardening system for the desired space (chapter 3 has complete parts and instructions for building a system for any room size). The flood and drain system is the best for seedlings.
- Smell removal system (if necessary); smell removal systems in the grow room are ionizers and air neutralizing agents such as Ona®.
Climate Maintenance
It is important to maintain a proper room temperature (70 to 80°F), a proper root temperature (slightly under 70°F), and a proper humidity (40 to 70%) so that the walls will not mold and plants are in a healthy environment for optimal growth.
Halide Closet-Size Unlimited System
Materials
- 400 to 1,000-watt metal halide / sodium lights in a closet. A stationary 400-watt bulb effectively covers up to 16 square feet of space. Using a light mover adds another one-third of usable space, resulting in about 21 square feet. A stationary 1,000-watt bulb effectively covers up to 64 square feet. A track or Sun Circle® adds another one-third of usable square footage.
- Oscillating fan.
- Exhaust fan.
- Air-cooling for lights (if necessary).
- A custom gardening system for the desired space (see chapter 3).
- Smell removal system (if necessary); smell removal systems in the grow room are ionizers and air neutralizing agents such as Ona®. For exhausting odors in the exhaust pipe, charcoal filters and ozone generators are used.
Maintenance
It is important to maintain a proper room temperature (70 to 80°F), a proper root temperature (slightly under 70°F), and a proper humidity (40 to 70%) so that the walls will not mold and plants are in a healthy environment for optimal growth.
In other words, the space may require good ventilation, air-cooled lights, and / or an air conditioner in order to acquire the proper variables for optimum or satisfactory growth if a grower uses the more powerful 400 to 1,000-watt halide / sodium bulbs.
In most cases, seedlings do not smell, but there are exceptions. For small spaces, an ionizer in the room should do the trick. For large areas where some odors escape from exhausting, a device to remove smell can be inserted into the exhaust pipe after the exhaust fan. For example, boxes with charcoal filters or ozone generators can be used to zap unwanted skunk-like odors before they are sent outside. There are ready-made products, such as Magic Dragon® and Uvonair® that can be inserted easily into exhaust pipes.
Starting Seeds
Ideally, the grower cultivates with a strain (or many) that will grow well outdoors in the geographical area, produce a hearty yield, and have the odor and / or flavor of preference. It helps to know a seed’s history. The more that is known, the less the gamble.
After obtaining the preferred seed stock, a grower should follow the next set of instructions in order to get off to a good start.
- Water should be boiled (to sterilize), placed into a clean jar or glass, and allowed to cool to room temperature. Soaking the seeds in water for 24 to 48 hours is the next step. Then, seeds should be removed from the water and wrapped in wet cheesecloth or cotton. The seeds must not dry out. Lukewarm water can be used to remoisten the cloth.
- A grower should find the sprouted germinants. Some germinants may sprout right away, while others may sprout days later.
- The germinants should be placed into a growing medium. For the growing medium, a grower has several choices, such as potting soil, soilless mix, peat moss, rockwool cubes, oasis cubes, or peat pellets. Before seeds are placed in medium, a small hole should be made to bury the seedling so that it lies 1/8 to 1/4 inches under the medium. The seed part should be up, and the white tail should be pointing downward. The seedling should be handled delicately when it is covered in the medium so that the stalk does not break.
- Sprouted seeds can be put in pots (about 4 inches high) that contain potting soil, soilless mix, or peat moss. Several germinants can be placed in one container at first, then they should be transplanted into individual containers before they start to develop too many roots. Normally, less than a week is a good amount of time to wait before transplanting the young plants into individual containers. After a week or so, roots will tangle and the job becomes more difficult. The longer the wait before putting a germinant in its own container, the greater the odds of stunting the plant. A spoon can be used to scoop out tiny plants so that they can be moved to individual containers.
- For rockwool or oasis cubes, seedlings again should be put in the medium with the tail pointing down. Cubes must not be allowed to dry out. If cubes dry out, plants can die or growth can be stunted.
- Peat pellets work too. In order to use peat pellets, water must be added to the cubes, which will make the cubes expand. When the cubes expand, the germinants can be buried in the peat pellets with the white tail pointing downward.
- The seedlings should be placed 1 to 3 inches beneath fluorescent lights or 11/2 to 2 feet beneath a 400-watt metal halide bulb.
Often the more expensive specialty fluorescent grow tubes are worth the extra bucks. Daylight fluorescent tubes work too. Alternating a cool white and a warm white in a fluorescent light fixture is a cheap way of making it through the seedling phase. Using only cool whites or warm whites will work, if no other tubes are available, but using only warm whites or only cool whites results in slower growth and some plants may turn a little yellow due to inadequate lighting.
Mice
Mice like to eat fresh, young shoots. Therefore, they should not have access to young plants.
Seedling Care
Feeding
A fertilizing routine should be started a couple of weeks after germination. A grower should use fertilizer only at half strength during vegetative growth. An example is to use Sea Mixtm 3-2-2, Alaska Fish Fertilizer ®, or liquid kelp at the recommended rate. It may be easiest to use only one fertilizer for all feedings, unless the grower is confident about combining fertilizers.
If plants are placed on a flood table, feeding maintenance is lowered dramatically. A leak-proof table can be flooded periodically by hand or a pump. Pumps are convenient for lots of plants. Chapter 3 explains how to build a flood and drain system.
Overwatering and underwatering can stunt a plant, which leads to poor production. Overwatering is most common in potting soil that is not allowed to drain. When potting soil is saturated with water, there is little air in the soil. When cubes or soilless mix are frequently saturated with solution, the solution drains well and the roots can receive an abundance of air due to the nature of the medium.
Seedlings that are severely yellow, with stiff, woodlike stalks will not grow to be healthy plants. They will be stunted. The stalks should be soft and bendable.
One option is to mist the plants daily or every few days with a sprayer.
Lighting
If fluorescent lights are used, each pot should be placed so that the top is 1/2 to 2 inches beneath tubes.
For a 400-watt halide light, the light distance should start at 1 1/2 to 2 feet above the plants.
As the plants grow, the lights should be raised so they are always at a constant distance from the plant tops to avoid burns.
Running the lights for 18 hours on a timer is recommended during vegetative growth. However, keeping the lights on for 24 hours with no timer is another possibility that works.
Temperature
Seedlings can grow well in cool and warm temperatures, however hot temperatures can stunt plants. The ability to grow well in cool temperatures varies from strain to strain. A temperature around 70 to 80°F is safe for most strains.
Moving Seedlings Outdoors
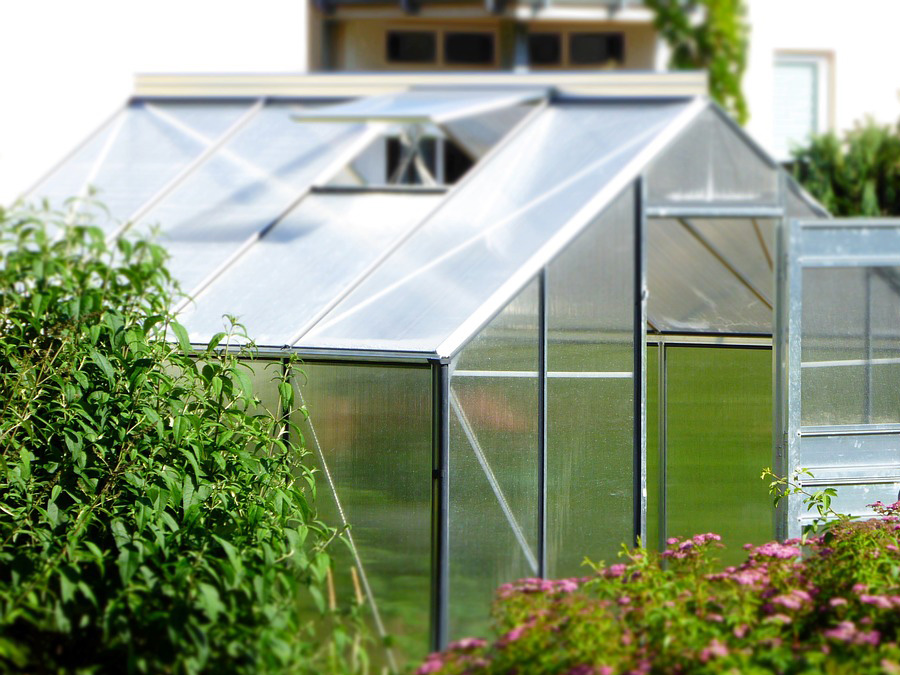
After seedlings are one month old and there is little risk of frost, they can be transplanted to an outdoor system (site) or a greenhouse or cheap coldframe. Good glass can make better light!
Plants can moved out of a seedling room sooner (after 2 to 3 weeks), but the growth rate will be slow until the plants are about 6 weeks old, and they will be more vulnerable to predators, such as mice and slugs. When growing outdoors, seedlings can go into some kind of outdoor mini-greenhouse (cold frame) in early spring, soon before or after the last day of frost, if rainy conditions are not dominating. If the weather is terrible and growth is spindly, transplanting seedlings into larger containers and burying them up to their first set of leaves may prevent a disaster. Roots will grow from the stalk, and the plants will recover from their weak state.
Some young plants can fight off adverse weather, such as frosts, if the strain has the potential in its genes.
If a mini-greenhouse is used for outdoor cultivation, there are several possible types. The options are pretty much endless, but, a simple rule is to keep the plants covered with 6ml clear plastic. Adding an exhaust fan is recommended if the grow zone is not temporary.
Plants in the Northern Hemisphere (above the Tropic of Cancer) are normally transplanted after March 22 when the days are getting longer. (September 22 is the ordinary date for the Southern Hemisphere.)
Building a Hoophouse
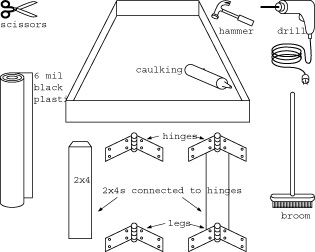
Tools
- Handsaw.
- Hammer.
- Exacto knife.
- Shovel (if corner posts are dug into the ground).
Materials
- One-inch PVC pipe (10 to 12-foot lengths); two pieces for every 2 feet of hoophouse length.
- 2×4 wood for bottom frame.
- 3 to 3 1/2-inch wood nails.
- 6×6-inch posts for the corners of the frame.
- Door.
- In-line fan.
- 6ml clear poly (greenhouse grade preferred).
- Fasteners for mounting the 1-inch PVC against the 2×4.
- Four-way 1-inch PVC joints, one for every two pieces of 1-inch PVC pipe in the frame, minus the first and last fittings which will be 3-way 1-inch PVC joints.
- Two 3-way 1-inch PVC joints.
- Two 1-foot lengths of 1-inch PVC.
- In-line fan and matching 2 to 4-foot length of stovepipe.
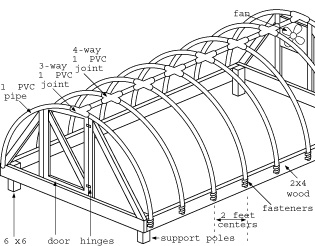
Procedure
- The four corner posts should be cut to equal lengths and buried in the ground, or placed on flat hard ground like cement.
- 2x4s are hammered with nails to the posts in order to make a rectangle box.
- Now, the center spine is made.
- At the front end there is a 3-way joint.
- Then a 2-foot length is connected, followed by 4-way joints.
- The pattern is repeated until the last 3-way joint is connected to the last 2-foot length. For extra strength, all connections can be glued with PVC glue.
- The first 2 pieces of the long 1-inch PVC pipe should be inserted into the first 3-way fitting, then clamped to the side 2x4s. The next step is to repeat this for all of the long pipes.
- The house can be covered with a sheet of 6ml plastic.
Smart Option
An in-line fan and a 2 to 4-foot piece of stovepipe can be hung inside of the house and a small hole can be cut in the rear of the hoophouse for air to exhaust.
To maintain a top-quality environment, cooling or heating a greenhouse are options.
Heating a Greenhouse
A greenhouse can be heated with the following systems. Glass holds warm air in a greenhouse better than other materials.
- Unit heater such as a forced-air heater (good for small greenhouses).
- Convection tubes.
- Central heating (uses hot water or steam). Good method on big-scale.
- Radiant heaters (heats the area near plants, not all of the air).
- Solar heat. This stores heat in a collector, and can be used with a backup heating source that activates when this system is not sufficient.
Cooling a Greenhouse
A greenhouse can be cooled with the following items.
- A roof vent allows hot air to leave a greenhouse in a mild climate. In a hot climate, this will not be sufficient.
- Shade cloth can be used to cover the roof and 2/3 of the sides of the greenhouse. These come in shades that block out light at 30%, 40%, 50%, 60%, and 70%. The right strain should be used with shade cloth.
- Evaporative cooling (heat exchangers). These can cool temperatures under hot conditions. They can be used with shade cloth, too. This will save energy.
Transplanting Seedlings
Plants can be transplanted at any time of the vegetative growth phase. As a general rule, plants should be able to spread their roots and not become too root-bound. Plants should not be transplanted during budding.
Plants can be transplanted from one medium to another. For example, plants in rockwool, clay, perlite, soilless mix or dirt can go into any other medium.
Plant roots will adapt to various root environments. The key is to feed the roots properly at all times. For example, a plant in peat moss or soilless mix that is transplanted to clay or perlite will need a new feeding program because soilless mix can be constantly irrigated or it can go days between irrigation. However, roots located in a medium such as clay cannot go days between waterings, given that plants are grown under a strong climate.
For hydroponic growing, following a pattern of continuous feeding for 6 days and flushing for 1 to 2 days is the safest method for providing a healthy root environment for the plants in all hydroponic mediums.
When plants are transplanted from a hydroponic medium into soil, the plants can be cared for as though they are being grown in soil. Plants should be transplanted from a hydroponic (aeroponic) medium into soil at the youngest age possible in order to prevent stress.
Roots in soil or soilless mix anchor in the medium to keep roots intact. That makes transplanting a snap, especially if mix is neither too wet nor too dry. A grower should always keep soilless mix somewhere between too dry and too wet if feeding is done periodically (i.e. once a week). However, plants grown in soilless mix that are continuously fed with a top-feeding hydroponic system will grow faster than plants that are fed or watered periodically in soilless mix.
Outdoor gardening systems can be put together several ways, using systems such as soil / soilless, hydroponic, and aeroponic. Systems and feeding instructions are discussed in full detail in chapter 3.
Plants can be spaced far from each other and left to grow together, or they can be put closer together and trained away from each other.
Outdoor container plants using soil / soilless mix can have up to 3 seedlings per 5 to 20-gallon container.
What a Grower Should Know about Seedlings
Pulling plants with male sex characteristics (males and hermaphrodites) allows for the production of seedless flowers. In order to make seeds, identifying and using pollen immediately (or storing immediately in the freezer) is the key, especially for the serious breeder. Breeding is explained in detail in chapter 6.
Flowering plants are male, female, or both (hermaphrodites). When a grower knows the difference he can make the garden grow more efficiently by, for instance, growing only female flowers.
Sexing Seedlings
Some growers can identify the sex of plant seeds.
A trick to sexing plants that are 3 to 5 weeks old is to decrease the photoperiod from 18 hours to 12. When the lights run at 12 hours for 3 to 5 days, the plants’ flowering mechanisms are triggered. After the 3 to 5 days, the light timer should be reset to run for 18 hours. In most cases, males show their forming pollen sacks in a week, give or take a couple of days, while females normally show their pistils soon afterwards. Sometimes, though, a female will show pistils sooner than a male shows pollen.
Putting Seedlings through the Test
Putting young seedlings through tests such as overwatering, underwatering, drought, high heat, low light, coldwater-feeding, or crowding can help sort out the strong plants from the weak. Testing can also allow a grower to have the genetics that a plant needs in order to survive in a particular climate.
However, just because plants look best at a young age does not mean that they will necessarily demonstrate the ability to outproduce those that were shocked or died at a young age due to adverse conditions. Nevertheless, plants that are strong in youth tend to continue being strong plants through adulthood.